Wednesday, December 29, 2021

Happy Hedgehogs thank you sneak peek

 I hope everyone had a very merry Christmas filled with family and friends.  May your new year be healthy and happy.  Today I will share a card I made with a new bundle being released in the January-June 2022, which will be available to customers beginning January 4th.  It's called Happy Hedgehogs and can be bundled with the Hedgehog Builder punch to save 10%.  I've also used some upcoming designer series paper (DSP) called New Horizons.  This DSP is absolutely stunning and will work for so many types of cards.   I stamped tree image and a butterfly were stamped directly onto the DSP, then I colored the butterfly, leaves and trunk of the tree with Stampin' Blends.  The hedgehog, a butterfly and the Thanks sentiment were stamped on Basic White cardstock in Momento black ink.  You can see how I put this card together by watching my YouTube video here: https://youtu.be/bNQWgPHSfmc 


For the inside of the card, I stamped a sentiment from the Happy Hedgehogs.  I then stamped the toadstool and butterfly in Momento and colored with my blends.  


Supplies and measurements:
Polished Pink cardstock for card base 5 1/2 x 8 1/2"
Pansy Petals DSP 4 x 5 1/4"
New Horizons DSP 3 3/4 x 5"
Basic White cardstock for inside 3 5/8 x 4 7/8", extra scrap for stamping images
Special Moments Sale-A-Bration stamp set for outside sentiment
Happy Hedgehogs stamp set and coordinating Hedgehog Builder punch
Stampin' Blends:
Soft Succulent for tree leaves and grass tufts inside
Lt. Evening Evergreen for Grass tufts inside
Polished Pink for toadstool
Lt. Petal Pink for butterfly, hedgehog cheeks and ears
Dk. Calypso Coral for butterfly
Dk. Pale Papaya for butterfly
Lt. Crumb Cake for toadstool stem
Colorlifter for toadstool stem
Ink pads in Soft Suede and Momento Tuxedo Black 

Thank you for taking time from your busy day to drop by my blog.  Please leave a comment, I'd love to hear from you.  Click on the shopping cart in the upper right to shop my online store 24/7 for any Stampin' Up! supplies you want/need.

Until next time; be happy, stay healthy and happy stamping!
Teresa

Tuesday, December 21, 2021

Rudolph the red-nosed penguin treat box

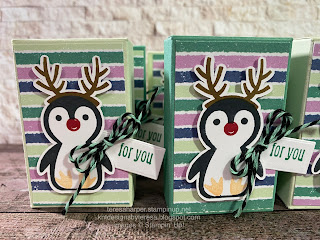
 Thought I’d pop on and show you the final set of treat boxes I needed to make before Christmas.  I try to send treats to my daughter’s work multiple times a year.  I can’t tell you how good it feels to have these completed. She’s taking them into work today.  

The treat box features the Penguin Place bundle.  I tried to keep them pretty simple as I was making 20 of them.  I used the Sale-a-Bration Designer Series Paper which is retired, but you could use any Designer Series Paper, change the colors, make it your own.  


Supplies and measurements:
Soft Sea Foam or Just Jade cardstock 4 3/4 x 5 1/2"
    Score on 4 3/4 " side at 1/2, 1 1 1/4, and 4"
    Score on 5 1/2" side at 3/4, 2 1/2, 3 1/4 and 5 (cut per the template below)
Designer Series Paper (dsp) 1 5/8 x 2 5/8" (if directional, cut in portrait mode)
Penguin Place and Penguin Builder Punch or (hand cut--in my case because I had 20 to do I used my scan n cut)
Ornate Frames dies for the sentiment but you could easily just use a small strip of paper.  
Brew Some Fun or other stamp with a small sentiment.
Twine or Ribbon ( I used some retired Baker's Twine I had in black and mint macaron)
Momento Tuxedo Black ink for penguin
Pale Papaya ink pad for feet
Cherry Cobbler ink pad for nose
Soft Suede ink pad for antlers
Just Jade ink pad for sentiment

First stamp in black and cut out your penguin using the penguin builder punch, add nose in cherry cobbler.  Stamp the antlers in soft suede and cut out OR you could use a piece of basic white cut at       1 3/8 x 2 3/8" to stamp the penguin and add the antlers to the top of his head without cutting out.   Add feet to penguin in pale papaya.  Next stamp the sentiment on the small tag from Ornate Frames dies.  

Prepare box according to cutting and scoring instructions in the template below.  The back of the box will be the panel with the thumb tab circle punch on it.  Adhesive will go on the outside of the 1/2" side tab near the score line and the inside front bottom flap near the bottom.  Lay prepared cardstock on table with inside of box facing up.  Fold on the second score line from the left and then fold at the first score line on the right over the top and adhere.  I like to close the top of the box at this point as it's easier for me to adhere the bottom box flaps.  First fold in the side flaps, then the back flap and lastly the front flap which has the adhesive on the inside of the flap.


Next add the dsp  to the front panel with your preferred adhesive.  Add penguin to the dsp using stampin' dimensionals to the top and bottom of the penguin leaving the center open to slide in the tag.  Stamp the for you sentiment from Brew Some Fun on the ornate frames tag and side under the penguin to secure.  Finally, add a baker's twine bow between the penguin and the sentiment.  Now you are finished!  Good job.  I put two Hershey's miniatures and a Hershey's nugget in my box.  I'm sure you can find lots of other things that will fit.  

Should you need to order any supplies, please click on the shopping cart in the upper right corner.  It will take you to my online store where you can shop 24/7.  Leave me a comment and if you make this box, please send me a photo.  

I want to wish you all a Merry Christmas and a Happy New Year!  Until next time; be happy, stay healthy and happy stamping!
Teresa

Wednesday, December 15, 2021

Pretty Pillowbox Poinsettia table favor/gift card holder/treat box-- Project 12 of the 12 Projects of Christmas 2021

 Well, we've reached the final project for the 12 Projects of Christmas today.  I hope you have enjoyed this series as much as I have.  I have to give credit for the inspiration for my project today to Sherry Roth of Stamped Treasures.  I used her directions to make the treat box and took inspiration from her decorations, but of course, I put my own spin on things.  I'm very pleased with how it turned out and these go together fairly quickly.  You can watch my YouTube video to see how I put these boxes together here https://youtu.be/W4O58KsgrFg 


Inside view which shows how much you can put inside this box.  Inside this particular box I have a peppermint snowflake, two holiday creme de menthe chocolates, and two Merci chocolates.  It also is sized to fit a gift card.  


Finished box size is 4 1/4 x 4 x 1 1/2".  The finished size for the inside box portion is 3 1/2 x 1 1/4 x      1 1/2"


Supplies used: 
Red Velvet Paper
Crumb Cake cs 8 1/2 x 11 (cut two pillowbox dies and a 4 x 6 piece for the inside box portion.  Remaining portion for stamping
Basic White cardstock for stamping and die cutting
Bumblebee cs for flower center
Gold and Rose Gold 6x6 paper
Adhesive sheets
Poinsettia dies
Christmas Season bundle which includes the Seasonal Labels dies
Stampin' Cut and Emboss machine
Evening Evergreen, Soft Succulent, Soft Suede and Early Espresso ink pads
Real Red Double-stitched satin ribbon
Gold Holly Leaves

Thank you so much for taking time from your busy holiday season to stop by my blog.  I do so appreciate it.  Please leave a comment and let me know your thoughts.  If you would like to purchase any supplies, click on the shopping cart in the upper right corner.  It will take you to my online store where you can shop 24/7.  I'd love to earn your business.

I would like to wish everyone a very merry holiday season and a prosperous new year!  

Until next time; be happy, stay healthy and happy stamping!
Teresa

Monday, December 13, 2021

Time of Giving truffle box and gift tag Project 11 of the 12 Projects of Christmas

 Todays project in our 12 Projects of Christmas is a truffle treat box and matching gift tag.  They feature the Time of Giving stamp set and Giving Gifts dies.  Thanks for looking.  You can watch how I put my projects together over on my YouTube channel here https://youtu.be/cMP3AIJnac8 


The finished box size is 2 x 3 1/2 x 1 1/4”.  I stamped all over the cardstock before scoring.  It makes a nicer finish when you do it beforehand.


Here is the cutting template 

We made this matching gift to go along.  I love how this turned out.  Directions are in my video.


Supplies and measurements
Cherry Cobbler cardstock for box 6 1/2 x 7, 2 1/4 x 4 inch for tag
Basic Black cardstock 2 pieces 1 5/8 x 3 1/4 (1 each for the box and tag) I used adhesive sheets on the back to make it easier to adhere.
Basic White Thick 2 1/4 x 4" for the tag
Time of Giving stamp set and Gift of Giving dies
Evergreen Forest 3D embossing folder
Black and White Gingham Ribbon
Cherry Cobbler Ink pad
Evening Evergreen Ink pad

Additional Supplies used for the Blushing Bride box
Blushing Bride cardstock
Silver foil
Blushing Bride ink pad
Gray Granite shimmer ribbon

Thanks for stopping by today.  Please leave me comment and let me know which box is your favorite.  If you would like to shop my online store for supplies, click on the shopping cart in the upper right corner.  I would really appreciate your business.

Until next time; be happy, stay healthy and happy stamping!
Teresa

Sunday, December 12, 2021

Peaceful Deer Diamond Book Bound fold Project 10 of the 12 Projects of Christmas 2021

 Can you believe we are almost to the end of the 12 Projects of Christmas series?  Time is sure flying by.  Today has been a very busy crafting day.  I helped the granddaughters make 68 holiday treat bags for their classrooms, as well as creating this project for today.  I do have projects planned ahead; however, it seems like I tend to create a new one most days.  Crazy huh?  I just have a new idea pop into my head and I have to run with it to see where it goes.  I sure hope you like the project today.  I was inspired by a card Lisa Curcio made which used the diamond element on today's card.  It made me wonder what it would look like when paired with the book bound fun fold, and that is how today's card came together.


Here is the inside view.  If you would like to see how I put this card together, you can watch my video here https://youtu.be/A-2ooTuHaQU 


Supplies and Measurements:
Sahara Sand cardstock 4 1/4 x 11 scored at 5 1/2 and 6 3/4 
Peaceful Deer Designer Series Paper (retired) use any you would like (You will need five pieces)
    4 x 4"    1 x 4"     2 5/8" square    2 3/8" square    1 7/8" square    
Basic Black cardstock     2 3/4" square and 2" square
Garden Green cardstock 2 1/2" square
Stampin' Blends markers in Soft Suede and Light Petal Pink for deer
Stampin' Write marker in Soft Suede for tree trunk
Ink pads in Early Espresso and Garden Green
Fine Art Ribbon
Peaceful Deer stamp set and Deer Builder Punch Bundle
Tear n Tape adhesive
Stampin' Seal adhesive
Tombow Multi Purpose Glue

Thanks for stopping by my blog today.  I really do appreciate your taking time during this very busy season.  Leave me a comment and let me know what you think.  I love to read them.  If you would like to purchase any supplies, please shop my online store by clicking on the shopping cart in the upper right corner.  I would love to earn your business.

Until next time; be happy, stay healthy and happy stamping!
Teresa

Saturday, December 11, 2021

Snowflake Wishes Cocoa Packet with Greeting Card and Gift Card Pocket

Hello everyone!  Today is Project 9 of the 12 Projects of Christmas.  I have a great gift option for you today.  First off, let me thank Dawn Griffith of Dawn's Stamping Thoughts for the inspiration for this project.  When I saw her make one, I just knew I had to make one with the Snowflake Wishes stamp set.  I love how it turned out and I hope you do too!  Now without further ado, let's get started.


This card holds anything that is 1/2" thick or less so you have quite a few possibilities for treats inside.  My pouch holds a packet of cocoa, Ghirardelli chocolate and a chocolate peppermint stir stick.   

The surprise of the cocoa pouch is that it opens up to a full-size greeting card and a gift card pocket!  You can see how to make this project by clicking here https://youtu.be/XBZttt0RLmA 
Below is the measurements and cutting template for the card and box.  


Supplies:
Pool Party cardstock 9x 8 1/2"
Basic White cardstock for inside sentiment panel 3 3/4 x 5 1/4
Designer Series Paper 2 pieces 3 3/4 x 5 1/4, 2 1/4 x 3 3/4 and 3/4 x 5 1/4 
Ink Pads in Pool Party, Highland Heather, Pacific Point and Versamark
White embossing Powder
Blending Brushes
Stitched Rectangle dies
Snowflake Wishes stamp set
Stampin' Cut and Emboss machine
Pool Party striped grosgrain ribbon

Thanks for stopping by today!  I'm so happy you did.  Please leave me a comment, I'd love to hear from you.  If you need to pick up some Stampin' Up supplies, click on the shopping cart in the upper right.  It will take you to my online store where you can shop 24/7.  I'd love to earn your business.

Until next time; be happy, stay healthy and happy stamping!
Teresa

Friday, December 10, 2021

Sweet Little Stockings Birthday card

 Well, here we are at Project 8 of the 12 Projects of Christmas.  We're almost at the end, I'm hoping you are enjoying this series as much as I am.  Today’s project features Sweet Little Stockings and the coordinating Stockings dies which are currently half-price while supplies last.  You can order in my online store by clicking on the shopping cart in the upper right.  

I made two versions of the card using both the kitten and puppy.  I’m not sure which one is my favorite, which one is yours.  Leave a comment and let me know.  To watch how I put this card together, click here https://youtu.be/q7Tqo8ixTIo  Be sure to subscribe to my channel and click the notification bell so you can receive notifications each time I upload a video.  


Here is a look at the inside of the card.  The cat is fussy cut from the Sweet Stockings Designer Series Paper.  

Supplies and measurements:
Basic Black card base 8 1/2 x 5 1/2", scrap cut to 1/2" by 2 3/4" (I used the Pick a Banner Punch on each end)
Mint Macaron cardstock 5 1/2 x 4 1/4" embossed with the upcoming Gingham Embossing Folder, then cut to 5 1/4 x 4.  
Scrap of Polished Pink for bows
Adhesive Sheets for adhering to Polished Pink cardstock
Scrap of Pattern Party Designer Series Paper, (black and white gingham) die cut with the banner die from the Stockings dies.
Basic White for stamping and die cutting the images
Momento Tuxedo Black ink, Versamark ink
White embossing powder
Heat Tool
Stampin' Cut and Emboss machine
Stampin' Blends in Polished Pink, Mint Macaron, Crumb Cake and Light Soft Suede
Wink of Stella glitter brush
Black and White Gingham Ribbon (Colored with Dark Polish Pink Blend)
Turtle Friends stamp set
Sweet Little Stockings stamp set
Stockings Dies
Pick A Banner punch

Thanks for stopping by my blog today.  I do appreciate you taking a little time from your busy day to spend it with me!  

Until next time; be happy, stay healthy and happy stamping!
Teresa

Wednesday, December 8, 2021

Joyful Life Double Flap treat box --Project 7 of the 12 Projects of Christmas 2021

 Before I get started with the project, I want to share that today only, December 8, 2021, is FREE SHIPPING day on orders of $50 or more (pretax) for Stampin' Up!  Click on my shopping cart in the right corner and it will take you directly to my online store where you can enjoy free shipping on all orders  of $50 or more before tax (if you have that--we don't here in Oregon.)  

Now, let's get started with our project!  For today, I have another treat box.  I have to confess, I had intended to use Snowflake Wishes with this project, but it just didn't work out!  The adorable little hedgehog from Joyful Life won out.  I was inspired by Cathryn Themann.  She made a similar project, but her measurements did not fit my treats so I tweaked them to fit my design.  You can watch out I put my box together here: https://youtu.be/cdTtvxfNN2E


You can watch my video on how to make it here 

 
Supplies and Measuresments
Evening Evergreen cardstock 8 1/4 x 5 1/2"  Score and cut according to the template below.
Basic White (for inside flap) 2 x 2 3/4 & Basic White scrap for stamping and diecutting Seasonal Label die approximately 2 1/2 x 3"
Painted Christmas Designer Series Paper 2 7/8 x 2 1/8 in Portrait mode (if directional pattern), 2 pieces 2 7/8 x 5/8 in Portrait, 2 pieces 2 1/8 x 5/8 in Landscape.
finished box size is 3 x 2 1/4 x 3/4"


Thank you for stopping by my blog today.  I really appreciate you taking time from your busy day.  Please leave me a comment.  I'd love to hear from you.  If you need any Stampin' Up! supplies you can shop my online store 24/7 by clicking on the shopping cart in the upper right corner.

Until next time; be happy, stay healthy and happy stamping!
Teresa

Monday, December 6, 2021

Snowmen Peppermint Bark treat box with Penguin Place

 Hello everyone!  Today is Project 6 of the 12 Projects of Christmas.  I have a special treat box for you today.  When I designed this box I did so with the Ghirardelli Peppermint Bark Snowmen.  I tried to recreate the snowman on the package and use the Penguin Place bundle.  I was inspired by a video I watched on how to use the Penguin Builder Punch to make a snowman.  I loved it and knew I had to make one of my own.  The Ghirardelli Peppermint Bark Snowmen seemed the perfect pairing for my project.  I hope you love it as much as I do.  I'm thinking these will make some really nice teacher gifts, coworker gifts and the box is plenty big enough to drop a gift card inside!  You can see how I created this box by watching the FB live replay on YouTube by clicking here: https://youtu.be/rzT0rkzErpE 


Measurements and supplies:
Real Red cardstock 5 1/4 x 4", scored on all four sides at 1/2"
Real Red cardstock 5 5/16 x 4 1/16, scored on all four sides at 1/2"  Punch finger holes with a 1/2" circle punch on the long sides.
Pattern Party Designer Series Paper (DSP) 4 1/8 x 2 7/8"
Basic White approximately 3 7/8 x 2 5/8--diecut with 3rd largest Scalloped Contour die
Scraps of Basic White for punching and stamping large enough to punch Penguin and stamp scarf
Real Red scrap to punch hat for snowman
Scrap Heartwarming Hugs DSP for hat band
Scrap of Pumpkin Pie for the snowman nose
Inks in Evening Evergreen, Real Red, Smokey Slate and Momento Tuxedo Black
Gingham Ribbon
Wink of Stella
Penguin Place stamp set
Penguin Builder Punch
Snowman Builder Punch for nose
Black fine line marker

Thanks for stopping by my blog!  I appreciate you taking time from your busy life to spend it with me.  If you would like to purchase any of the supplies I've used today, please click on the shopping cart in the upper right corner.  I would love to be your Stampin' Up demonstrator if you don't already have one.  Please leave me a comment, I'd love to hear from you.

Until next time; be happy, stay healthy and happy stamping!
Teresa

Sunday, December 5, 2021

Snow Wonder Snowflake Hugs//Project 5 of the 12 Projects of Christmas

 Happy Saturday everyone.  Today was a busy day spent decorating the Christmas tree with the grandkids and a couple of their friends.  Two littles and four teenagers!  What a fun time we had.  

Today's project features the Snow Wonder stamp set and coordinating Snow Time dies.  What a great bundle to have in your stash, especially if you love snowmen like I do.  The Snow Time dies are currently 20% off so grab them quickly before they sell out.  I have also used the layering diorama dies which I absolutely love.  It really gives some fun layers to the card front and the inside sentiment piece.  You can watch the replay of how I made this card here https://youtu.be/vJReef6FvtQ    I would love it if you would subscribe to my channel so you don't miss any new videos posted or follow me on Facebook at KnT Designs by Teresa where a conduct a live most every Tuesday evening at 7:45 pm PDT.


This is the inside of my card.  It's stenciled with the layering diorama dies and ink blended with Pool Party, Balmy Blue and Misty Moonlight inks.  The sentiment is stamped in Misty Moonlight and the snowflakes are third generation Misty Moonlight ink.
Products used:
Layering Diorama dies
Snow Wonder stamp set
Snow Time dies
Misty Moonlight cardstock 5 1/2 x 8 1/2, scored at 4 1/2 for the card base
3 pieces of Basic White cardstock 3 3/4 x 5 
2 x 3 piece of Misty Moonlight scrap for sentiment
Peaceful Place Designer Series Paper cut at 4 x 5 1/4
Metallic Pearls
Stampin' Blends in Pumpkin Pie, Cherry Cobbler, Smokey Slate, Lt. Pool Party, Shaded Spruce, Dk Balmy Blue, Lt. Misty Moonlight, Lt. Basic Black, Lt. Soft Suede and Color Lifter
Inks in Pool Party, Balmy Blue, Misty Moonlight and Craft White
White Embossing Powder
Heat Tool
Stampin' Cut and Emboss machine

Thank you for stopping by my blog today.  Please leave me a comment, I'd love to hear from you!  If you would like to purchase any products, click on the shopping cart in the upper right corner.  

Until next time; be happy, stay healthy and happy stamping!
Teresa

Saturday, December 4, 2021

Classic Cloche Village Project 4 of the 12 Projects of Christmas

 It’s Project 4 of the 12 Projects of Christmas today and we are using the Classic Cloche stamp set and  Cloche dies you Stampin’ Up!  (on sale while supplies last for $14.50).  I do so hope you are enjoying these projects as much as I am.  As a quick reminder check out the last chance sale and the clearance rack in my online store.  Click on the shopping cart in the upper right corner.

You can watch the FB Live replay over on YouTube here https://youtu.be/nqAsa68-22c  to see how I made these cards.


Supplies and measurements:
Card base for standard A2 in Soft Succulent 5 1/2 x 8 1/2”
Card base for gift card holder in Soft Succulent 5 1/2 x 9 scored at 3 1/4 & 7 1/2”
3rd largest stitched rectangle in Basic White
Ever Eden Designer Series Paper 2 11/16 x 1/2” // 1 5/8 x 5 3/8 (if making gift card holder card base)// 3 3/8 x a hair less than 4 11/16
Evening Evergreen cardstock cut with largest scalloped contour die
Soft suede cardstock 5/16 x 2 3/4
Gold 6x6 specialty cardstock to diecut cloche base.  Use an adhesive sheet on back prior to die cutting.
Stamp pads in Smokey slate, basic gray, Sahara sand, Cherry cobbler and pool party
Thank you for taking time out of your day to spend it with me.  Leave me a comment, I’d love to hear from you.  To order supplies, click on the shopping cart.  I’d really appreciate your business.

Until next time; be happy, stay healthy and happy stamping!
Teresa

Friday, December 3, 2021

Snowman Season Pop-up Mini Gift Bag card

 Today is project three of the 12 Projects of Christmas.  I hope you are enjoying this series.  The project today is a card AND a holder for a gift card or money.  You can watch the video by clicking here https://youtu.be/KLRk1w2M5Mk   It will take you to my YouTube channel where you can see how I put this card together.  It's best explained by watching.  I was inspired by Rachel Tessman who showed how to make the pop up mechanism for the card.  For my card I used the stamp set Snowman Season by Stampin’ Up!  I love these little snowman.  


Here’s a look at the inside of the card.  

This card will fit in a standard A2 sized envelope which you can find in my online store as a medium envelope.
Supplies needed:
Card base in real red 5 1/2 x 9;scored at 3 1/4 and 7 1/2”
Real red 2 3/4 x 3
Basic white cardstock 4 x 10 1/2   Score on long side at 1/2, 1, 5, 5 1/2, 6 & 10. Score on short side at 1/2 & 3”
Designer Series Paper Gingerbread and Peppermint  3 x 5 1/4 in Portrait if directional, two pieces 1 1/4 x 5 1/4 also portrait.
Basic White for inside cut at 3 3/8 x 5 1/4”
Basic White for front 2 5/8 x 2 7/8”
Two low profile magnets to hold card closed.
Simply Elegant trim for bag handles, two pieces 3 1/4 long
Stampin’ Blends in Real Red, Old Olive, light Pool Party, light Pumpkin Pie, light gray granite
Real Red ink pad

Here is a template for cutting and scoring the mini gift bag for the inside

I hope you’ve been inspired by my project today and will find it useful.  Thank you for stopping by!  Please leave me comment.  To purchase any supplies, click on the shopping cart in the upper right corner.  

Until next time; be happy, stay healthy and happy stamping!
Teresa

Thursday, December 2, 2021

Poinsettia Petals Cocoa Bomb treat box 12 Projects of Christmas 2021

Just a reminder, the Last Chance products sale from the July-December 2021 mini catalog is happening now through January 3, 2022.  All products are while supplies last so be sure to get yours!  In addition, check out the Clearance Rack as we just had a clearance rack refresh of new items.  Again, these are while supplies last and deeply discounted.

Today’s box is the 2nd project in my 12 Projects of Christmas series.  It is a treat box I designed to hold a cocoa bomb.  My particular cocoa bomb fits in a 2 1/4” square treat box.  It is decorated with the Heartwarming Hugs Designer Series Paper.  You can find a video showing how I made these here https://youtu.be/SsXTpISGacY 
The Poinsettia decoration is cut from the Red Velvet Paper using both the outline and the embossing dies from the Poinsettia Dies by Stampin’ Up! The leaves are cut from Pear Pizzazz using the leaves dies in the same way.  Flower center has a trio of Champagne rhinestones.
The box is made from a 9 1/2 x 7 3/4” piece of Mossy Meadow cardstock cut like the template below.  It is matted with five pieces of 2 1/8” square cardstock in pear pizzazz and five pieces of Heartwarming Hugs Designer Series Paper cut at 2” square.  The sentiment on the front is stamped from the Poinsettia Petals stamp set in Mossy Meadow and cut with a rectangle die from Beautiful Trees dies.
Here are the measurements and cutting template for the box. 

Thanks for stopping by my blog today!  I do appreciate you taking time from your busy day.  Please leave me a comment, I would love to hear your thoughts.  I hope I've inspired you to make something of your own.  Should you wish to purchase any supplies, please click on the shopping cart in the upper right corner.  It will take you to my online store.

Until next time; be happy, stay healthy and happy stamping!
Teresa


Wednesday, December 1, 2021

Poinsettia Petals Thank you Card

 Hello and welcome to the beginning of my 12 Projects of Christmas series for 2021.  Today I am featuring Poinsettia Petals. I made two cards utilizing the stamps and dies.  The card design is cased from Marisa Alvarez.  The first card has the poinsettia petals stamped in Cherry Cobbler and colored in with the light Real Red Stampin’ Blends marker.  The leaves are stamped in Mossy Meadow and colored with the light Mossy Meadow Blends marker.  I cut the sprigs fromBumblebee cardstock and covered them in Wink of Stella.For the center of the poinsettia, I first colored with the Bumblebee Stampin’ Write marker, then added three Decorative matte dots to the center.  The splatter is done in Mossy Meadow and comes from the Merriest Moments stamp set.  The strips of Designer Series Paper are from Heartwarming Hugs and the gingham piece is 1 1/4 x 4”, the striped piece is 3x 2”.  You can see how I made this card by watching here https://youtu.be/SsXTpISGacY 


The second card uses Designer Series Paper and dimensions.  Instead of coloring, I stamped Cherry Cobbler on Real Red for the poinsettia petals and Mossy Meadow on Pear Pizzazz cardstock for the leaves.  The sprigs are cut from the gold brushed metallic cardstock.  The solid flower center is cut from Bumblebee and overlayed with the detailed flower center also cut from the brushed metallic cardstock.

This is the inside of both cards.

Thank you for stopping by my blog today.  I hope you liked what you saw.  I will be posting projects daily for the next twelve days to complete the twelve projects of Christmas.  Please join me over on my Facebook page at KnT Designs by Teresa for live videos featuring the 12 Projects of Christmas at 7:45 pm PDT each night excluding Mondays and Wednesdays.

Until Thursday; be happy, stay healthy and happy stamping!

Teresa