Saturday, November 26, 2022

Snowman Magic Cracker Treat box, 9th in the 12 Projects of Christmas 2022

 I sure hope everyone survived Thanksgiving Day and Black Friday shopping.  I had such a good time!  It's a tradition for my mom and I to get up early each Black Friday and spend the day together shopping, having lunch and just enjoying each other's company.  We've missed a handful of years, but we both look forward to our time together each year.  

Today's project was inspired by Tami White.  I figured out my own measurements for the box to fit the treats I wanted to put in them.  The Snowman treats I found at my local Home Goods store.  The brand is LaSuissa, made in Italy, milk chocolate filled with cocoa cream.  I myself am more of a dark chocolate fan, but I couldn't pass up those little snowmen for this project.  To see how I've put it together, be sure to watch my YouTube channel replay HERE:


This is the template of how each piece should look when you die cut them.  Be sure to trim 1/8” or so off each end piece of the white as shown in the video.


Measurements and supplies:

Snowman Magic stamp set
Cracker and Treat Box dies
Shimmer or Basic White cardstock, 2 5/8 x 5
Basic Black cardstock, 2 1/4 x 5"
Scraps of Basic White for scarf and holly
Ink Pads: Memento Black, Shaded Spruce and any color for scarf (Sweet Sorbet)
Stampin' Blends in Lt. Pumpkin Pie and Lt. Cherry Cobbler
Silver Metallic Edge Cotton Ribbon

Thank you so much for stopping by!  If you would like to purchase any Stampin' Up! supplies, click on the shopping cart in the upper right.  Please leave me a comment, I'd love to hear from you.

Until next time; be happy, stay healthy and happy stamping!
Teresa


Thursday, November 24, 2022

Snowman Magic Faux Step Fold card, 8th in the 12 Projects of Christmas 2022

 Happy Thanksgiving everyone!  I hope you are having a wonderful time with family and/or friends.  I am spending Thanksgiving with my husband and oldest granddaughter today.  

Today's project is a Faux Step Fold card and I really am pleased with the way it can easily sit on the mantle for display all holiday season long.   To see how I've put my card together, head on over to my YouTube channel HERE:


Measurements and Supplies:
Snowman Magic bundle (includes stamps and Snowman dies)
Wintry 3D embossing folder
Texture Chic Designer Series Paper
    for narrow card: 2 1/4 x 4 3/8" OR for wider card 2 3/4 x 4 3/8"
Pool Party cardstock for card base 4 1/4 x 11", Score at 4 1/2, 9 & 10" on long side
Petal Pink cardstock 8 1/2 x 2 1/2" for narrow card OR 8 1/2 x 3" for wider card, score either piece at 3"
Evening Evergreen cardstock 3 x 4 1/4" approx.  Run through Wintry 3D embossing folder with snowflakes, then cut:
    (2) two pieces 1 x 4 1/4"
    (1) one piece 7/8" x 4 1/8"
Scrap of Soft Suede cardstock for snowman arms
Basic White cardstock for stamping and die cutting
Basic White cardstock for inside 4 x 3 3/4"
Ink Pads: Basic Gray, Pool Party, Evening Evergreen, Memento Black
Stampin' Blends: Lt Pumpkin Pie, Dk Pool Party

Thanks so much for stopping by, I really do appreciate you take time from your busy day!  Please leave me a comment, I'd love to hear from you.  To purchase any of the supplies I've used today, click on the shopping cart in the upper right.  It will take you to my online store.

Until next time; be happy, stay healthy and happy stamping!
Teresa


Saturday, November 19, 2022

Ringed with Nature Poinsettia treat box, 7th in the 12 Projects of Christmas series 2022

 I have the coordinating treat box for you today that goes along with the card I showed you in Thursday’s blog post.  If you missed it, be sure to check that out.  The pair make a great little gift for someone.  They both feature the Ringed with Nature bundle by Stampin’ Up!  It includes the stamp set and coordinating Tree Rings Hybrid Embossing Folder.  When purchased in the bundle (through Jan. 4, 2023), you can save 10%. For complete instructions on assembling the box, watch my YouTube video HERE:


Supplies and measurements:
Ringed with Nature bundle (includes stamp set and coordinating Tree Rings Hybrid 
Apple Harvest stamp set for sentiment only
Sending Dies to die cut sentiment (or if you have Apple Blossom dies from Perfect Partner Promo)
Embossing Folder
Festive Pearls
Gingham Cottage Designer Series paper 1 1/8 x 3 1/2"
Blushing Bride cardstock (cs) 4 x 4 5/8" 
    score on 4" side @ 1/2, 1 3/4, 2 1/4 & 3 1/2"
    score on 4 5/8" side @ 1/2" from each end
Blushing Bride cardstock for inside 1 3/16 x 5 1/5"
    Score on long side @ 3 1/8, 3 1/2 & 3 7/8 from each end
Soft Suede cardstock for tree ring
Basic White cardstock for stamping and fussy cutting
Mint Macaron cardstock scrap for sprigs
Gold Foil (or Distress Gold DSP) for sprigs

Thanks so much for stopping by today, I really appreciate it.  If you would like to order any Stampin' Up! supplies, click the shopping cart in the upper right.

Until next time; be happy, stay healthy and happy stamping!
Teresa


Thursday, November 17, 2022

Ringed with Nature Poinsettia card, 6th in the 12 Projects of Christmas series 2022

 Hello and Happy Thursday!  Time is really getting away from me.  I realized yesterday (after my granddaughter told me) Thanksgiving is next week!  I thought I had another week….well, let’s get on with our project. 

Today I have made a Christmas card to go along with the treat box we will make on Saturday, so be sure to check back for that!  If you would like to see how I put the card together, watch my YouTube video HERE:  

This card features the Ringed with Nature stamp set and coordinating Tree Rings Hybrid Embossing Folder.  These embossing folders are very unique because you cut and emboss all with one pass through the die cut machine.  


Supplies and Measurements:
Ringed with Nature bundle (includes Tree Rings Hybrid Embossing Folder)
Christmas to Remember stamp set (for inside sentiment only)
Festive Pearls
Gingham Cottage Designer Series Paper, 4 x 5 1/4”
Blushing Bride cardstock 5 1/2 x 8 1/2, scored in the center at 4 1/4”
Blushing Bride cardstock 1/2 x 3” for sentiment strip
Soft Suede cardstock 4 1/2 x 5 1/2”
Basic White cs for inside layer 3 5/8 x 4 7/8”
Basic White cardstock for stamping and die cutting images
Mint Macaron cardstock for die cutting sprigs
Distressed Gold (or gold foil) for die cutting sprigs
Ink pads: Blushing Bride, Garden Green, Real Red, Crushed Curry (flower centers, optional)
Lovely Labels Pick a Punch for sentiment strip
Paper Snips
Stampin’ Cut & Emboss die cutting machine

Thank you for stopping by my blog today.  As always, your time is appreciated.  Please leave me a comment, I’d love to hear from you.  To shop for Stampin’ Up! Supplies, click on the shopping cart in the upper right.  

Until next time; be happy, stay healthy and happy stamping!
Teresa

Saturday, November 12, 2022

Yeti to Party cocoa sprinkles gift box, #5 of the 12 Projects of Christmas

 Hello everyone!  Today's project is #5 in the 12 Projects of Christmas series for 2022.  I am so excited to share the project I have for you today!  I found some cute hot cocoa sprinkles in my local grocery store earlier this month and couldn't wait to make up a treat box for them.  I hope you love the project as much as I do.  To see how I've put this gift box together, be sure to watch the replay over on my YouTube channel HERE:


Supplies and Measurements: 
Yeti to Party stamp set (Yeti dies if you purchased in September, otherwise retired)
Love You More Than dies (Stampin' Up! Annual Catalog 152698)
Celebration Tags dies or White CS cut to 2 5/8 x 1 3/8" for sentiment
Fine Sparkle Gems
Poppy Parade CS 9 1/2 x 8 1/2, score on 9 1/2" side at 2, 6 3/4 & 8 3/4"
    rotate clockwise 1/4 turn, score on 8 1/2" side at 2, 4, 6 & 8"
Basic White CS for stamping & die cutting images
Soft Suede CS for die cutting the word Chocolate twice
Snowfall Accents Puff Paint
Balmy blue double Stitched Ribbon (optional for top of box)
Stampin' Blends markers: Bermuda Bay, Flirty Flamingo, Dk soft Suede, Lt Crumb Cake & Color Lifter
Ink Pads: Memento Black, Poppy Parade
Storybook Gnomes Designer Series Paper (patterned paper)
    three (3) 1 7/8 x 4 5/8" and one (1) 1 7/8 x 1 7/8"

Thank you for stopping by today!  I'd love to hear from you, please leave me a comment.  If you would like to order Stampin' Up! Supplies from my online store, be sure to click the shopping cart in the upper right corner.

Until next time; be happy, stay healthy and happy stamping!
Teresa

Thursday, November 10, 2022

Yeti to Party Hot Chocolate Card/treat packet, #4 of the 12 Projects of Christmas

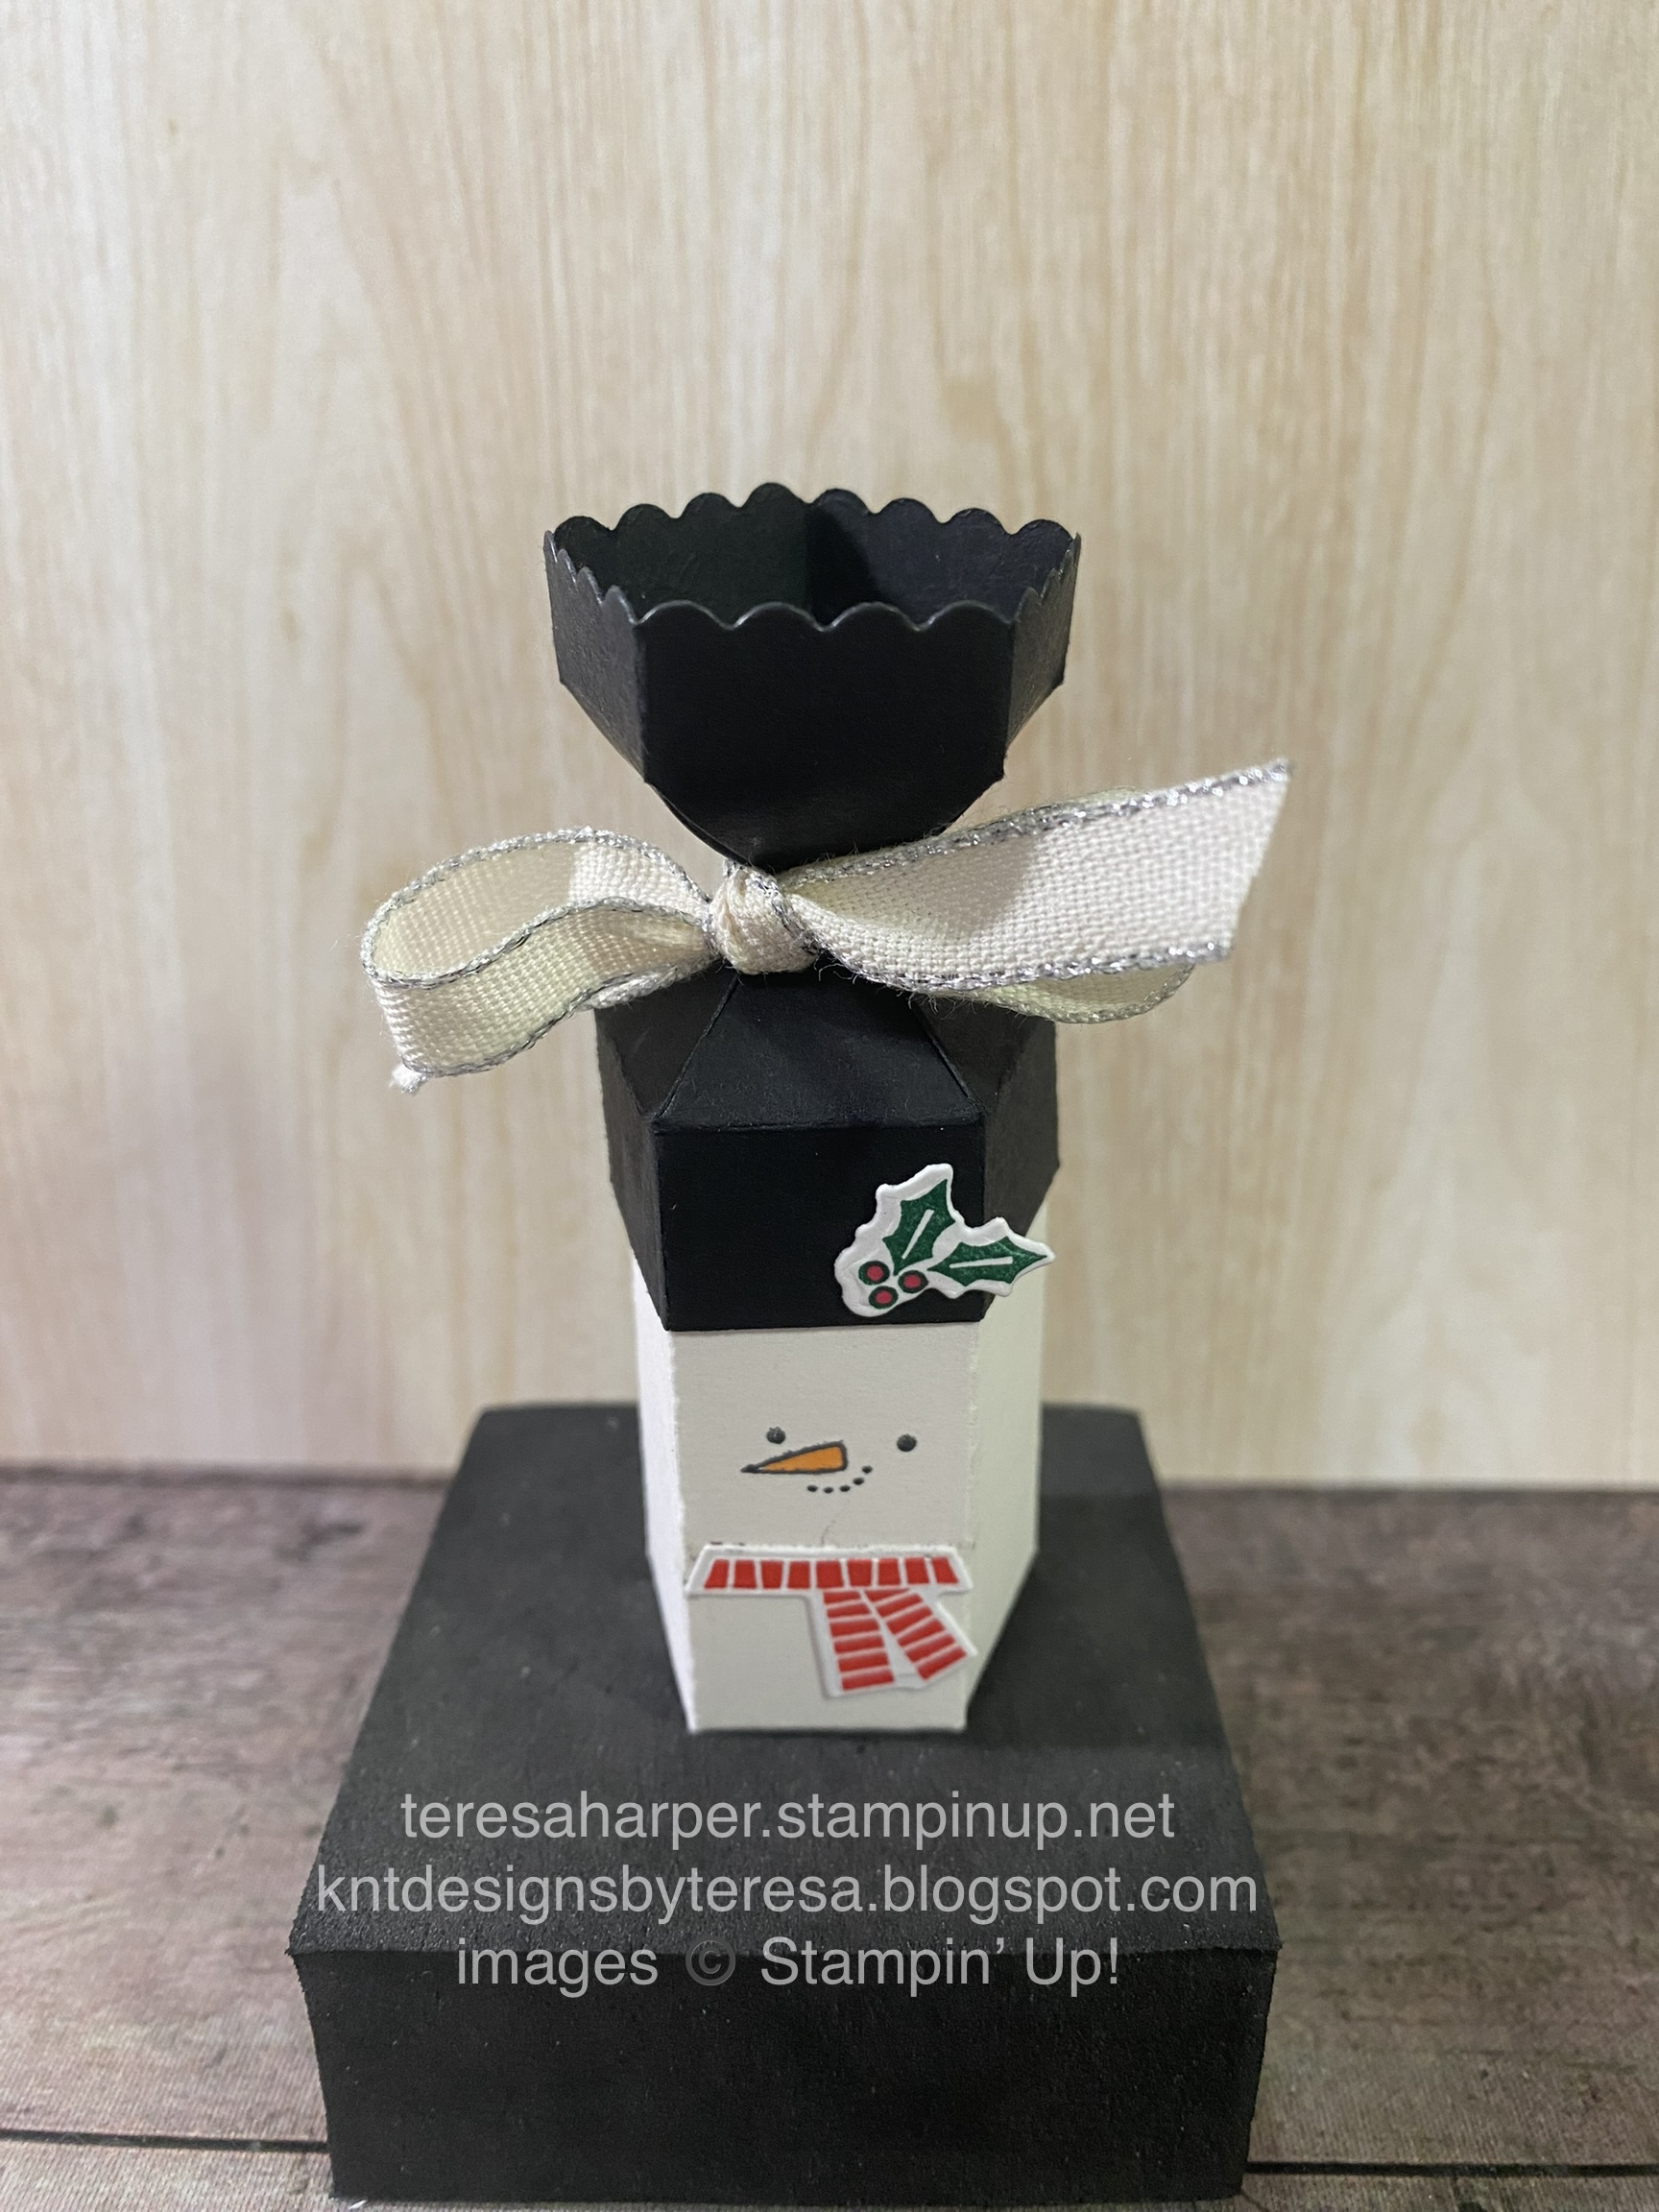
 Happy Thursday!   The project I have for you today actually came about after I created the project I will be sharing with you on Saturday.  I made the treat box, then decided I need this card/cocoa pocket to go with it.  I hope you like what you see and are inspired to make some to gift to your family and friends.  To see how I put this project together, be sure to watch the replay over on my YouTube channel HERE:


Supplies and Measurements:

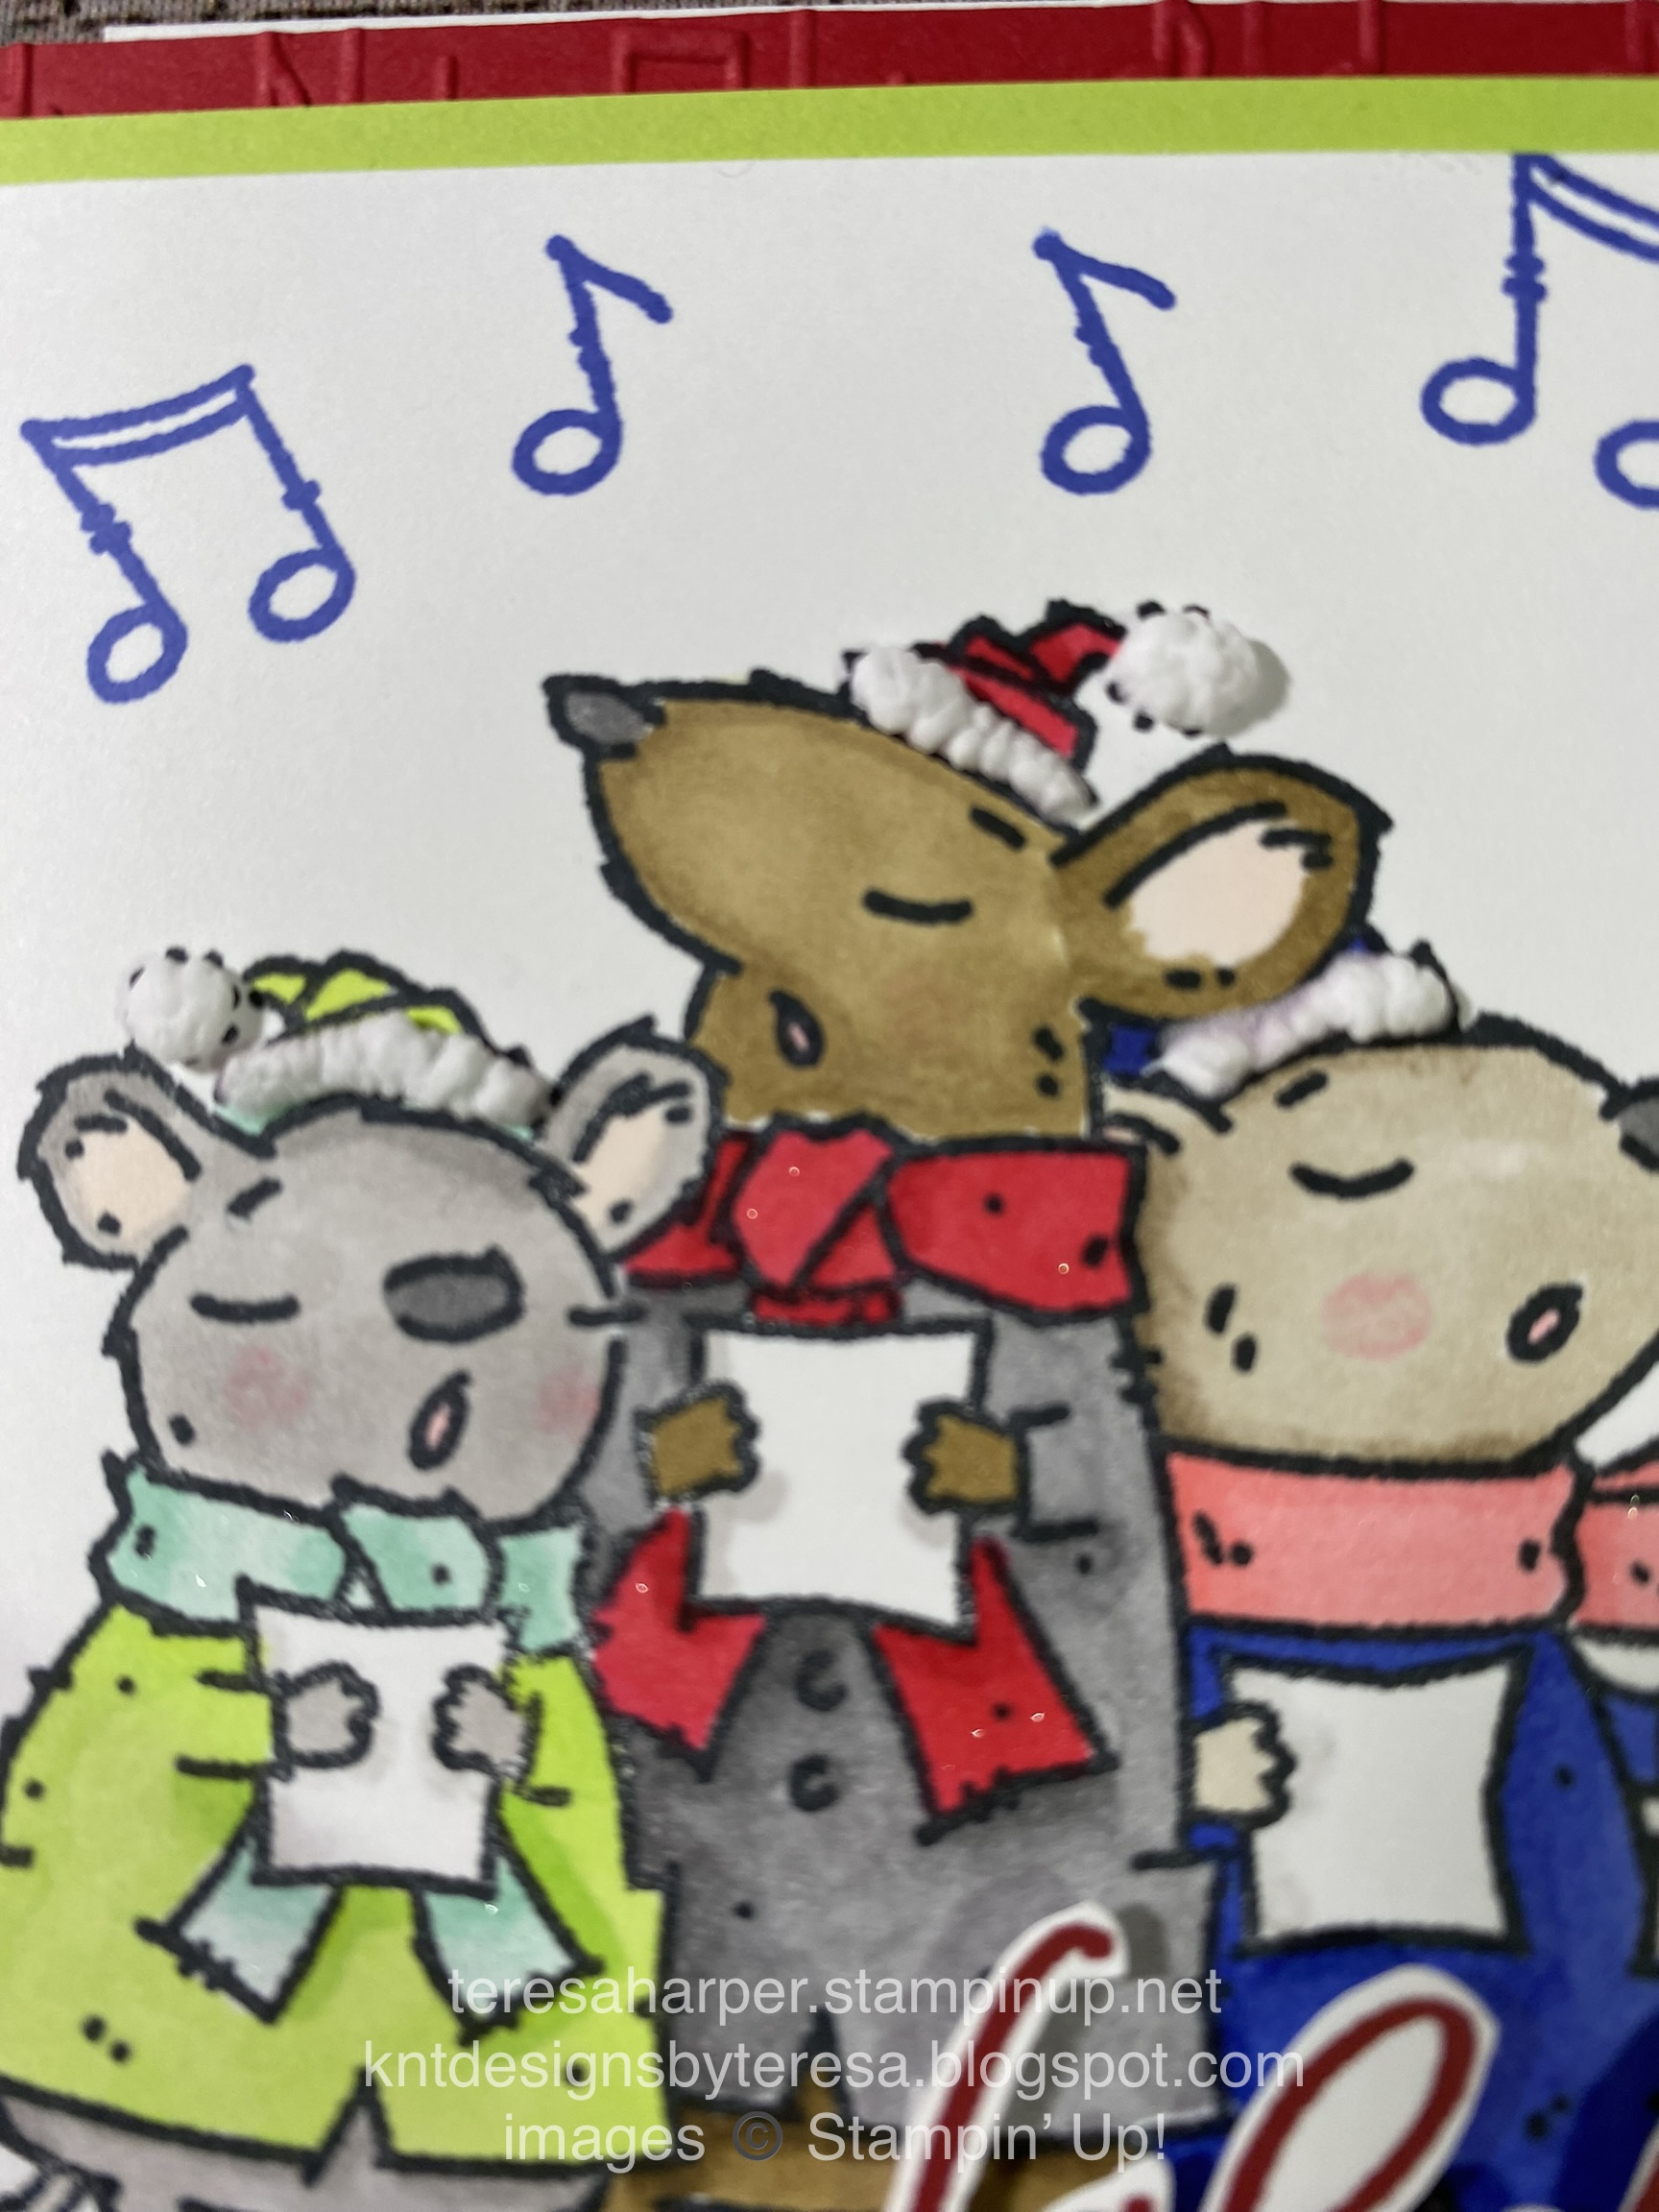
Yeti to Party Stamp Set (Coordinating Yeti dies--retired)
Love You More than Dies
Celebration Tags Dies OR Basic White CS 2 5/8 x 1 3/8"
Heart Pearls
Snowfall Accents Puff Paint
Balmy Blue Double Stitched Ribbon
Stampin' Blends markers: Bermuda Bay, Flirty Flaming, Dk Soft Suede, Lt Crumb Cake, Color Lifter
Ink Pads: Memento Black, Poppy Parade, Soft Suede & Balmy Blue
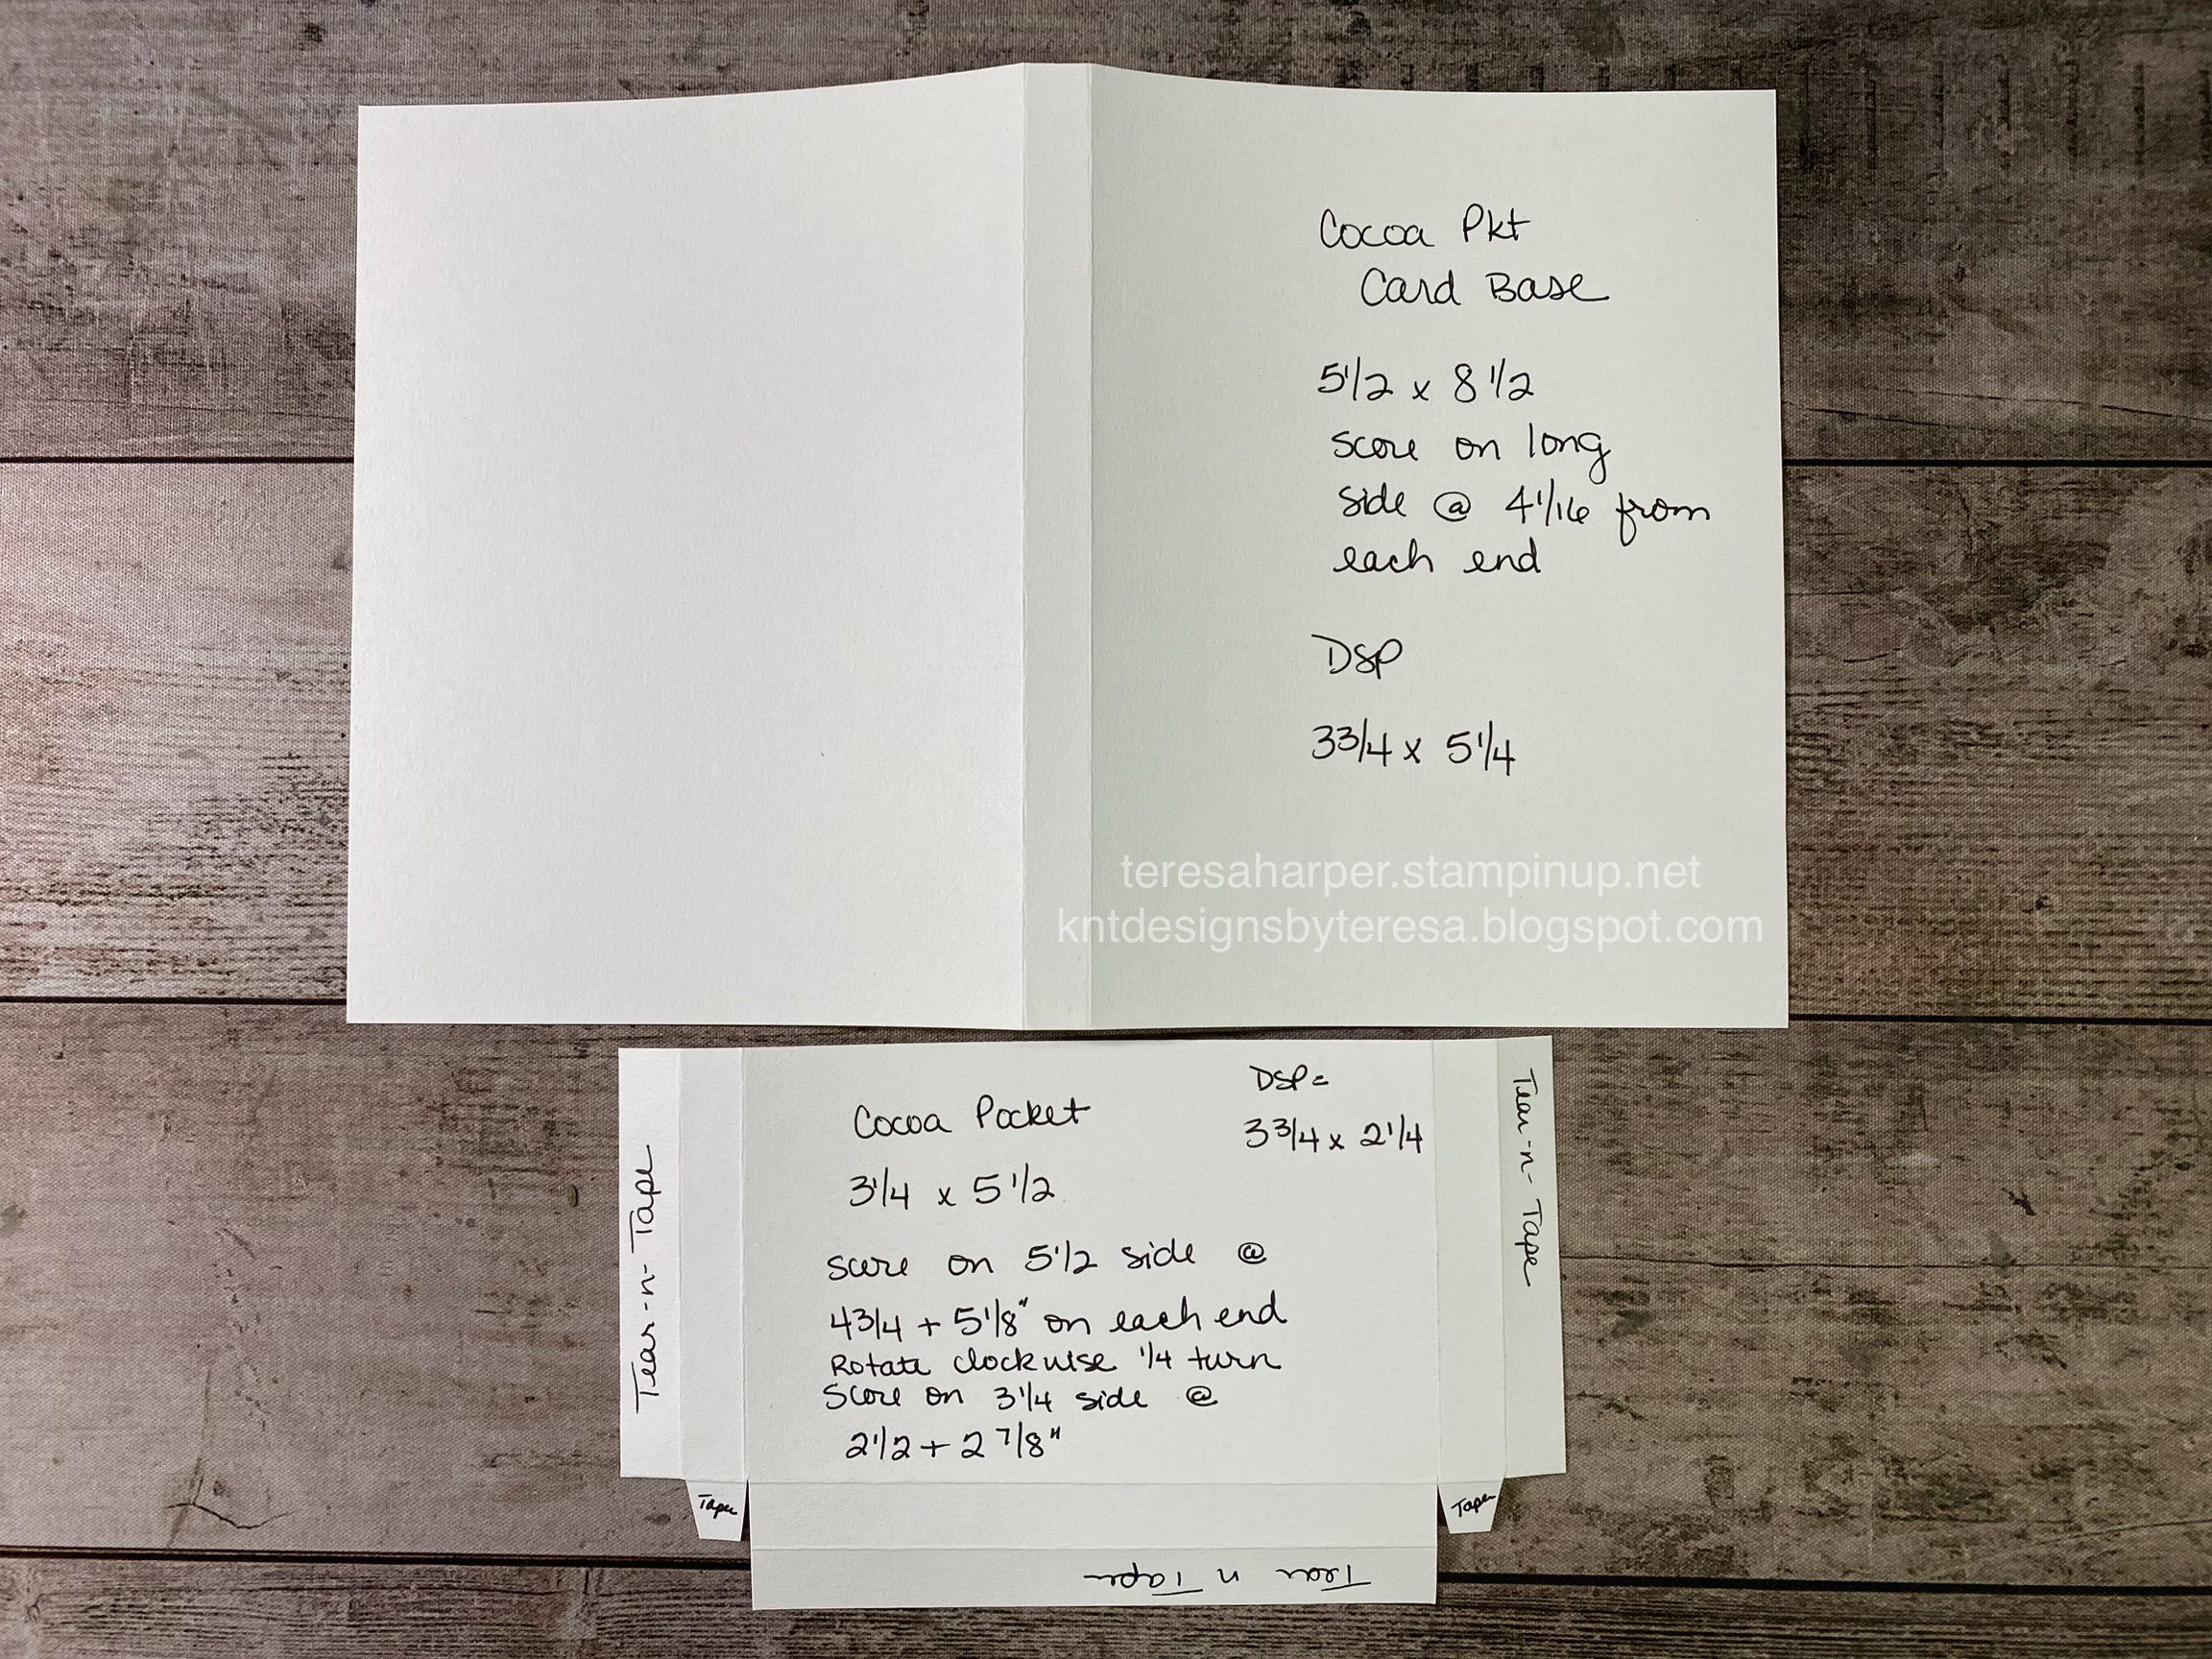
Poppy Parade Cardstock (CS) 5 1/2 x 8 1/2" scored at 4 1/16" from each end on the 8 1/2" side
Poppy Parade CS 3 1/4 x 5 1/2", scored on the 3 1/4" side at 2 1/2 & 2 7/8"
    turn 1/4" clockwise and score on 5 1/2" side at 4 3/4 & 4 7/8, flip 180 degrees and score again at
     4 3/4 & 4 7/8" (see template)
Basic White CS for inside layer, 3 5/8" x 4 7/8"
Basic White for stamping and die cutting
Storybook Gnomes Designer Series Paper, two (2) pieces
    One (1) piece 3 3/4 x 5 1/4" for outside
    One (1) piece 3 3/4 x 2 1/4" for inside
Soft Suede CS for die cutting 

Thanks for taking time from your busy day to stop by my blog!  Please leave me a comment, I'd love to here from you.  To order any Stampin' Up! supplies, click the shopping cart in the upper right.  I'd be ever so appreciative of your business.  

Until next time; be happy, stay healthy and happy stamping!
Teresa

Sunday, November 6, 2022

Book Fold Caroling Mice, 3rd in the 12 Projects of Christmas series

 This is the 3rd Project in my 12 Projects of Christmas series for 2022.  Today I've made a Book Fold card using the Caroling Mice and Framed & Festive.  I think those mice are just adorable and who wouldn't smile when they receive this card in their mailbox?  I know I definitely would!  To see how I put this card together, be sure to hop on over to my YouTube channel and watch the replay HERE:


Measurements and Supplies:

Caroling Mice stamp set (exclusive with Stampin' Rewards)
Framed & Festive (Part of the Fitting Florets collection available while supplies last 160888)
Satin Edged Ribbon
Merry Melody 3D Embossing Folder
Real Red cardstock 4 1/4 x 11, scored at 5 1/2" & 6 3/4"
Parakeet Party cardstock 4 x 4"
Basic White cardstock 4 x 4" and 3 3/4 x 3 3/4"
Scrap for stamping sentiment
Ink Pads: Memento Black, Pool Party, Cherry Cobbler, & Orchid Oasis
Stampin' Blends:
Mice 1: Parakeet Party, Pool Party & Gray Granite
Mice 2: Smokey Slate, Real Red and Soft Suede
Mice 3: Flirty Flamingo, Crumb Cake and Orchid Oasis
Flirty Flamingo for inside ears and cheeks (be sure to add prior to filling in with the appropriate color to avoid the alcohol ring)
Cherry Cobbler, So Saffron and Smokey Slate for lamp post
Snowfall Accents Puff Paint
Wink of Stella
Stampin' Cut & Emboss machine
Stamperatus

Thank you for stopping by today!  Please leave me a comment and let me know if you plan to make your Christmas cards this year.  To order any Stampin' Up! supplies I've used, please click on the shopping cart in the upper right.  I'd be so appreciative of your business.  

Until next time; be happy, stay healthy and happy stamping!
Teresa

Saturday, November 5, 2022

Christmas Season cross stamping Christmas cracker

Today's project is the second project of my 12 Projects of Christmas 2022, and shows another way to use the cross stamping technique I demonstrated during my live tutorial on Tuesday which you can watch over on my YouTube channel HERE:

I wanted to show the technique is not just for cards and can be done on any size paper.  I hope you are inspired to try it and to make some treat boxes for loved ones during the holidays.  I think everyone should have the Cracker and Treat box dies.  They can be used for any occasion, and you get so many extra labels you can use on anything and everything!  


Supplies and Measurements:
 Measurements and Supplies:
Christmas Season Stamps (2022-23 Annual Catalog)
Christmas to Remember stamps (sentiment only)
Cracker and Treat Box dies (2022-23 Annual Catalog)
12 x 12 Full sheet of Basic White cardstock for stamping
Basic White scraps for sentiments
Ink Pads: Early Espresso, Crumb Cake, Evening Evergreen, Soft Succulent, Garden Green, Pear Pizzaz, Old Olive and Cherry Cobbler
Festive Pearls or other embellishment
Gold Shimmer Ribbon

Thanks for stopping by my blog today!  Please leave a comment and let me know what you think of this technique.  To shop my online store, click on the shopping cart in the upper right.

Until next time; be happy, stay healthy and happy stamping!
Teresa

Thursday, November 3, 2022

Christmas Season cross stamping Christmas cards

 Hello and Happy Thursday everyone!  Today we begin my series of the 12 Projects of Christmas 2022.  Boy has it been a very busy week for me, I'm sure yours has been as well.  Today I have a cross stamping technique which uses a full sheet of Basic White cardstock and makes four cards.  It's very easy and no card will ever be exactly the same!  I love this technique and how my cards turned out with very little effort.  You can see how I stamped the full sheet and put these cards together by watching the replay over on my YouTube channel HERE:


Measurements and Supplies:
Christmas Season Stamps and Seasonal Labels coordinating dies (2022-23 Annual Catalog)
Christmas to Remember stamps (sentiment only)
Very Best Occasions stamp bundle (includes Very Best Trio Punch)
Full sheet of Basic White cardstock for stamping
four (4) 1 7/8 x 2 1/8" Basic White cardstock
two (2) each Soft Succulent and Evening Evergreen 2 x 2 1/4" cardstock
four (4) Basic White cardstock 2 3/4 x 4 1/4" for inside layer
Ink Pads: Early Espresso, Crumb Cake, Evening Evergreen, Soft Succulent, Garden Green, Pear Pizzaz, Old Olive and Cherry Cobbler
Linen Thread
Flat Jingle Bell Trinkets
Festive Pearls or other embellishment

I sure hope you are inspired to make some quick cards this way.  It's a really fun and easy technique and can be used with any solid stamps.  Please leave me a comment, I'd love to know if you've tried this technique and what you thought of it.  To purchase Stampin' Up! supplies from my online store, click on the shopping cart in the upper right corner.  I'd be ever so grateful for your business.  

Until next time; be happy, stay healthy and happy stamping!
Teresa