Showing posts with label ink blending. Show all posts

Sunday, September 14, 2025

Sunflower Love & Courage Making a Difference card tutorial

For my project today, I wanted to make a card using the Love & Courage stamp set and pair it with the Sunflower 3D embossing folder.  I used an ink blending technique to ink my focal background.  The sentiment uses a colored ink embossing powder technique.  I hope you are inspired to make some cards of encouragement for those in your life that are fighting the battle, not just breast cancer, with any cancer.  Change up the colors to suit your needs.  This is an important fight and most of know someone who is currently struggling with it or has fought the fight already.  $3 of every stamp set purchased in my Stampin' Up! online store goes to a Breast Cancer organization.  

To see how I've put this card together and learn the techniques I've used, be sure to watch the video tutorial over on my YouTube channel.  You can make several of these in whatever color you choose and donate to a cancer center.  They'll get into the hands of those who could use some encouragement and you get the joy of stamping and giving.   


Measurements and Supplies:
Love & Courage stamp set 165935
Sunflower 3D embossing folder 166145
Traditional Labels die 165864 (can be purchased in a bundle with coordinating sentiment stamps)
Charming Shimmer Faceted Dots 166139
Woven Ribbon (White) 164634
Early Espresso cardstock for card base 5 1/2" x 8 1/2", scored in center at 4 1/4"
Basic White cardstock
    front layer 4" x 5 1/4"
    inside layer 3 5/8" x 4 7/8"
    scraps for stamping
Ink Pads: Early Espresso, Granny Apple Green, Pretty in Pink, Blackberry Bliss, VersaMark
Stampin' Blends alcohol marker: Dk Pretty in Pink, Dk Blackberry Bliss
Sponge Daubers 133773
Basics WOW! Embossing Powder (clear) 165679
Embossing Additions Tool Kit 159971

Thanks so much for stopping by today!  You can order your stamp set in my Online store 24/7 by clicking on the shopping cart to the right.

Until next time; be happy, good health to you and happy stamping!
Teresa

Wednesday, September 3, 2025

Autumn Wishes pumpkin centerpiece card

I have another sneak peek card (guess it's not really a sneak peek card now!  New Stampin' Up! product is available in my online store today!!! Click the shopping cart on the right, go to menu, scroll down to What's New)  Today's card uses part of the Autumn Toile suite available in the Sept-Dec 2025 Mini catalog.  I'm using the Amber Autumn bundle to make this beautiful fall card.  I hope you love it.  You can watch the video replay over on my YouTube channel to see how I've made this one.  


Measurements and Supplies:
Amber Autumn bundle* 165893 (contains stamps & coordinating dies)
Branching Out dies 165775 (can be purchased in a bundle with loosely coordinating stamps)
Irregular Weave Trim 165903
Early Espresso & Old Olive Linen Thread pack 165986
Cajun Craze & gold Dots 165984
Early Espresso cardstock for card base, 5 1/2" x 8 1/2", scored in center at 4 1/4" (A2 size)
Early Espresso cardstock for Branching Out die, third from smallest
Basic White cardstock 4" x 5 1/4", inside piece 3 5/8" x 4 7/8", piece for die 2nd smallest & scraps for stamping images/sentiment
Blending Brushes 160518
Ink Pads: Early Espresso, Cajun Craze, Darling Duckling & Old Olive
Stampin' Blends alcohol markers: Timid Tiger, Cajun Craze, Darling Duckling, Daffodil Delight, Pecan Pie, Old Olive, Mossy Meadow and Natural Tones Deep SU 100

Thanks so much for stopping by today.  I hope you have enjoyed these sneak peeks of how the new products can make some fantastic cards.  

Until next time; happy stamping, good health to you and happy stamping!
Teresa

*Purchasing bundles saves 10% over the individual piece prices when combined.  You must use the bundle item code for the 10% bundle discount.  When purchasing Last Chance items; be sure to check if the individual piece prices are discounted.  Individual piece prices could be less expensive if the discounts are deep enough.

Sunday, August 31, 2025

Time to Celebrate Autumn Trees card

We are continuing on with some sneak peeks from the upcoming Stampin' Up! product release launching on September 3.  Along with that, I'm featuring some designer series paper techniques to enhance and make the paper your own.  You will find some suggested techniques in the September-December mini catalog on page 43, I hope you will give them a try.  I used an ink blending and coloring technique on my card today.  You can find the card tutorial video on my YouTube channel.  


Measurements and Supplies:
Autumn Trees bundle *165900 **Sneak peek
More Messages bundle* 165473 (outside sentiment)
Traditional Labels dies 165864 (can be purchased in a bundle* with sentiment stamps) **Sneak peek
Autumn Toile 12 x 12 DSP 165882 4" x 5 1/4" **Sneak peek
The Right Words stamp set 165316 (inside sentiment)
Streaked Dots 165902 **Sneak peek
Old Olive cardstock for card base 5 1/2" x 8 1/2", scored in center at 4 1/4"
Old Olive cardstock for label die
Very Vanilla cardstock for stamping & inside layer 3 5/8" x 4 7/8"
Ink Pads: Old Olive, Early Espresso
Stampin' Blends alcohol markers: Old Olive, Dark Cloud Cover, Light Pecan Pie & Natural Tones Medium Deep SU 300
blending brushes 160518

I hope you have liked this quick and easy card and that you learned some techniques from it.  I enjoyed teaching them.  

Until next time; be happy, good health to you and happy stamping!
Teresa

*Purchasing bundles saves 10% over the individual piece prices when combined.  You must use the bundle item code for the 10% bundle discount.  When purchasing Last Chance items; be sure to check if the individual piece prices are discounted.  Individual piece prices could be less expensive if the discounts are deep enough.

**Sneak peek items will be available to the general public beginning September 3, 2025.  If you would like to join my team, you can add them to your starter kit today!  

Sunday, May 18, 2025

Cutest Cows meets Impressions Abloom in a cookie box

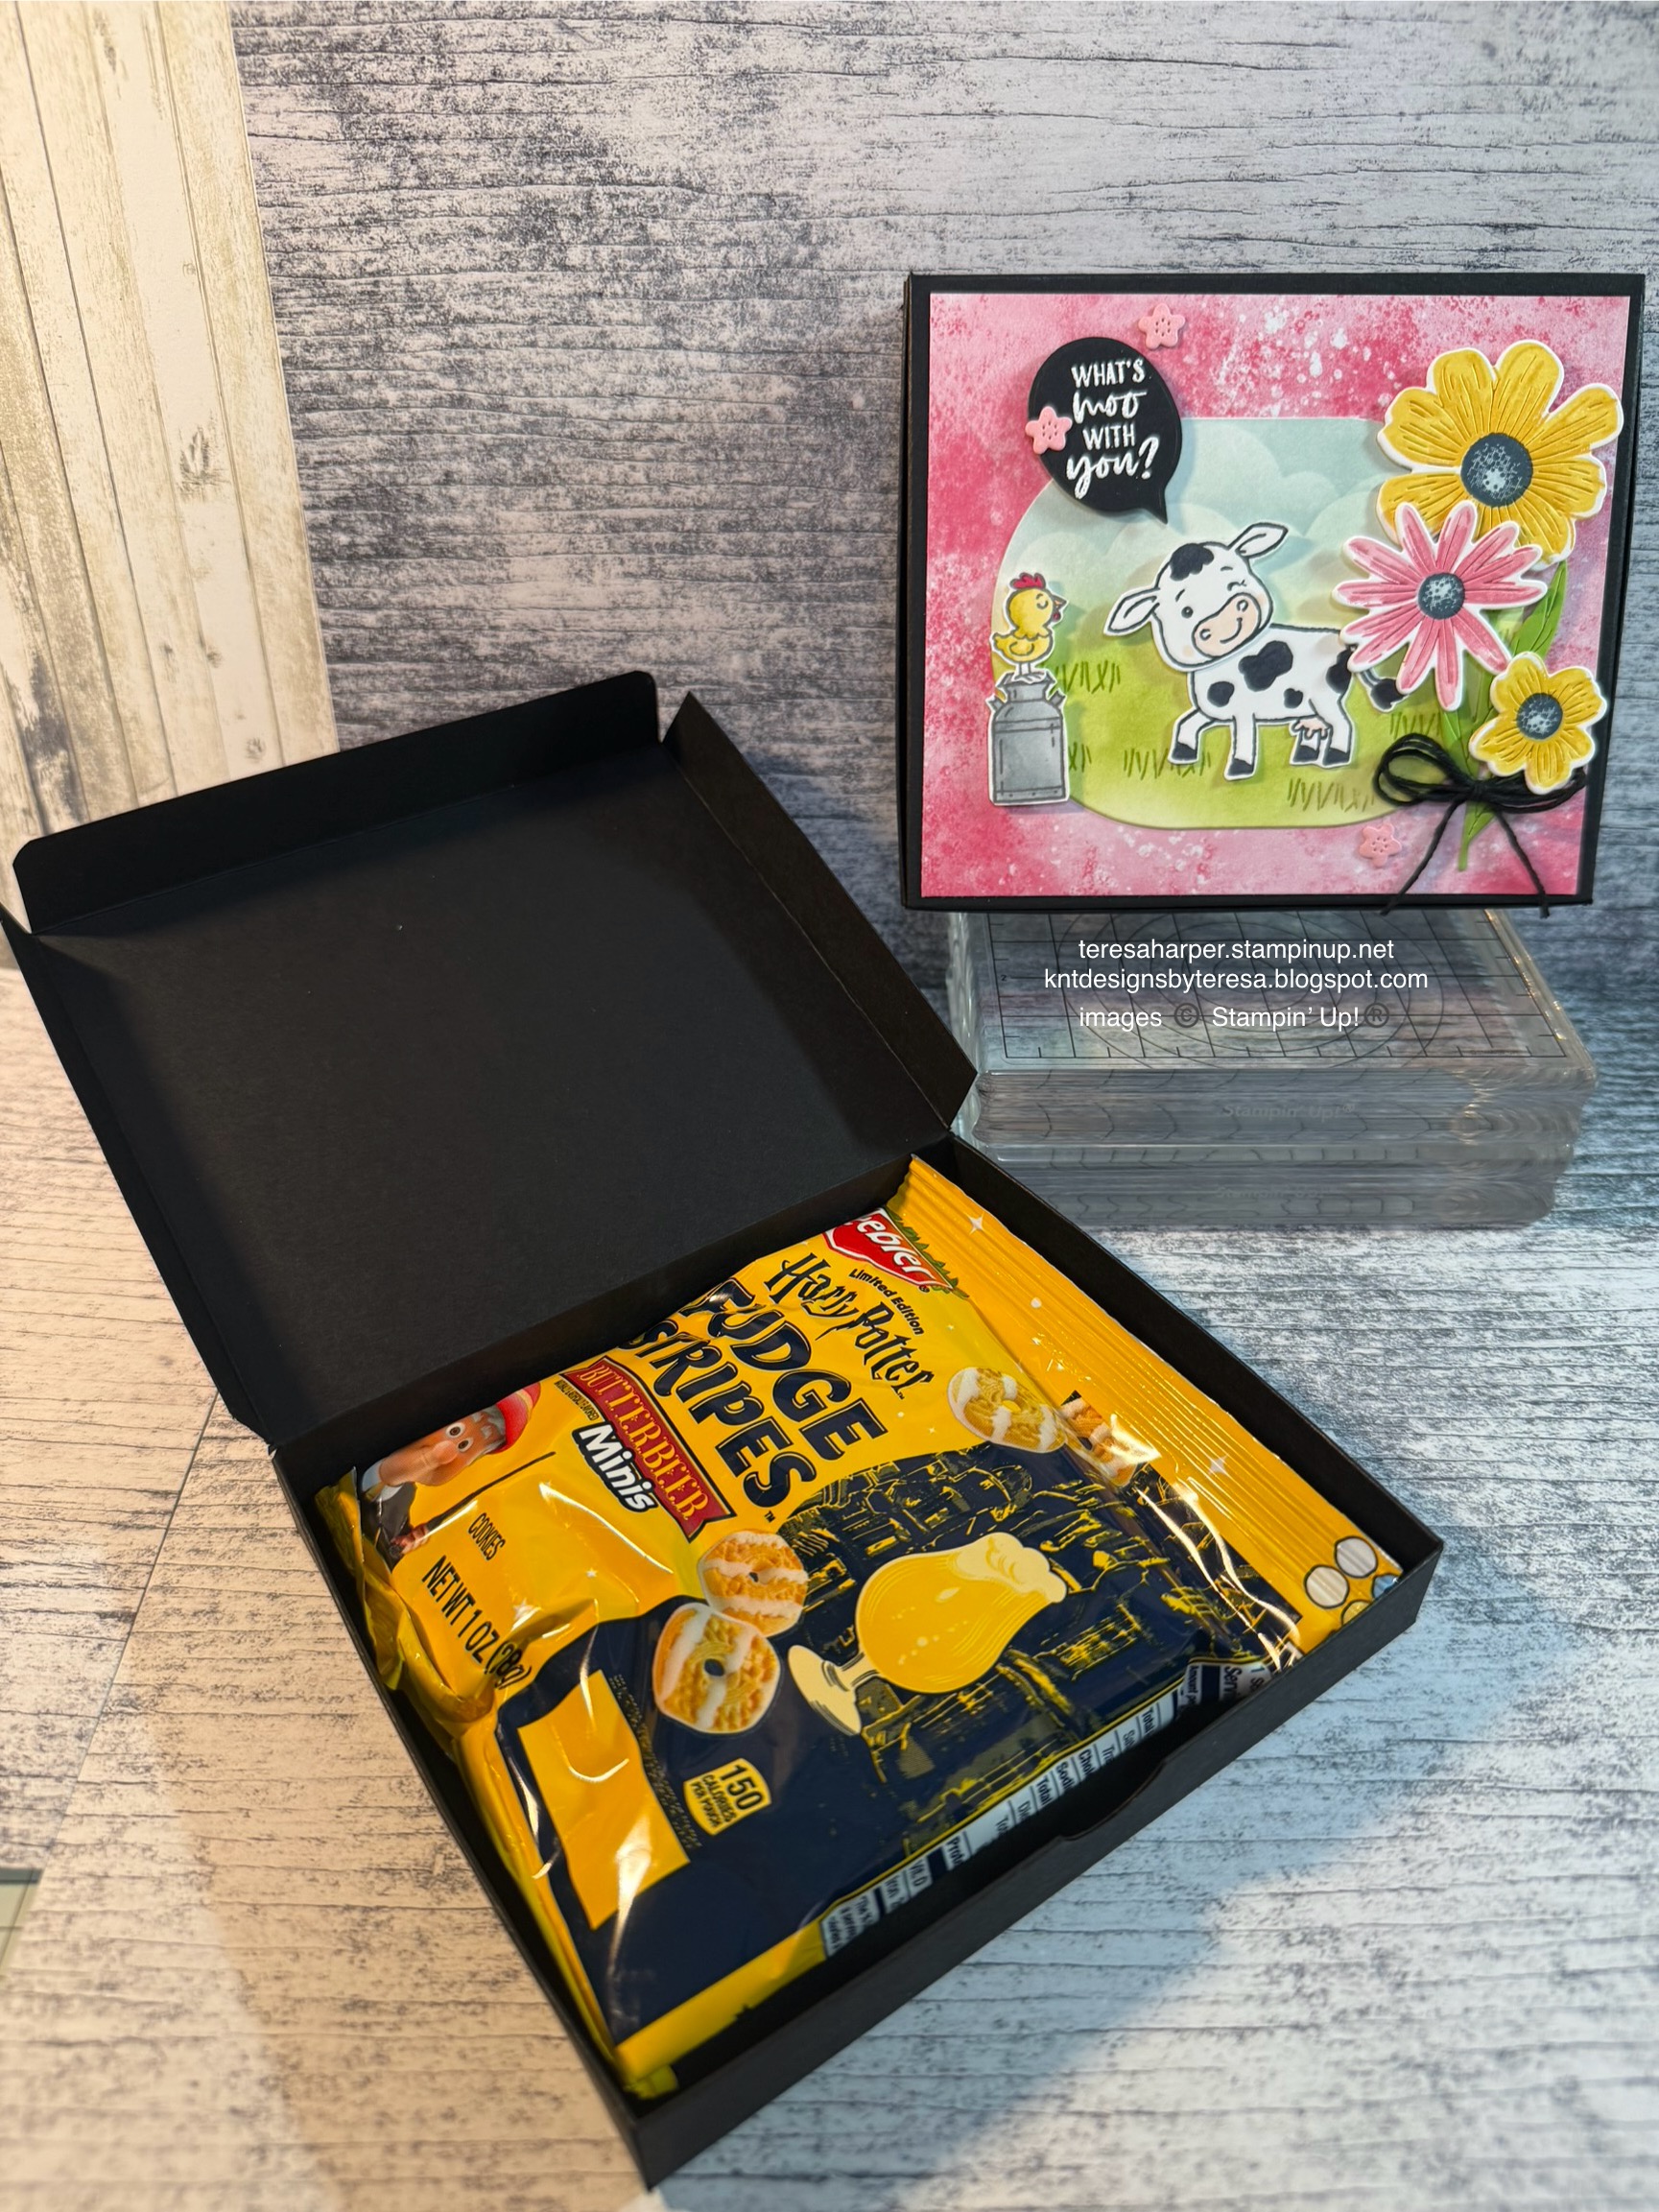
 I have a treat box today which uses new product, Impressions Abloom, and mixes with older product, Cutest Cows, (currently in the last chance category in my online store and discounted.)   I had purchased a large box of limited-edition Keebler®️ butterbeer flavored mini cookies.  I finally got around to making a box for them.  I had a hard time because of the Harry Potter theme and not having any supplies for that.  So I had this great idea last night (at least I thought it was) to combine the Impressions Abloom flowers with the milk can and cow as butter is made from milk products and butter is used in the making of butterscotch.  I know, its a stretch but it did turn out pretty cute don't you think?  You can watch the video tutorial on making this box over on my YouTube channel.


Measurements and Supplies:
Cutest Cows stamps 162892 & Cutest Cows builder punch 162896 (last chance item while supplies last)
Impressions Abloom bundle* 165617 (includes stamps 165605 & coordinating dies 165610)
Meant to Bee dies 166582 (for sentiment) can be purchased in a bundle* 167243 with coordinating     stamps
Bright Skies dies (to make a mask for ink blending clouds if desired) 162793 (last chance item while   supplies last)
2025-2027 In Color 6"x6" DSP #165300, Strawberry Slush background 4 1/4" x 5"
Basic Black cardstock, 8 1/4" x 12" for box & scrap for sentiment label)
    Score on 8 1/4" side at 3/4" & 1 1/2" on each end
    Score on 12" side at 3/4", 1 1/2", 6", 6 3/4", & 11 1/4"
Basic White cardstock for stamping images and for the background oval piece (rectoval lol!)
Ink Pads: Crushed Curry, Daffodil Delight, Cloud Cover, Secret Sea, Strawberry Slush, Pretty in Pink, Basic Gray, Granny Apple Green and Memento Tuxedo Black & VersaMark watermark ink
Stampin' Blends Markers: Strawberry Slush, Cloud Cover, Basic Black, Darling Duckling, Daffodil Delight, Petal Pink and Peach Pie
Baker's Twine Essential Pack 155475: Basic Black
Wink of Stella Glitter Brush 141897
Blending Brushes 160518
Basics WOW! Embossing Powders 165679: Opaque Bright White
Heat Tool 
Embossing Additions Tool kit 159971 (optional, but useful)
Adhesives: Tear & Tape, Tombow liquid glue, mini glue dots, Stampin' Seal tape runner

Thanks so much for stopping by today.  You can find all the supplies I've used today in my online store by clicking on the shopping cart in the upper right.

Until next time; be happy, good health and happy stamping!
Teresa

*Purchasing bundles saves 10% over the individual piece prices when combined.  You must use the bundle item code for the 10% bundle discount.  When purchasing Last Chance items; be sure to check if the individual piece prices are discounted.  Individual piece prices could be less expensive if the discounts are deep enough.


Wednesday, March 26, 2025

Rainbow arched lattice birthday card

 Hello all.  For my card today, I’ve gone slightly outside the box and combined the Everyday Arches dies with the Linked Together dies.  I do love how the two together can be trimmed to make an arched lattice.  It took a bit to figure out how to make it work, but once it came together, I loved it.  To see how I’ve put this one together, be sure to watch the video replay over on my YouTube channel.


Supplies and Measurements:
Wishes stamp set 165428
Everyday Arches dies 164629
Country Flowers bundle 163411* (includes stamps 163405 & dies 163410
Linked Together dies 164808
adhesive-backed Textured Dots 163338
Basic Black cardstock 5 1/2" x 8 1/2", scored in center at 4 1/4" for card base
Basic White cardstock 4" x 5 1/4" for ink blended focal piece, plus pieces for stamping & die cutting images, arch and lattice dies
Basic White cardstock for inside layer 3 5/8" x 4 7/8"
Ink Pads: Calypso Coral, Flirty Flamingo, Fresh Freesia, Azure Afternoon, Pretty Peacock, Night of Navy, VersaMark watermark ink pad & Tuxedo Memento Black
Stampin' Blends alcohol markers: Fresh Freesia, Pool Party, Flirty Flamingo, Daffodil Delight, Lemon Lolly, Pretty Peacock, Calypso Coral, Pecan Pie, Natural Tones collection Deep SU 100
Wink of Stella Glitter Brush 141897
blending brushes 160518 and/or 153611
Basics WOW! Embossing powder 165679 (black)

Thanks so much for stopping by today!  I hope you've been inspired and will stamp and send a card for someone special.  

Until next time; be happy, be healthy and happy stamping!
Teresa

*Purchasing bundles saves 10% over the individual piece prices when combined.  You must use the bundle item code for the 10% bundle discount.  When purchasing Last Chance items; be sure to check if the individual piece prices are discounted.  Individual piece prices could be less expensive if the discounts are deep enough.


Sunday, February 23, 2025

Cutest Cow Tales fold over flap box

 Hello and happy Sunday.  I hope everyone had a great week.  Today, I'm using the Cutest Cows stamp and punch to decorate a fold over flap box I designed to fit 3-4 Cow Tale Minis.  I get mine at my local Dollar Tree but you can find them online.  I think they will also fit Merci chocolates, although, I didn't have any on hand to experiment with. The finished box size is 2 3/4" x 4" x 3/4", any treat that is narrow and shorter than 4" in height should work. If you give this box a try, be sure to share with us over on Facebook in the Group Social.  Also, we would love to know what you found to fit in yours.  You will find the link here: KnT Designs Stampers Group.  

You can watch the video replay on how I put this box together over on my YouTube channel.  


Measurements and Supplies:  
Cutest Cows stamps 162892 & coordinating Builder Punch 162896
Mixed Labels dies 164652 (can be purchased in a bundle 164653*) fence & sentiment label
Elements of Text 164774 (splotches in the sky)
Around It All dies 164725 (aka wonk a-doodle circles) (bundle* available)
I used excess rubber from Hearts & Hugs to make the cow spots on my belly band.
Calypso Coral cardstock 8" x 7 1/2"
    score on 8" side at 3/4", 4 3/4" & 5 1/2"
    score on 7 1/2" side at 1/2", 1 1/4", 4" & 4 3/4"
Basic White cardstock 1 1/4" x 8" & scraps for stamping and die cutting
Pecan Pie cardstock scrap
Forever Plaid Designer Series Paper 164678
    (1 each) 2 5/8" x 3 7/8" (2 each) 5/8" x 3 7/8" (1 each) 5/8" x 2 5/8"
    If you wish to cover the front flap (1) each 2 5/8" x 2 3/8"
Ink Pads: Pecan Pie, Early Espresso, Granny Apple Green, Azure Afternoon
Stampin' Blends alcohol markers: Calypso Coral, Cajun Craze, Pecan Pie, Lt Crumb Cake, Dk Petal Pink & Natural Tones collection Medium SU 500 & Light SU 900
Adhesive-backed Sparkle Gems 161288
blending brushes small 160518 or large 153611

I hope you enjoyed this little treat box and that you will make some to share real soon.  Thanks so much for stopping by. 

Until next time; be happy, stay healthy and happy stamping!
Teresa

*purchasing bundles saves 10% over the individual piece prices when combined.  You must use the bundle item code for the 10% bundle discount.  When purchasing Last Chance items; be sure to check if the individual piece prices are discounted.  Individual piece prices could be less expensive if the discounts are deep enough.


Wednesday, February 19, 2025

I love you more than cookies fun fold card

 Hello, I hope you’ve all had a great week.  This week I'm using some products that are on the Last Chance list and those which are likely to go on the next last chance list, along with new products.  The idea is to get you using all of those sets you currently have and make them new again with another set.  So here we go.....  If you would like to see how I put this card together, be sure to visit my YouTube channel for the video replay.


Measurements and Supplies:
Dear Santa stamp set 164303 (Last Chance item) (not just for Christmas as you can see!)
Perfect Pairs stamp set 164898 (Last Chance item)
Elements of Text stamps 164774
Around It All dies 164725 (can be purchased in a bundle for a 10% savings)
Everyday Arches dies 164629 (can be purchased in a bundle for a 10% savings)
Iridescent Faceted Gems 163368
Blending brushes
Ink Pads: Azure Afternoon, Granny Apple Green, Early Espresso, Memento Tuxedo Black
Stampin' Blends alcohol markers: Lt Wild Wheat, Pecan Pie, Crumb Cake, Melon Mambo, Flirty Flamingo, Lt Balmy Blue, Lt Azure Afternoon, Lt Petal Pink, Natural Tones collection, Deep Su 100 & Lt SU 900
Paper Snips
Melon Mambo cardstock for card base 5 1/2" x 8 1/2", scored at 1 1/4" & 4 1/4"
Basic White cardstock, inner layer 2 3/4" x 5 1/4" plus scraps for stamping & die cutting
Bloom Impressions 12 x 12 DSP, (free with purchase during Sale a-bration thru 2/28/25
    4 x 5 1/4", then cut on 4" side at 2 3/4", envelope flap piece 2 1/4" x 6", inside layer 2 3/4" x 3/4"

Thanks so much for stopping by today.  I appreciate you taking some time from your day to spend it with me.  To purchase your Stampin' Up! supplies in my online store, click on the shopping cart in the upper right.  Thanks so much!

Until next time; be happy, stay healthy and happy stamping!
Teresa


Saturday, February 15, 2025

Wishing You the Best Trellis card

 Hello and welcome back to the blog.  I know I've been missing in action for a little while, but the truth is I've been down with a virus....mostly a head cold but man did it knock me down this time.  I'm feeling a bit better and I have a card tutorial for you today using the Linked Together bundle by Stampin' Up!  To see how I've put this card together, be sure to watch the video replay over on my YouTube channel.


Measurements and supplies:
Linked Together Bundle 164810* (includes stamps 164806, dies 164808 & decorative masks 164809)
Country Woods Designer Series Paper 163393 4" x 5 1/4" & 1/2" x 4 7/8"
Melon Mambo cardstock for card base 5 1/2" x 8 1/2", scored in the center at 4 1/4"
Pecan Pie cardstock to cut out trellis
Cardstock scraps in Summer Splash, Pretty in Pink & Melon Mambo 
Basic White cardstock 2 1/2" x 3 7/8" for focal image, inside layer is 3 5/8" x 4 7/8" & scraps for sentiment
Ink Pads: Summer Splash, Pecan Pie, Melon Mambo & Pretty in Pink
blending brushes 160518
sponge dauber 133773
2024-2026 In Color Shimmer Gems 163781
Linen Thread for bow 104199

Thanks for stopping by today.  To purchase your Stampin' Up! supplies, click on the shopping cart in the upper right.  I would love to earn your business!  Thanks in advance.  

Until next time; be happy, stay healthy (at least try) and happy stamping!
Teresa

*purchasing bundles saves 10% over the individual piece prices when combined.  You must use the bundle item code for the 10% bundle discount.  When purchasing Last Chance items; be sure to check if the individual piece prices are discounted.  Individual piece prices could be less expensive if the discounts are deep enough.

Wednesday, January 29, 2025

Hexagon Shaped birthday card with Darling Dinos

 For today's project I've used some new dies by Stampin' Up! to make a hexagon shaped birthday card for my youngest grandson.  He'll be seven in March and is absolutely obsessed with dinosaurs so when Stampin' Up! released the Darling Dinos bundle in January, I knew I would have to have it.  Thanks for taking a look.  To see how I've put this card together, there is a video replay over on my YouTube channel.


Measurements and Supplies:
Meant to Bee dies 166582 (Can be purchased in a bundle 167243* with coordinating stamps 166583)
Darling Dinos bundle 164735* (includes stamps 164728 and coordinating dies 164734)
Thick Basic White cardstock 5 1/2" x 8 1/2", scored in center at 4 1/4"
Basic White cardstock multiple pieces 
Basic Black cardstock
Ink Pads: Crushed Curry, Pumpkin Pie, Highland Heather, Azure Afternoon, Misty Moonlight, Old Olive & Memento Tuxedo Black
Blending Brushes
Stampin' Blends alcohol markers: Gray Granite, Azure Afternoon, Soft Sea Foam, Balmy Blue

to shop my online store for all your Stampin' Up! supplies, click on the shopping cart in the upper right.  I would really appreciate your business.  Thanks so much.

Until next time; be happy, stay healthy and happy stamping!
Teresa

*purchasing bundles saves 10% over the individual piece prices when combined.  You must use the bundle item code for the 10% bundle discount.  When purchasing Last Chance items; be sure to check if the individual piece prices are discounted.  Individual piece prices could be less expensive if the discounts are deep enough.

Wednesday, November 20, 2024

Shepherd's Care Peace on Earth sentiment card with a twist

 Hello everyone.  This week I am not featuring any specific product.  I've been in a bit of a creative slump, so I'm just going where my creativity takes me with whatever products I happen to be inspired by.  Today's card features Shepherd's Care from the SD 2024 mini catalog by Stampin' Up!

For my card, I wanted the Shepherd's stamp to be the star of the show.  I also wanted to make a card that I could quickly and easily duplicate.  Of course, the quick and simple never seems to be quite within my grasp....I just can't stop and so the sentiment label came about here.  I didn't want to alter to the label die cut to fit my sentiment and when I put it on the card, the idea came to me to stamp a partial image to the left of the sentiment so it would look as if it's part of the scene.  I hope you like this technique as I'll probably be using it more often.  

To see how I made this card and the special way I did the sentiment label to blend in with the scene, be sure to watch the video replay over on my YouTube channel.


Supplies and Measurements:
Shepherd's Care stamp set 164300
Changing Leaves dies 164138 (for sentiment label)
Misty Moonlight card stock, 5 1/2" x 8 1/2" scored in center at 4 1/4" for card base.
Sentimental Christmas 12 x 12 DSP 164209 ($3 of every purchase is donated to a literacy charity for         kids) 4" x 5 1/4"
Night of Navy cardstock, 3 3/8" x 4 5/8"
Basic White cardstock 3 1/4" x 4 1/2" for focal image, scrap for sentiment label and 3 5/8" x 4 7/8" for     inside layer.
Ink Pads: Night of Navy, Misty Moonlight, Crumb Cake and VersaMark watermark
Iridescent Faceted Gems 163368
Blending Brush
Basics WOW! embossing powders 165679 (clear)
heat tool
stamp positioner tool

I hope you like this card and that you will give it a try.  The layout is pretty basic and I think that helps the image to pop!  

Until next time; be happy, stay healthy and happy stamping!
Teresa

**Online Exclusives items can be while supplies last.  If they are in the store, they are available for purchase.  If they say Currently Unavailable, the stock will be replenished.  If they are no longer in the store, unfortunately, they will not return. 


Wednesday, November 13, 2024

Dear Santa

 First of all, today is the beginning of the Stampin’ Up!®️ Seasonal sale.  Be sure to check the online store to see all the special deals November 13-15, 2024.  Sale ends at 11:59 pm MT on the 15th.  

My intention this week is to mix and match sets in my crafty stash with Stampin’ Up!’s®️Dear Santa stamp set available in my online store.  For my card today, I’ve kept it very simple as this particular image doesn’t need a lot to make it adorable.  I hope you like it and it’s very easily duplicated if you want to make quite a few.  Video replay is available over on my YouTube channel.  


Measurements and Supplies:
Dear Santa stamp set 164303
Peaceful Seasons 164145 stamp set for inside sentiment (can be purchased in a die bundle 164021*)
Regal Winter DSP 164156 (4" x 5 1/4")
Cherry Cobbler cardstock 2 7/8" x 4 3/8"
Basic White cardstock 2 3/4" x 4 1/4" & inside layer 3 5/8" x 4 7/8"
Thick Basic White cardstock for card layer, 5 1/2" x 8 1/2", scored in center at 4 1/4"
Ink Pads: Memento Tuxedo Black, Night of Navy
Stampin' Blends Markers: Blackberry Bliss, Lost Lagoon, Pecan Pie, Lt Gray Granite, Lt Bubble Bath, Color Lifter & Natural Tones collection Light SU 900 and Medium Light SU 700
Blending Brushes 160518

Thanks so much for stopping by.  I hope you check out the seasonal sale going on now.  Cardstock, ink, bundles and DSP from the 2024-2025 Annual catalog are all on sale.  It's time to stock up on those basics and maybe get yourself a bundle or two.    

Until next time; be happy, stay healthy and happy stamping!
Teresa

*purchasing bundles saves 10% over the individual piece prices when combined.  You must use the bundle item code for the 10% bundle discount.

**Online Exclusives items can be while supplies last.  If they are in the store, they are available for purchase.  If they say Currently Unavailable, the stock will be replenished.  If they are no longer in the store, unfortunately, they will not return. 

Monday, August 26, 2024

Frosted Forest Masculine Thinking of You/Birthday card

 Hello everyone! I hope you had a fabulous weekend.  For the kids here in Sheridan, this is the last week of summer vacation.  I plan to soak up the most of it with our grandkids and spend some time at the beach this week.  The weather is supposed to be nice, but often when it's nice here at home, it's not so nice at the beach.  Hopefully, we'll have good enough weather to play in the sand. 

Now onto my card for today.  I made the original card you see here for my husband for our 44th wedding anniversary last Friday.  When I made the card during my YouTube live, I switched out the inside sentiment for a birthday card.  Either way, the design works well without changing the sentiment on the front.  I do love how it turned out.  You can watch the YouTube replay to see how I put the card together.


Supplies & Measurements:
Frosted Forest bundle 164137* (includes stamps 164344,  dies 164136 & masks 164350) **
In The Grove bundle 163512* (includes stamps 164459 & dies 163511)
Thoughtful Journey DSP, 4 x 5 1/4"
Basic White cardstock for stamping/die cutting, inside piece 3 5/8" x 4 7/8"
Pretty Peacock cardstock for card base, 5 1/2" x 8 1/2", scored in the center at 4 1/4"
Old Olive cardstock for die cutting trees
Ink Pads: Old Olive, Mossy Meadow, Early Espresso, Pecan Pie, Pretty Peacock, Gray Granite, Wild Wheat
Blending Brushes
Adhesive-backed Dragonflies & Birds, 162743
Basic White Medium Envelopes

Thanks so much for stopping by today.  I do so appreciate you taking time from your busy day to spend a little with me.  

Until next time; be happy, stay healthy & happy stamping!
Teresa

Monday, July 15, 2024

You Brighten My Days Butterfly 6x6 DSP Fun Fold card

Happy Monday everyone!  I'm so grateful you stopped by today.  The card I have for you today, uses a quick and easy fun fold.  I do love the impact you get with it and it really shows off those 6x6 scenery papers you have a difficult time cutting up!  To see you I've put this card together, be sure to watch the video replay over on my YouTube channel.  


Supplies and Measurements:
Sketched Butterflies bundle 163492 (includes stamps 163490 & dies 163491)*
Spotlight on Nature bundle 163581 (includes stamps 163579 & dies 163580)*
Thoughtful Journey 6x6 DSP  6 x 5 1/4" in landscape orientation
    On 6" side:  First cut 1 7/8", then cut another piece 1 7/8", this leaves a piece 2 1/4" (keep in order)
Iridescent Striped Trim 163299
Card base is Blackberry Bliss, 5 1/2" x 8 1/2", scored at 2 1/8" & 4 1/4"
Basic White cardstock 1 3/4" x 5 1/4", additional for circle
Fresh Freesia cardstock
Adhesive sheets 152334
2024-2026 In Color Shimmer Gems 163781
Ink Pads: Blackberry Bliss
Blending Brush 160518
Take Your Pick Tool 144107
    Die Brush Adapter 149655


I hope you have enjoyed this project today and are inspired to make a card to send to someone.  It will surely brighten their day!  Until next time; be happy, stay healthy and happy stamping!
Teresa

*purchasing bundles saves 10% over the individual piece prices when combined.  You must use the bundle item code for the 10% bundle discount.

Monday, June 24, 2024

Playful Ghosts treat box July 2024 Online Exclusives Sneak Peek

For my sneak peek of the July Online Exclusives collection, I’m sharing a project I made using Playful Ghosts and a die from the Greetings of the Season set.  When I first saw these dies, I knew I would have to make some treat boxes using them.  This is the first one I’ve made.  I love how it turned out and plan to make several more and have them ready for October so I’m not scrambling, like usual, at the last minute to get them finished. 😂 Each box will hold two fun size candy bars (I used Snickers).  You can watch the video replay of the live tutorial here.


Supplies and Measurements:
Playful Ghosts stamp set 164366 (July 2024 Online Exclusives)
Forever Forest stamps 162054 & dies 162057
Greetings of the Season dies 164112 July 2024 Online Exclusives (can be purchased in a bundle with a sentiment set 164113)* 
Gorgeous Grape cardstock 3 3/4" x 7" & piece for tag
    score on 7" side at 1, 3 1/4, 4 1/4 & 6 1/2" (score down 1/2" only at 1/2" & 3 3/4" for gussets)
    score on 3 3/4" side at 1"
Basic White cardstock scraps
Iridescent Striped Trim 163299
Natural Tones Linen Thread (releasing Sept. 2024 in holiday mini catalog)
Wink of Stella Clear Glitter brush 
Ink Pads: Crushed Curry, Peach Pie, Flirty Flamingo, Gorgeous Grape, Night of Navy, Basic Gray, Old Olive, Basic Beige
Stampin' Blends markers: Gray Granite, Smoky Slate, Pecan Pie, Peach Pie, Pumpkin Pie, Color Lifter, Highland Heather, Petal Pink, Wild Wheat

Thanks so much for stopping by.  I hope this has helped give you a peek into what is coming in July in the Online Exclusives and that it helps you to make some decisions for yourself on what you might need to add to your collection.  Online Exclusives will be released to the public on July 3rd; however, you can add to a starter kit today if you join my team.  You will find all the joining information in this link.

Until next time; be happy, stay healthy & happy stamping!
Teresa

*purchasing bundles saves 10% over the individual piece prices when combined.  You must use the bundle item code for the 10% bundle discount.

Monday, June 10, 2024

Layers of Beauty Grateful For You

 For my final project this week using the Layers of Beauty bundle by Stampin' Up!, I've created this Grateful for You card.  It's a pretty simple layout meant to focus entirely on the images in the stamp set and how quickly and easily you can color them with the decorative masks included in the bundle.  I've also provided some tips and tricks on how to quickly color a single rose right alongside the large focal image.  Be sure to watch the video replay over on YouTube.


Measurements and Supplies: 
Layers of Beauty Bundle 163519 (includes stamps 163514, dies 163518 & decorative masks 163517)*
Unbounded Love dies 163383 (Can also be purchased in a bundle 163384*, with the coordinating stamps)
Card base: Blackberry Bliss cardstock 5 1/2" x 8 1/2", scored at 4 1/4"
Pretty in Pink cardstock 4 1/8" x 5 3/8" & scrap for sentiment label
Basic White cardstock 4" x 5 1/4" & scraps for single roses
Basic White cardstock for inside layer is 3 5/8" x 4 7/8"
Ink Pads: Blackberry Bliss, Pretty in Pink, Basic Gray & Garden Green
Blending brushes
Lemon Lolly or Daffodil Delight & Granny Apple Green Stampin' Blend markers
Iridescent Pearls

I hope you have enjoyed all the projects shown with this week using this bundle.  As a reminder, Stampin' Up! has a sale on bundles this month, June 2024.  You can save an additional 10% off the bundle price.  To shop my online store to see all the bundles on sale, click here: https://www.stampinup.com/categories/specials/bundle-sale?demoid=2109129
Thank you in advance for supporting my small business!  I do appreciate it.

Until next time; be happy, stay healthy and happy stamping!  
Teresa

*Bundle pricing saves 10% over the combined prices of the individual pieces

Wednesday, June 5, 2024

Layers of Beauty rose bouquet card

Layers of Beauty is the featured bundle this week.  Stampin' Up! just happens to have a sale going this month for all their stamp & die bundles.  Be sure to check out the sale here: https://www.stampinup.com/categories/shop-products/featured-products/bundled-savings/stamp-die-bundles?demoid=2109129

I have some tips and tricks to make the layering stencils super easy for you.  For this card I focused on the single rose which can be cut from the large rose bouquet.  It’s one of the neatest things about this bundle, the ability to take just one rose instead of using the entire image.  It definitely has a lot more versatility because of it.  Be sure to watch the video replay to see my easy tips and tricks.  You’ll find the replay on YouTube here.


Supplies and Measurements:
Layers of Beauty Bundle 163519 (includes stamps 163514, dies 163518 & decorative masks 163517)*
Cute Crochet 3D Embossing Folder 163792
2024-2026 Shimmer Gems 163781
Basic White thick cardstock, 5 1/2" x 8 1/2", scored in center at 4 1/4"
Basic Black cardstock 4 x 5 1/4"
Basic White cardstock for making template and for die cutting roses
Black embossing powder from basics collection 165679
Stamp Pads: Calypso Coral, Highland Heather, Daffodil Delight, Blueberry Bushel, Pretty in Pink, Melon Mambo, Garden Green & Basic Gray, Versamark clear ink for embossing
Stampin' Blends: Lemon Lolly, Granny Apple Green (for inside if desired)
Embossing Additions Tool Kit 159971
Heat Tool 129053
Blending brushes 160518 small, 153611 large

Until next time; be happy, stay healthy and happy stamping!  

*Bundle pricing saves 10% over the combined prices of the individual pieces

Wednesday, May 29, 2024

Loveliest Tree Father's Day card

I am a sucker for a good tree bundle and this one is no exception for me.  I do love how you can easily pair it with other stamp sets you may have on hand to bring in a whole new feel to your card.  I do love how this one turned out and with the fishing image from Beside Me, it's perfect for a Father's Day card or even a birthday card. To see how I put my project together, be sure to watch the replay over on YouTube.


Measurements and Supplies:
Loveliest Tree bundle 163716 (includes stamps 163714 & coordinating dies 163715)*
Beside Me stamp set 160780
Bright Skies dies 162793
So Swirly Embossing Folder 163791
Blending Brushes, Sponge Daubers
Stampin' Blends Markers: Copper Clay, Lt Pool Party, Summer Splash, Gray Granite, Night of Navy, Crumb Cake, Pecan Pie, Natural Tones Light SU 900, Natural Tones Medium, SU 600, Wild Wheat, Daffodil Delight, Granny Apple Green, Pecan Pie
Stampin' Write Markers: Garden Green, Early Espresso, Old Olive and Shaded Spruce
Ink Pads: Pool Party, Copper Clay, Pebbled Path, Garden Green, Azure Afternoon
Card base: Copper Clay cardstock, 5 1/2" x 8 1/2", scored in center at 4 1/4"
Basic White 3 3/4" x 5" outside layer, 3 5/8" x 4 7/8" inside layer, scraps for stamping

Thanks so much for stopping by.  To order your Stampin' Up! supplies, click on the shopping cart in teh upper right.  I would be ever so grateful for your business.

Until next time; be happy, stay healthy, and happy stamping!
Teresa

*Bundle pricing saves 10% over the combined prices of the individual pieces