Friday, July 29, 2022

Hello Harvest Hippest Hippo watercolor card

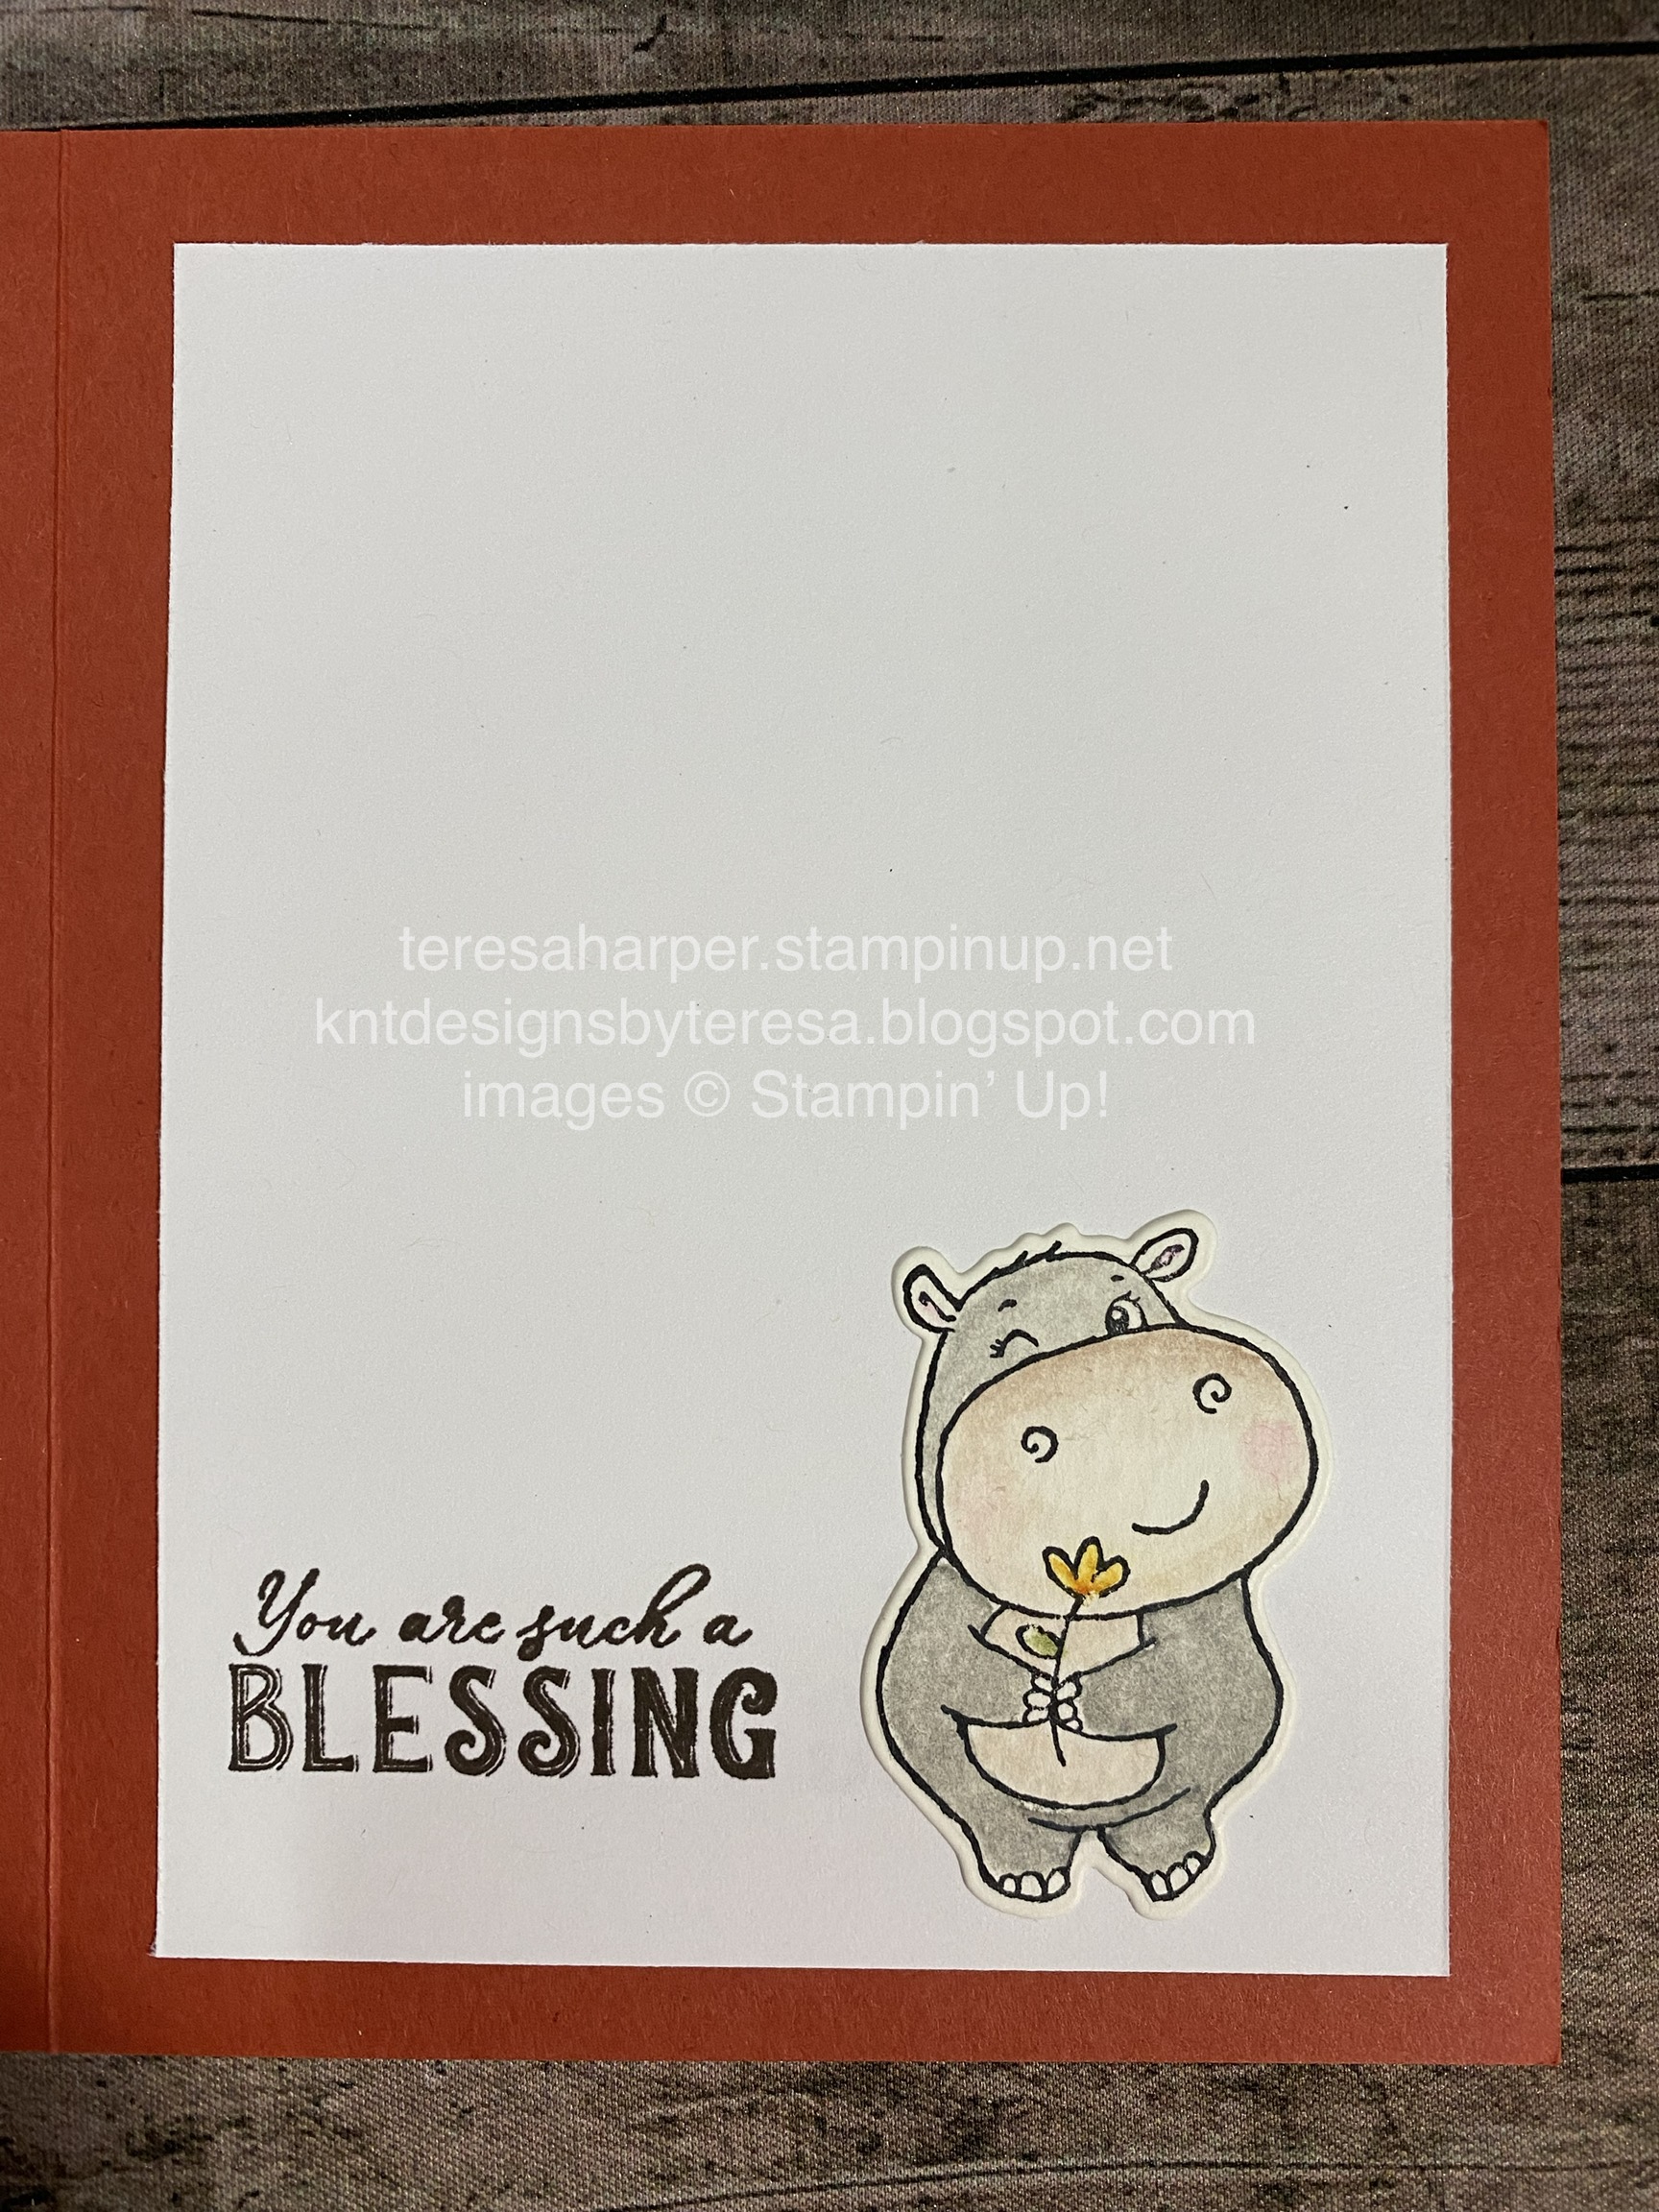
 Here is another of the projects I shared during my FB Live video on Tuesday evening.  For this card, I used the watercolor pencils by Stampin' Up! on Fluid 100 watercolor paper with a blender pen.  I love how vibrant the colors turned out here.  I also think this combination of stamp sets makes a very cute fall card for someone.  To see how I colored my images, you can watch my YouTube video here:


Measurements and Supplies: 
Watercolor Pencils: Cajun Craze, Pumpkin Pie, Crushed Curry, Daffodil Delight, Early Espresso, Basic Gray, Flirty Flamingo, Old Olive
Card Base Cajun Craze Cardstock 5 1/2 x 8 1/2, scored at 4 1/4"
Rustic Harvest DSP 4 x 5 1/4"
Fluid 100 Watercolor Paper for stamping and die cutting images
Hello Harvest bundle (Hello Harvest stamps, Rustic Pumpkin dies) 159644
Hippest Hippos and Hippo dies (free Sale a-bration items through 8-31-22 or while supplies last)
inside layer, Basic White cardstock 3 5/8 x 4 7/8"
Stazon Ink for images to be water colored
Early Espresso ink pad for sentiment

Thanks for stopping by the blog today!  Please leave me a comment.  To order Stampin' Up! supplies, click on the shopping cart in the upper right.  It will take you to my online store.  I'd be ever so grateful for your business. 

Until next time; be happy stay healthy and happy stamping!
Teresa


Thursday, July 28, 2022

Watercolored Hippest Hippo Wonderful World fun fold card

 Today's project is a fun fold card I created for a challenge by Dena Rekow.  I started with the Hippest Hippo stamp set and decided to try my hand at a little water coloring with Stampin' Up!'s watercolor pencils.  I also wanted to use some free Sale a-bration items in this card.  I think I've achieved all the goals I set out for with this card.  I sure hope you like it.  You can watch the FB Live replay over on my YouTube channel here


Supplies and Measurements:
22" Satin Edged Ribbon, colored with Lt Flirty Flaming Stampin' Blend
Card base, Thick Basic White, 5 1/2 x 10, scored at 4 1/4 and 8 1/2"
Basic White cardstock 3 x 7", scored in half at 3 1/2"
Mossy Meadow cardstock 2 7/8" x 3 3/8"
Wonderful World DSP 4 x 5 1/4", two pieces 1 1/4 x 5 1/4"
Coordinating Wonderful World DSP 2 3/4" x 3 1/4"
Basic White 2 3/4" x 3 1/4", 4 1/4" x 5 1/4" to cut mini pocket envelope die
Coordinating Wonderful World DSP 2 1/4" x 3 1/8", trim with right side of mini pocket envelope die with top of DSP at the top to make the scallop edge
Thick Basic White large enough to stamp and die cut hippo and punch decorative circle
Stazon Ink
Momento Black ink
Mossy Meadow ink pad
Watercolor Pencils: Flirty Flamingo, Melon Mambo, Rich Razzleberry, Garden Green, Basic Gray, Early Espresso
Hippest Hippos stamp set
Hippo Dies
Biggest Wish
Water Painter

Thanks for stopping by!  If you need to purchase any supplies, please shop my online store by clicking on the shopping cart in the upper right.  I'd be ever so appreciative.  

Until next time; be happy, stay healthy and happy stamping!
Teresa


Saturday, July 23, 2022

Wonderful World greeting cards

 The cards for today were made to go in the card gift box I showed on my blog on Thursday.  If you missed those measurements, be sure to go back and look.  You will also find a video over on my YouTube channel on how to put the cards and box together HERE:  All cards use the same dimensions, same stamp set and Designer Series Paper, and coordinate perfectly with the card gift box from Thursday.  I've made two of each card to put in the gift box.  I've used various sentiments from Inspired Thoughts by Stampin' Up!  It's one of my go to stamp sets for sentiments as it has a variety for any occasion and also has sentiments for the inside of your card as well.  As you can tell, I made all the cards using the same materials and layout, just changing up the colors and DSP from the packet.  


Measurements and Supplies:
Wonderful World Stamp and DSP pack (Sale a-bration choice, free with qualifying purchase in July and August 2022)
Pretty Flowers embossing folder
Brushed Brass Butterflies
Crinkled Seam Binding Ribbon (White), colored with Stampin' Blends markers
Card Base 5 1/2 x 8 1/2", scored in the center at 4 1/4" (Rich Razzleberry, Blackberry Bliss, Flirty Flamingo and Orchid Oasis cardstocks.)
Basic White and Pear Pizzazz cardstock 4 x 5 1/4" for Embossing
Basic White cardstock for focal image 2 3/8 x 3 1/8" (you'll need to six to make the cards)
Cardstock 2 1/2 x 3 1/4" to layer (Rich Razzleberry, Blackberry Bliss, Flirty Flamingo and Orchid Oasis)
Inside layer, Basic White cardstock 3 5/8 x 4 7/8"
Wonderful World DSP 2 x 4" (you'll need two each of three designs for six cards)

Thanks so much for stopping by today!  To shop my online store for your Stampin' Up! supplies, click on the shopping cart in the upper right corner.  I'd very much love it if you would leave me a comment.

Until next time; be happy, stay healthy and happy stamping!
Teresa


Wednesday, July 20, 2022

Wonderful World card gift box

 Today’s project is a card gift box I made for a friend.  It will hold six cards, if not too bulky with a little extra room to spare.  Of course, you can make these for any season.  Be sure to check out my blog on Saturday and see the cards I made to go inside.  It features the Wonderful World stamp set and coordinating designer series paper (DSP) which you can choose as a free gift with a qualifying purchase during Sale a-bration while supplies last during July and August.  If you would like to see how I put my card box together, you can watch over on my YouTube channel HERE:


This is the box I made on my YouTube video.  
This box I made during my Facebook Live.  Dimensions are the same.  I simply used different coordinating cardstock and Designer Series Paper from the same pack Wonderful World pack of paper
 
Measurements and Supplies:
Wonderful World Stamp and DSP bundle from Sale A-Bration brochure (free gift with $100 purchase)
Fabulous Frames Dies
26" of Coordinating Ribbon of your choice (I used Soft Sea Foam Seam Binding Ribbon colored with Lt Old Olive Stampin' Blend and Satin Edged Ribbon colored with Lt. Orchid Oasis Stampin' Blend)
Box Top: Blackberry Bliss or Orchid Oasis cardstock 6 13/16 x 8 1/16", score at 1" on all four sides. 
Box Bottom:  Blackberry Bliss cardstock or Orchid Oasis 8 1/2 x 7 1/4", score at 1 1/4" on four sides.
Wonderful World DSP 4 5/8 x 5 7/8"
Orchid Oasis cardstock 4 x 5 1/4", die cut with rectangular frame from Fabulous Frames Dies
Basic White cardstock 2 3/8 x 3 1/4" for stamping and die cutting.
Rich Razzleberry or Blackberry Bliss cardstock 2 3/8 x 3 1/4" for die cutting oval frame.
Stampin' Blends in Orchid Oasis or Old Olive to color ribbon if desired.
Ink pads in Melon Mambo and Pear Pizzaz OR Rich Razzleberry and Pear Pizzaz
Sponge Daubers
Tear n Tape adhesive
Paper Snips
Brushed Brass Butterflies

I sure hope you've enjoyed my project for today.  To order any of the products I've used, click on the shopping cart in the upper right.  Please leave me a comment, I'd love to hear what you're thinking and if you plan to make this project.

Until next time; be happy, stay healthy and happy stamping!
Teresa

Saturday, July 16, 2022

Happy Holiday Vintage Christmas vase

 Happy Saturday everyone!  Hope your week has been good!  Mine has been very busy, but I'm starting a little staycation time.  Today's card is one made with Stampin' Up!'s Vintage Christmas stamp set.  You will find it in the July-December 2022 mini catalog on page 63.  It has a coordinating punch (Vintage Bottle) which can be found in the 2022-23 Annual Catalog and can be purchased in a bundle with Bottled Happiness.  If you purchase all three items during July or August 2022, you will earn a free level 1 Sale a-bration gift of your choosing!  Please remember all Sale a-bration gifts are while supplies last.  The Soft Sea Foam and Pool Party Cards and Envelopes have already sold out!  If you would like to see how I put my card together today, you can watch the replay over on my YouTube channel here:


Supplies and Measurements:
Vintage Christmas stamp set
Card Base in Thick Whisper White cardstock 5 1/2 x 8 1/2 scored at 4 1/4"
Merry Merlot cardstock 4 x 5 1/4"
Basic White cardstock 3 x 4", small scrap for stamping 1 1/2 x 3" and 3 5/8 x 4 7/8" for inside
Sun Prints Designer Series Paper 4 x 5 1/4"
Linen thread
Rustic Metallic Adhesive Dots
Ink pads in Merry Merlot, Soft Suede, Garden Green and Night of Navy
3/4" circle punch (discontinued)
masking paper
Wink of Stella glitter pen
Deckled Rectangles dies (only used to cut out inside of layers, not actually used for the card)

Thanks for stopping by today!  Please leave me a comment, I'd love to hear from you.  You can shop my online Stampin' Up! store by clicking on the shopping cart in the upper right.  Thank you, your business is appreciated!

Until next time; be happy, stay healthy and happy stamping!
Teresa


Thursday, July 14, 2022

Vintage Christmas Fall Blessing card

 It's been a very warm and busy week here in Oregon.  Today's project features the Vintage Christmas stamp set but I've tried to show you how it isn't just for making Christmas cards.  By using some different colors and a non-Christmas looking Designer Series Paper, I've turned this set into more of a fall card.  The layout for this card was from a mystery card challenge I participated in by Barb Milliken.  She gave us the pieces and sizes of cardstock and we chose the stamps and supplies.  Let's see how I put this card together.  You can watch the video replay over on my YouTube channel here: 


Supplies and Measurements:
Crushed Curry cardstock for card base 5 1/2 x 8 1/2" scored in the middle at 4 1/4"
Early Espresso cardstock 4 x 5 1/4"
Painted Christmas Designer Series Paper 2 x 4"
Basic White cardstock 2 1/2 x 3 1/4", 3/4 x 2 1/2" and 3 5/8 x 4 7/8" 
Linen Thread
Rustic Metallic Adhesive backed dots
Ink Pads in Crushed Curry, Early Espresso, Shaded Spruce and Crumb Cake
Vintage Christmas stamp set by Stampin' Up!
Hello Harvest stamp set by Stampin' Up! (for greeting)
Timeworn Type Embossing Folder
Stampin' Dimensionals
mini glue dots
Stampin' Seal adhesive
Stampin' Cut and Emboss Machine

Thanks for stopping by today!  You can purchase any of the supplies I've used on my card today in my online Stampin' Up! store by clicking on the shopping cart in the upper right.  Please leave me a comment after ordering, I'd love to hear from you!  

Until next time; be happy, stay healthy and happy stamping!
Teresa


Saturday, July 9, 2022

Shaded Summer Kindest Gnome

 Today's card features one of my most favorite stamp and die bundles from the newly released JD2022 Mini catalog by Stampin' Up!  I've also used the Summer Shadow dies which are in the annual catalog for 2022-23 and I couldn't resist adding a bit of the Sale a-bration free designer series paper called Rings of Love.  You can choose this paper absolutely free once your order reaches $50 in product and who doesn't love free.  You will find details by clicking on the shopping cart in the upper right corner.  

I just love how this card came together and doesn't that little gnome just make you smile?  You can watch how I put this card together over on my YouTube channel here:


Supplies and measurements:
Kindest Gnomes stamps and Gnomes dies bundle 159626
Shaded Summer stamp set
Summer Shadow dies 
Stitched Greenery die
Crushed Curry card stock 5 1/2 x 8 1/2", folded at 4 1/4
Crushed Curry cardstock scraps
Rings of Love DSP, two pieces each 1 x 5 1/4", and a piece 1/2" x 4 7/8
Soft Suede cardsock 2 x 5 1/4
Basic White 4 x 5 1/4, 3 5/8 x 4 7/8 and scraps for stamping and die cutting
Scraps of cardstock in Parakeet Party, Evening Evergreen, Poppy Parade and Crumb Cake 
Ink pads in Soft Suede, Crushed Curry, Poppy Parade and Momento Tuxedo Black
Stampin' Blends markers for coloring: Poppy Parade, Daffodil Delight, Petal Pink, SU 900, Soft Suede
Wink of Stella Glitter Pen
Stampin' Dimensionals and mini Stampin' Dimensionals

Thank you for stopping by today!  Please leave me a comment.  I'd love to hear from you and I would especially like to know if you recreate this card.  

Until next time; be happy, stay healthy and happy stamping!
Teresa

Thursday, July 7, 2022

Shaded Summer Square Card

 Hello and happy Thursday to everyone!  I hope you had an enjoyable 4th of July holiday celebration if you live in the U.S.  Today's project features the Shaded Summer stamps and Summer Shadow dies by Stampin' Up!  You will find them both in the 2022-23 Annual Catalog.  If you would like to purchase any of the supplies I've used today, click on the shopping cart in the upper right corner.  It will take you to my online store.  As a reminder, Sale a-bration is going on which means for each qualifying purchase of $50 USD, you earn a free item from the Sale a-bration brochure!  But you better hurry, everything is while supplies last and all will end on August 31, 2022.  


You can watch how I put this card together on my YouTube channel here:

Supplies and Measurements:
Sweet Sorbet cardstock 4 1/4 x 8 1/2" scored at 4 1/4" for card base
Basic White 4 1/8 x 4 1/8" for layering, scraps for stamping and cutting (approx quarter sheet)
Basic Black cardstock 3 3/4 x 3 3/4" and scrap for stamping sentiment
Scrap of Garden Green and 22-24 In Color Glimmer Paper in Sweet Sorbet
Shaded Summer stamp set
Summer Shadow dies
Elegant Faceted Gems
Stitched Greenery die
Ink Pads in Garden Green, Sweet Sorbet and Versamark
Wink of Stella Glitter Pen
White Embossing Powder
Heat Tool
Stampin' Cut and Emboss Machine

Thanks for stopping by today.  Be sure to leave me a comment and definitely let me know if you will be making a card like this!  

Until next time; be happy, stay healthy and happy stamping!
Teresa


Saturday, July 2, 2022

Elephant Parade mini card and pocket envelope envelope

 It's Sale a-bration time!  July 1-August 31, 2022, is the second half of this year's free earning period.  For every $50 increment you spend, you can choose a free item from the Sale a-bration brochure.  The increments are accumulative, so the more you spend, the more you earn!  Be sure to check out the details by clicking on the shopping cart to the right.  The items in the brochure are usually exclusive to this promotion.  

The card I'm showing you today, is a card I was inspired to make based on a card I saw Wendy Cranford make.  I made a card from her sketch and after completing it, I decided to take that card even further and make an A2 standard card with the mini card on the front and add a pocket envelope inside of that for a gift card or money.  I hope you like how I've put this together.  It would make a great card for any and all occasions in which you might want to add a little gift.  You can watch how I put this card together, and see my original card in my FB Live replay over on my YouTube channel here:

Front of the card
Inside view of the mini card on the front.
Inside view of the regular A2 card base.

Measurements and supplies:
Card Base 5 1/2 x 8 1/2", scored at 4 1/4" in Basic White Thick cardstock.
Mini card base 3 1/8" x 8 1/2", scored at 4 1/4" in Basic White cardstock.
Inside Layer, Basic White 3 5/8" x 4 7/8"
Scraps of Basic White for stamping and die cutting
Scraps of Soft Sea Foam cardstock for die cutting
Rich Razzleberry  two pieces 4 x 5 1/4" and one piece 2 5/8 x 3 7/8" 
Wonderful World Designer Series Paper and Stamp Set (available as a Sale a-bration free choice, July 1-August 31, 2022) cut at 2 x 3 1/4" and additional piece approximately 4 1/2 x 5 1/4" for inside mini pocket.
Twigs and Sprigs Embossing folder and Die 159168
Elephant Parade Bundle (Elephant Parade stamps and Elephant Dies) 158695
Biggest Wish stamp set for inside greeting (or use what you have on hand)
Mini Pocket Envelope Dies 159167
Stampin' Blends markers in Melon Mambo, Smokey Slate, Lt. Petal Pink
Ink Pads in Momento Basic Black, Pear Pizzaz and Rich Razzleberry
Wink of Stella Glitter Pen
Blending Brush
Stampin' Cut and Emboss die cutting machine

Until next time; be happy, stay healthy and happy stamping!  Have a safe and happy July 4th holiday if you live in the U.S. 
Teresa