Showing posts with label gift card. Show all posts

Wednesday, July 23, 2025

Locking gate fold gift card box with July 2025 Online Exclusives

Hey everyone!  I've got a box I think is unique I put together.  I've designed it to be a gate fold box with a locking mechanism and sized to fit a gift card perfectly.  I hope you find it useful, I sure had fun creating it.  Free Shipping starts today, July 23 and runs through July 25, 2025.  Be sure to click on the shopping cart for my Stampin' Up! online store, and get your free shipping on orders of $75 or more before tax and after any rewards or coupons are used.   

Be sure to watch the video tutorial for how I put my box together over on my YouTube channel. 


Supplies and Measurements:
Fright Night bundle* 166107 (includes stamps & coordinating dies)
Spooky Sweet Halloween 12 x 12 Specialty DSP   
    (2 pieces) 7/8" x 3 3/8"
    (2 pieces) 7/8" x 2 1/8"
    (2 pieces) 1" x 3 3/8"
    Images punched out from the ephemera sheet
Petunia Pop two-tone cardstock scraps
Granny Apple Green cardstock scrap
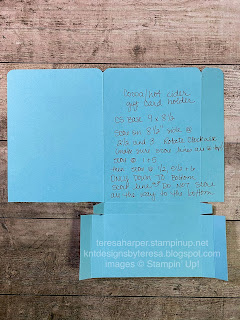
Basic Black cardstock for the box, 6" x 7 1/2"
    Score on 6" side at 1/4" & 1 1/4" each end
    Score on 7 1/2" side at 1/2" 1 5/8" & 2 5/8"
Basic White cardstock for tag
Baker's Twine Essentials Pack 155475
Shimmer Star Foam Stickers 166202
Ink Pads: Petunia Pop, Memento Tuxedo Black
Wink of Stella Glitter Brush 141897

Thanks so much for stopping by today!  I appreciate you so much.  To order your Stampin' Up! supplies, click on the shopping cart to the left.  If you give this box a try, please share with me over on my KnT Designs Stampers Group Social page over on Facebook.  I would love to see what you made and what you found to fit inside.

Until next time; be happy, good health to you and happy stamping!
Teresa

*Purchasing bundles saves 10% over the individual piece prices when combined.  You must use the bundle item code for the 10% bundle discount.  When purchasing Last Chance items; be sure to check if the individual piece prices are discounted.  Individual piece prices could be less expensive if the discounts are deep enough.

Saturday, July 5, 2025

Cheers to a double flap fold over gift card pocket

 Happy Saturday everyone and welcome to my blog.  This card was created to be a complement to the treat box I shared on Wednesday.  The box opening is similar to this card.  Now, I didn't create this fold, I just came up with my own measurements and recreated the inside portion as I've seen multiple do in the past.  I used my own measurements so they may not be the same as others.  You can find the video tutorial for this card over on my YouTube channel.  


Supplies and Measurements:
Cheers & Sips bundle* 165594 (includes stamps and coordinating dies)
Lovely & Sweet dies 162626 (last chance, heavily discounted while supplies last!)
Fright Night dies 166106 (can be purchased in a bundle*166107 with stamps to save 10%)
More Messages die 165472 (can be purchased in a bundle* with coordinating stamp)
Glass and Garden embossing folders (Glass) 165597
Celebratory Sips Designer Series Paper 165586
    2 1/2" x 4" landscape orientation
Blackberry Bliss two-tone cardstock (2 Pieces)
    4 1/4" x 12", score at 4' & 9 1/2"
    4" x 3 3/4"
Blackberry Bliss cardstock for tag & flowers
Bubble Bath cardstock for largest tag & flowers
Basic White cardstock for stamping & inside piece 3 1/2" x 5 1/4" scored at 3/4"
2024-2026 In Color Flat Pearls 165266
Stampin' Blends alcohol markers: Blackberry Bliss, Strawberry Slush
Ink Pads: Blackberry Bliss, Strawberry Slush, Bubble Bath
Iridescent Striped Trim 163299 (last chance, heavily discounted while supplies last)

Thanks so much for stopping by today.  I truly appreciate you!  To order your Stampin' Up! supplies from my online store, click the shopping cart in the upper right.  I would be every so grateful for your business.

Until next time; be happy, good health to you and happy stamping!
Teresa

*Purchasing bundles saves 10% over the individual piece prices when combined.  You must use the bundle item code for the 10% bundle discount.  When purchasing Last Chance items; be sure to check if the individual piece prices are discounted.  Individual piece prices could be less expensive if the discounts are deep enough.

Saturday, April 19, 2025

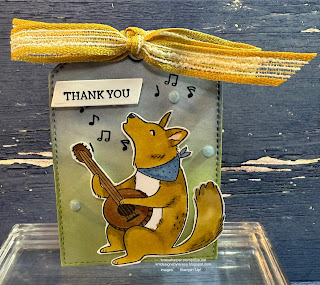
Musical Jamboree Thank you treat box made with tag dies

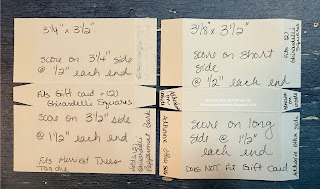
 I have a treat box made with the tag from Merriest Trees dies for you today.  I’ve combined it with the singing coyote from Musical Jamboree.  I thought this would make a cute music teacher’s gift.  It can fit a gift card and Ghirardelli chocolate squares if you use the larger template (3 1/4" x 3 1/2") which fits the sides of the tag exactly.  The smaller template (3 1/8" x 3 1/2"), does not fit a gift card and fits just inside the stitching on the tag.  I’ve included both sizes here, they’re made exactly the same way, using the same scoring measurements and cutting directions.   Check out the video replay over on my YouTube channel to see how I’ve put it together.  


Supplies and Measurements:

Last Chance items (while supplies last):
Musical Jamboree stamp set 163616
Merriest Trees dies 162047 *discounted (coordinating stamps also discounted)
Wild Wheat Rustic Striped Ribbon (about 14") 164061 *discounted
Stampin' Blends: Wild Wheat & Boho Blue *both are discounted
2023-2025 Opaque Sparkle Gems 163782 *discounted 
Wild Wheat cardstock 3 5/8" x 8 1/2" (already retired as inventory was depleted) 
        Substitute Mossy Meadow or Crumb Cake if needed.
    Cut two pieces from the 8 1/2" strip at 2 5/8" for tags, trim remaining piece to 3 1/4" x 3 1/2"

Current product not on the last chance list:
Ink Pads: Mossy Meadow, Night of Navy, Secret Sea (sneak peek item coming 5/2025), Memento Tuxedo Black
More Messages die 165472 (sneak peek item coming 5/2025)
Mixed Labels stamp set 164643 (for thank you sentiment)
Basic White cardstock for stamping & for the tag and sentiment label
Stampin' Blends alcohol markers: Pecan Pie & Petal Pink
Paper Snips 103579

I hope you have enjoyed some inspiration for using the Musical Jamboree stamp set along with the die from Merriest Trees.  I've used that one die for so many different projects.  It's such a great size and I love the stitching!  To order your last chance items (or any other Stampin' Up! products), click on the shopping cart to the right.  I would truly appreciate your business.  

Until next time; be happy, stay healthy and happy stamping!
Teresa


Sunday, January 5, 2025

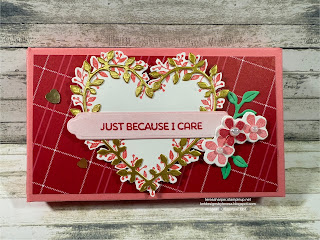
Sneak Peek of Heart Shaped Just Because I Care fold over treat box

 Hello everyone.  I hope you like the sneak peek of one of this year's Sale a-bration offerings by Stampin' Up!  This is a level 2 set which includes a photopolymer stamp set and coordinating dies.  I found some Italian milk chocolate hearts at my local Home Goods store and knew I would need to make a treat box to share them in.  I designed two boxes, one with reinforced sides and front and the other with just a reinforced front so I could get two boxes from one sheet of cardstock if I were to make a bunch of them.  I like to design boxes which allow me to get multiples from one sheet of cardstock.  If you would like to see how I've put this box together, be sure to watch the replay over on my YouTube channel.  


Supplies & Measurements:
Heart Shaped bundle 164946 (free with qualifying purchase Jan 7-Feb 28, 2025)
Just Adored DSP (Last Chance item 162976 while supplies last)
    (1) 4" x 2 1/4", (2) 4" x 3/8" & (2) 2 1/4" x 3/8"
Flirty Flaming Cardstock 7" x 6 1/4" Reinforced sides and front box (1 box from 8 1/2" x 11" sheet)
    Score on 7" side at 1/2", 1", 3 1/2", 4" & 6 1/2"
    Score on 6 1/4" side at 1/2" & 1" from each end
Flirty Flamingo Cardstock 7" x 5 1/4" for Reinforced front only box (2 boxes from 8 1/2" x 11" sheet)
    Score on 7" side at 1/2", 1", 3 1/2", 4" & 6 1/2"
    Score on 5 1/4" side at 1/2" each end
Basic White cardstock for stamping
Brushed Silver & Gold 12 x 12 Specialty Paper 164861
Ink Pads: Flirty Flamingo, Real Red 
Stampin' Blends: DK Shy Shamrock
Adhesive-Backed Heart Sequins 164920
Iridescent Pearls Basic Jewels 158987
small blending brush 160518

Thanks so much for stopping by.  I hope you find this treat box useful.  If you make one, I hope you will share on the Stampers Group Social on Facebook.  Tell us what you found to fit inside the box.  We would love to hear.

Until next time; be happy, stay healthy and happy stamping!
Teresa


Sunday, December 8, 2024

Seasons Greetings Scalloped gift card treat box

 I have another gift card treat box for you today.  After making the box on Tuesday with the scalloped treat boxes from Stampin’ Up!®️  , I decided you should have an alternative you could make right away with supplies you already have on hand.  So I took a box I had previously made, and altered it to make the scalloped gift card box you see today.  It is perfectly sized to fit a gift card and holds six Dove chocolates perfectly.  If you find something else to fit, please let us know what that is.  To see how I put the box together, be sure to watch the video replay over on my YouTube channel.  


Measurements and Supplies:
Winterly Tree Tops bundle 164066 (last chance list)
Greetings of the Season bundle*164113 (includes stamps and dies)**
Bright Skies dies 162793 (for scalloped edge on box top)
Real Red cardstock 5" x 6 3/4"
    score on 5" side 3/4" from each end and on 6 3/4" side at 3/4" & 3" from each end.
Nests of Winter 12 x 12 DSP, Pool Party snow pattern
    3 3/8" x 2 1/8" (2 pieces), 3 3/8" x 5/8" (2 pieces) & 2 1/8" x 5/8" (2 pieces)
Basic White cardstock for stamping and die cutting 
Ink Pads: Real Red & Memento Tuxedo Black
Stampin' Blends alcohol markers: Real Red, Shaded Spruce, Pool Party, Copper Clay
Wink of Stella Glitter Brush 141897
Stampin' Cut & Emboss machine (or other die cutting machine)
Adhesives of choice (I used Tombow Multi Purpose liquid glue, Stampin' Dimensionals, Stampin' Seal and mini glue dots.  

Thanks so much for stopping by and I hope you found this gift card box useful and will give it a try.  Please share with us over on the Knt Designs Stampers Group Social over on Facebook if you do and tell us what you found to fit inside.

Until next time; be happy, stay healthy and happy stamping!
Teresa

*purchasing bundles saves 10% over the individual piece prices when combined.  You must use the bundle item code for the 10% bundle discount.

**Online Exclusives items can be while supplies last.  If they are in the store, they are available for purchase.  If they say Currently Unavailable, the stock will be replenished.  If they are no longer in the store, unfortunately, they will not return. 


Saturday, November 23, 2024

Naughty & Nice Fun Fold pocket gift card holder

For my card today, I'm using Naughty and Nice from the Online Exclusives section of my Stampin' Up! online store.  When I started, I wanted a card that was more than a card, yet still quick and simple to put together.  This card came about from a tag I made.  I showed that tag to my oldest granddaughter, who exclaimed Santa tags!  Well, that meant I couldn't very well show how to make the exact card so......I thought about how to change the tag and make a card with it....this is the result of my thought process.  I hope you find it useful.  Of course, you can change this layout to fit any occasion just by changing the stamps and colors.  

To see how I've put this card together, be sure to watch the video replay over on my YouTube channel.


Supplies & Measurements:
Naughty & Nice stamp set 164358
Seasons of the Greetings bundle 164113* (includes stamps 164325 and dies 164112)
1 3/4" circle punch 119850
Thick Basic White cardstock 4 1/4" x 5 1/2"
Basic White cardstock for stamping and die cutting & inside piece 3" x 4"
Take a Bow 6x6 DSP, 2 pieces 1" x 4 1/8"
Bubble Bath cardstock 3 1/4" x 8 1/2", scored in center at 4 1/4"
Real Red cardstock approx. 3" x 3 3/4" for die cutting pocket
Real Red & White Peppermints 164050
Real Red & White Baker's Twine 164051
Ink Pads: Real Red, Bubble Bath, Shaded Spruce, Shy Shamrock, Tuxedo Memento Black
Stampin' Blends markers: Shaded Spruce, Shy Shamrock, Dk Real Red
Shy Shamrock Stampin' Write marker
Wink of Stella Glitter brush 141897
Paper Snips for fussy cutting
favorite strong adhesive (I used Tombow multipurpose liquid glue & Stampin' Seal)

I hope you find this pocket gift card useful and will make some of your own.  To order your Stampin' Up! supplies, click on the shopping cart in the upper right.  I'd love to earn your business, it helps keep making these projects for all of you.

Until next time; be happy, stay healthy and happy stamping!
Teresa

*purchasing bundles saves 10% over the individual piece prices when combined.  You must use the bundle item code for the 10% bundle discount.

**Online Exclusives items can be while supplies last.  If they are in the store, they are available for purchase.  If they say Currently Unavailable, the stock will be replenished.  If they are no longer in the store, unfortunately, they will not return. 


Wednesday, October 16, 2024

Christmas Friends gift card & treat top tuck tab box

Today I have a treat box for you that will hold 6 Dove chocolates and a gift card.  I've decorated it with the Christmas Friends bundle by Stampin' Up!  This set is so cute, I definitely love creating with it.  If you would like to see how I put my box together, watch the video replay over on my YouTube  channel.


Measurements & Supplies:
Christmas Friends bundle 164088* (includes stamps 164279 & coordinating dies 164087)
Greetings of the Season dies 164112**
Stylish Shapes dies 164112
Thick Basic White cardstock 5" x 6 3/4"
    score on 5" side at 3/4" each end
    score on 6 3/4" side at 3/4" & 3", each end
Take A Bow 6x6 DSP 164309
    1 piece 3 3/8" x 2 1/4" 
    2 pieces 5/8" x 2 1/8"
    2 pieces 5/8" x 3 3/8"
Scraps of Basic White for stamping
Real Red cardstock for Stylish Shape circle
Granny Apple Green cardstock for tag die from Greetings of the Season
Real Red & White Peppermints 164050
Ink Pads: Garden Green, Memento Tuxedo Black
Stampin' Blends alcohol markers: Lt Petal Pink, Granny Apple Green, Real Red, Lt Gray Granite, Color Lifter
Wink of Stella Glitter Brush 141897
Real Red & White Baker's Twine 164051

I hope you find this box useful and will make some for your friends/family.  To order your Stampin' Up! supplies, click on the shopping cart in the upper right.  

Until next time; be happy, stay healthy and happy stamping!
Teresa

*purchasing bundles saves 10% over the individual piece prices when combined.  You must use the bundle item code for the 10% bundle discount.

**Online Exclusives items can be while supplies last.  If they are in the store, they are available for purchase.  If they say Currently Unavailable, the stock will be replenished.  If they are no longer in the store, unfortunately, they will not return. 

Saturday, December 23, 2023

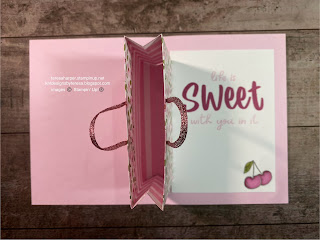
Simply Sparkling pop-up gift bag card for all occasion

 Happy Saturday!  Only two more days until Christmas, can you believe it?  Here's a little last minute gift card holder you can make with supplies you have on hand.  You can watch the video replay to see how I put this card together on YouTube.  It really isn't very difficult and can be accomplished in under an hour from start to finish.  I've made my card as a birthday card, but it can easily be adapted for Christmas or any occasion.  Imagine the look on your recipient's face, when they open it!  


Supplies and Measurements:
Simply Sparkling bundle 162871 (bundle includes stamps 162866 & dies 162870)*
Sweetest Cherries stamp set 158711 for inside sentiments
Perenial Postage dies 162607 (Available beginning January 4, 2024)
Banner Pick a Punch 153608
Bubble Bath cardstock, 5 1/2" x 8 1/2", scored in center at 4 1/4" & 3/4 x 2 1/2"
Basic White cardstock for stamping, inside layer 3 3/8" x 4 5/8" & outside approx. 3 1/4" x 4 1/2"
Delightfully Eclectic DSP , 4 x 10 1/2" for pop-up gift bag
    score on 10 1/2" side at 1/2", 1", 5", 5 1/2", 6" & 10"
    score on 4" side at 1/2" & 3"
Bold & Bright DSP 161449 for outside card layer 4 x 5 1/4" (or use Delightfully Eclectic)
Wink of Stella glitter brush
ink pads: Basic Gray, Bubble Bath, Berry Burst
Stampin' Blends: Dk Bubble Bath, Old Olive, Berry Burst
Metallic Woven Ribbon in Sweet Sorbet 159200
1/8" hole punch
tear & tape adhesive 154031

Have a very Merry Christmas or holiday season of your faith!  Thanks so much for supporting me all year, I really appreciate it.

Until next time; be happy, stay healthy and happy stamping!
Teresa


*When purchased in a bundle, you save 10% over the combined priced of individual items.

Saturday, June 24, 2023

Hey Chuck, Rise & Shine gift card pocket fun fold

 Happy Saturday!  Today is a fun fold gift card project.  I love to make these little surprise fun fold cards.  The Mini Pocket dies by Stampin’ Up! makes them so quick and easy to do!  Everyone should have this die set in their stash.  I hope you like this project and give it a try.  To see how I put it all together, watch the video replay on my YouTube channel HERE:


Measurements and Supplies:
Hey Chuck bundle (161553 stamps & dies with 10% savings)
Rays of Light stamp 158925
Mini Pocket dies 159167
Exposed Brick 3d Embossing Folder
Inked Botanicals Designer Series Paper 161157, approx 4 1/2 x 6  for die cutting
Crushed Curry card stock 5 1/2 x 8 1/2", scored in center at 4 1/4"
Basic White card stock 3 1/4 x 9 1/2", scored in center at 4 3/4", 2 3/4" x 4", (2 pieces each) 3 x 4 1/4" & scraps for stamping and die cutting
Pecan Pie cardstock 3 1/4 x 4 1/2"
Ink Pads: Pebbled Path, Crushed Curry
Stampin' Blends alcohol markers for coloring: Real Read, Boho Blue, Lt Gray Granite, Ivory, Pecan Pie, Lt Pebbled Path, Lt Lost Lagoon
Crushed Curry Stampin' Write marker

Thank you so much for stopping by today!  Please order your Stampin' Up! supplies from my online store by clicking on the shopping cart in the upper right.  Click the menu icon and shop products.  I would be ever so grateful for your business!

Until next time; be happy, stay healthy and happy stamping!
Teresa


Saturday, June 3, 2023

Gone Fishing tackle gift box

 Happy Saturday!  Welcome to the weekend.  Today, I’m attending our monthly craft day and really enjoying some girl time with my friends.  I hope you can find some time soon to do the same.  As a reminder, through the end of this month, there is a Designer Series Paper sale going on with selected papers from the Stampin' Up! 2023-2024 Annual Catalog.  You can find these in my online store here: https://www.stampinup.com/categories/specials/designer-series-paper-sale?demoid=2109129

Onto our gift box!  I designed this box to fit the tackle box top die in the Gone Fishing bundle by Stampin’ Up!  I love how it turned out.  I was thinking this box could hold fishing tackle for your favorite fisherman or Swedish Fish and a gift card so he can shop for his tackle.  I got too sick after I designed the box, to go shopping for the right size bag, so I used Hershey Nuggets instead.  This could be used for Father’s Day, birthday, retirement or any other occasion you would like it for.  Change the colors, make it a makeup case, jewelry box or whatever you like.  Women like to fish also, so change up those colors and make one for her!  You can watch the video replay over on my YouTube channel HERE:


Measurements and Supplies:  
Gone Fishing bundle (stamps and coordinating Gone Fishing dies)
Misty Moonlight cardstock, 10 3/4" x 7" for box, scored as shown on template above.
    three pieces approx 4" x 5 1/8", die cut all three pieces with the inner divided tackle die
    one piece 3 5/8" x 4 7/8" to mount the three stacked tackle die pieces above on. 
Boho Blue cardstock, approx 1 3/4" x 2"
small Silver Foil scrap
Small Smokey Slate scrap
Very Vanilla scrap for stamping and die cutting images
Tinsel Gems three-pack
Ink Pads: Pebbled Path, Daffodil Delight, Old Olive, Lemon Lime Twist, Boho Blue, Azure Afternoon, Sweet Sorbet, Calypso Coral, Misty Moonlight.
Wink of Stella glitter brush
corner rounder
1/2" circle punch
Stampin' Cut & Emboss machine

I sure hope you give this project a try.  I do love how it turned out and I'm hoping my husband will love it also.  As a reminder, I will be gone for the next two weeks, but will return with more content on 
June 22.  I hope to see you back here then.  

Until next time; be happy, stay healthy and happy stamping!
Teresa


Thursday, June 1, 2023

Gone Fishing double flap gift card box

 Before we get on to today’s project, I want to let you know I’ll be out the next two weeks.  Next week will be the final high school concert for my granddaughter and a lot of rehearsals for her final ballet performance.  The following week we are busy with final rehearsals and the performances.  I will return the week of June 21st with more fun-filled content.  Also, there is a Designer Series Paper sale which starts today, June 1 and runs through the end of the month, 15% on select papers from the 2023-24 Stampin' Up! Annual Catalog.  You will find those here: https://www.stampinup.com/categories/specials/designer-series-paper-sale?demoid=2109129

Now, onto our projects for the week.  Today I have a double flap gift card box which uses just 1/2 sheet of cardstock.  I designed this specifically to fit a gift card and stay within 1/2 sheet of cardstock.  It will hold six small chocolates as well.  It uses my featured bundle for the week Gone Fishing by Stampin’ Up!  To see how I put this box together, please watch the video replay over on my YouTube channel HERE:


Measurements and Supplies:
Gone Fishing bundle (includes stamp set and coordinating Gone Fishing dies)
Layering Leaves stamp set for outside sentiment (or use what you have)
Wild Wheat cardstock for box, 8 x 5 1/2", score as per template above
Gone Fishing DSP, 2 pieces each 2 1/8 x 3 3/8"
Boho Blue cardstock, approx 1 1/4 x 2 1/2" for front, 
    inside sentiment piece 1 1/4" x 2 1/4" OR 1 3/4" x 2" (if using Father's Day sentiment)
Scrap Very Vanilla cardstock for stamping and die cutting images
Ink Pads:  Misty Moonlight, Wild Wheat, Calypso Coral, Pebbled Path
linen thread
Wink of Stella glitter brush
Rustic Metallic Dots
3/8" Velcro Thin Clear Fastener 

I hope you give this project a try when yu need a gift card box next.  It would also be great for a graduate, birthday, wedding, etc.  

Until next time; be happy, stay healthy and happy stamping!
Teresa


Saturday, July 2, 2022

Elephant Parade mini card and pocket envelope envelope

 It's Sale a-bration time!  July 1-August 31, 2022, is the second half of this year's free earning period.  For every $50 increment you spend, you can choose a free item from the Sale a-bration brochure.  The increments are accumulative, so the more you spend, the more you earn!  Be sure to check out the details by clicking on the shopping cart to the right.  The items in the brochure are usually exclusive to this promotion.  

The card I'm showing you today, is a card I was inspired to make based on a card I saw Wendy Cranford make.  I made a card from her sketch and after completing it, I decided to take that card even further and make an A2 standard card with the mini card on the front and add a pocket envelope inside of that for a gift card or money.  I hope you like how I've put this together.  It would make a great card for any and all occasions in which you might want to add a little gift.  You can watch how I put this card together, and see my original card in my FB Live replay over on my YouTube channel here:

Front of the card
Inside view of the mini card on the front.
Inside view of the regular A2 card base.

Measurements and supplies:
Card Base 5 1/2 x 8 1/2", scored at 4 1/4" in Basic White Thick cardstock.
Mini card base 3 1/8" x 8 1/2", scored at 4 1/4" in Basic White cardstock.
Inside Layer, Basic White 3 5/8" x 4 7/8"
Scraps of Basic White for stamping and die cutting
Scraps of Soft Sea Foam cardstock for die cutting
Rich Razzleberry  two pieces 4 x 5 1/4" and one piece 2 5/8 x 3 7/8" 
Wonderful World Designer Series Paper and Stamp Set (available as a Sale a-bration free choice, July 1-August 31, 2022) cut at 2 x 3 1/4" and additional piece approximately 4 1/2 x 5 1/4" for inside mini pocket.
Twigs and Sprigs Embossing folder and Die 159168
Elephant Parade Bundle (Elephant Parade stamps and Elephant Dies) 158695
Biggest Wish stamp set for inside greeting (or use what you have on hand)
Mini Pocket Envelope Dies 159167
Stampin' Blends markers in Melon Mambo, Smokey Slate, Lt. Petal Pink
Ink Pads in Momento Basic Black, Pear Pizzaz and Rich Razzleberry
Wink of Stella Glitter Pen
Blending Brush
Stampin' Cut and Emboss die cutting machine

Until next time; be happy, stay healthy and happy stamping!  Have a safe and happy July 4th holiday if you live in the U.S. 
Teresa


Saturday, December 11, 2021

Snowflake Wishes Cocoa Packet with Greeting Card and Gift Card Pocket

Hello everyone!  Today is Project 9 of the 12 Projects of Christmas.  I have a great gift option for you today.  First off, let me thank Dawn Griffith of Dawn's Stamping Thoughts for the inspiration for this project.  When I saw her make one, I just knew I had to make one with the Snowflake Wishes stamp set.  I love how it turned out and I hope you do too!  Now without further ado, let's get started.


This card holds anything that is 1/2" thick or less so you have quite a few possibilities for treats inside.  My pouch holds a packet of cocoa, Ghirardelli chocolate and a chocolate peppermint stir stick.   

The surprise of the cocoa pouch is that it opens up to a full-size greeting card and a gift card pocket!  You can see how to make this project by clicking here https://youtu.be/XBZttt0RLmA 
Below is the measurements and cutting template for the card and box.  


Supplies:
Pool Party cardstock 9x 8 1/2"
Basic White cardstock for inside sentiment panel 3 3/4 x 5 1/4
Designer Series Paper 2 pieces 3 3/4 x 5 1/4, 2 1/4 x 3 3/4 and 3/4 x 5 1/4 
Ink Pads in Pool Party, Highland Heather, Pacific Point and Versamark
White embossing Powder
Blending Brushes
Stitched Rectangle dies
Snowflake Wishes stamp set
Stampin' Cut and Emboss machine
Pool Party striped grosgrain ribbon

Thanks for stopping by today!  I'm so happy you did.  Please leave me a comment, I'd love to hear from you.  If you need to pick up some Stampin' Up supplies, click on the shopping cart in the upper right.  It will take you to my online store where you can shop 24/7.  I'd love to earn your business.

Until next time; be happy, stay healthy and happy stamping!
Teresa

Saturday, December 4, 2021

Classic Cloche Village Project 4 of the 12 Projects of Christmas

 It’s Project 4 of the 12 Projects of Christmas today and we are using the Classic Cloche stamp set and  Cloche dies you Stampin’ Up!  (on sale while supplies last for $14.50).  I do so hope you are enjoying these projects as much as I am.  As a quick reminder check out the last chance sale and the clearance rack in my online store.  Click on the shopping cart in the upper right corner.

You can watch the FB Live replay over on YouTube here https://youtu.be/nqAsa68-22c  to see how I made these cards.


Supplies and measurements:
Card base for standard A2 in Soft Succulent 5 1/2 x 8 1/2”
Card base for gift card holder in Soft Succulent 5 1/2 x 9 scored at 3 1/4 & 7 1/2”
3rd largest stitched rectangle in Basic White
Ever Eden Designer Series Paper 2 11/16 x 1/2” // 1 5/8 x 5 3/8 (if making gift card holder card base)// 3 3/8 x a hair less than 4 11/16
Evening Evergreen cardstock cut with largest scalloped contour die
Soft suede cardstock 5/16 x 2 3/4
Gold 6x6 specialty cardstock to diecut cloche base.  Use an adhesive sheet on back prior to die cutting.
Stamp pads in Smokey slate, basic gray, Sahara sand, Cherry cobbler and pool party
Thank you for taking time out of your day to spend it with me.  Leave me a comment, I’d love to hear from you.  To order supplies, click on the shopping cart.  I’d really appreciate your business.

Until next time; be happy, stay healthy and happy stamping!
Teresa

Friday, December 3, 2021

Snowman Season Pop-up Mini Gift Bag card

 Today is project three of the 12 Projects of Christmas.  I hope you are enjoying this series.  The project today is a card AND a holder for a gift card or money.  You can watch the video by clicking here https://youtu.be/KLRk1w2M5Mk   It will take you to my YouTube channel where you can see how I put this card together.  It's best explained by watching.  I was inspired by Rachel Tessman who showed how to make the pop up mechanism for the card.  For my card I used the stamp set Snowman Season by Stampin’ Up!  I love these little snowman.  


Here’s a look at the inside of the card.  

This card will fit in a standard A2 sized envelope which you can find in my online store as a medium envelope.
Supplies needed:
Card base in real red 5 1/2 x 9;scored at 3 1/4 and 7 1/2”
Real red 2 3/4 x 3
Basic white cardstock 4 x 10 1/2   Score on long side at 1/2, 1, 5, 5 1/2, 6 & 10. Score on short side at 1/2 & 3”
Designer Series Paper Gingerbread and Peppermint  3 x 5 1/4 in Portrait if directional, two pieces 1 1/4 x 5 1/4 also portrait.
Basic White for inside cut at 3 3/8 x 5 1/4”
Basic White for front 2 5/8 x 2 7/8”
Two low profile magnets to hold card closed.
Simply Elegant trim for bag handles, two pieces 3 1/4 long
Stampin’ Blends in Real Red, Old Olive, light Pool Party, light Pumpkin Pie, light gray granite
Real Red ink pad

Here is a template for cutting and scoring the mini gift bag for the inside

I hope you’ve been inspired by my project today and will find it useful.  Thank you for stopping by!  Please leave me comment.  To purchase any supplies, click on the shopping cart in the upper right corner.  

Until next time; be happy, stay healthy and happy stamping!
Teresa