Thursday, February 28, 2019

By the Bay sunset of hope card

For my project today, I made a card for a my friend who was knocked over by her dog and suffered a broken shoulder which required a shoulder replacement surgery.  Ouch!  I hope she likes it.  The sentiment comes from High Tide which can be found in the annual catalog.  The house is a FREE Sale-a-Bration stamp set called By the Sea which can only be earned with a purchase of $50 or more through the end of March 2019.  I used our watercolor pencils to color in the scenery.  The sunset background is sponged using sponge daubers and the following colors of ink:  So Saffron, Mango Melody, Pumpkin Pie, Highland Heather, Pacific Point and Night of Navy.  The water is sponged using Balmy Blue and the waves were stamped in Bermuda Bay and also come from the High Tide stamp set.  This is attached to a larger piece of whisper white cardstock which has also been stamped with the same scene from By the Bay and then mounted on a card base of Mango Melody.  My inspiration is from the Sale-a-Bration brochure and I added my own touches.


For the inside of the card, I used the birds from the same set to stamp along the bottom and sea shell to stamp over the sentiment which is taken from the Flourishing Phrases stamp set.  I also added these elements to my envelope prior to mailing.  


Thanks for taking time from your busy day to stop by my blog today.  If you are interested in purchasing any of the items I used today, please click on the shopping cart in the upper right.  It will take you directly to my online store.  I would love to earn your business.  I hope you’ve received some inspiration today.  Please leave me a comment, I would love to hear from you.  Make it a great day and happy stamping!

Monday, February 25, 2019

Love is a cup of tea

Tea Together is one of the stamp sets which first caught my eye in the Occasions catalog.  I love it, but wasn’t going to get it because it needed framelits to go along with it and I kept the retired set from a couple of years back which is called Have a Cuppa.  Stampin’ Up! didn’t disappoint!  The framelits are offered in the Sale-a-Bration catalog as a FREE item!  It doesn’t get much better than that in my book.  The teapot and cup are colored with Stampin’ Blends markers in Pool Party light and dark.  The flowers are colored with Flirty Flamingo light and dark and Pineapple Punch light and dark markers.  I used the coordinating framelits to cut them out.  My card base is Flirty Flamingo.  Did you notice the marbled background layer?  This comes from the Petal Promenade Designer Series Paper which has one side of each sheet in flowers and the opposite side has marbled backgrounds.  It is perfect for this card.  The sentiment is from the same Tea Together stamp set.  It is stamped on a piece of Whisper White and cut out using the Stitched Labels framelits which I’ve altered to fit the sentiment.  The scalloped border is from the Be Mine Stitched framelits available in the Occasions catalog.  The lace doily is from the colored doilies pack.  You get 24 doilies in four colors, Flirty Flamingo, Coastal Cabana, Grapefruit Groce and Old Olive for $4.50. They are white on the reverse side so you can easily ink them with Stampin’ Blends, sponges/sponge dauber to make them any color to fit your project.  I used the Coastal Cabana here.  If coordinates quite nicely.


The photo below shows how I masked off the area to stop the flowers on the body of the teapot.  I first stamped the teapot on a Post-It note paper, then used the framelits to cut out the teapot.  Next I used my paper snips to trim out the inside area.  I keep this mask inside the stamp set for future use.


This card could be used as a birthday card, Mother’s Day card or just because.  I love how it turned out.

Thanks for taking time from our busy day to stop by my blog.  Please leave me a comment.  I’d love to hear from you.  If you would like to purchase any of the items I’ve used today, please click on the shopping cart in the upper right.  Until March 31, for every $50 you spend on product, you will earn a free Sale-a-Bration item.  If you spend $100, you can choose two level 1 items or one level 2 item which would earn you the Team Time framelits if you so choose.

Thursday, February 21, 2019

Beauty Abounds as Part of My Story

I’m loving the Beauty Abounds stamp set out of the Occasions catalog.  It makes simple and quick cards.  I used one of the Bokeh dots images from this set.  The butterfly stamp is from Butterfly Gala.  Here I paired it with Part of My Story which is a Sale-a-Bration item you can earn for free.  The card also has a strip of the Botanical Butterfly Designer Series Paper which is also a free Sale-a-Bration item.  Colors used are Mango Melody, Flirty Flaming, Lovely Lipstick and Lemon Lime Twist.  This card was very easy to make a set of four quick cards and envelopes, ready for gift giving, or very easily mass produced if you’re in need a lot of cards for a special event.  I used these as customer thank you cards this month.


I hope you’ve found some inspiration day and thank you for stopping by my little blog today.  If you’d like to purchase any f the items I’ve used, please click on the shopping cart and it will take you directly to my online store.  If you’d like to join my team and earn a discount, now is the time to join as we have a great deal.  All the details can be found on my shopping page.  

Please leave me a comment, I’d very much love to hear from you.  Thanks again for stopping by and happy stamping.  

Monday, February 18, 2019

Butterfly Gala with marble and ghosting techniques

This card turned out so beautifully.  It could be used for most any occasion including Valentines Day.  To make the background, I stamped my butterfly images on glossy white card in Versamark ink.  I then used alcohol on a cotton swab and added two drops each of Coastal Cabana, Balmy Blue and Bermuda Bay, tapping lightly all over the card until I was happy with the color.  To finish it off, I added a pearlized doily.  My sentiment is from the same stamp set and stamped in Bermuda Bay ink on a Decorative Label punch out inked around the edges with Coastal Cabana ink.  The final element is a stamped butterfly from the Butterfly Gala set, stamped in Moment black ink and sponged with dauber using the same three inks used in the background.  I used the Butterfly Duet punch to punch it out.  The stamp set and punch can be purchased separately or as a bundle which saves you 10%.  Finally, the focal image is mounted on a standard A2 card base in Bermuda Bay.  I was very pleased with the final result as the background started out as a play around with the ghosting technique, then just seeing what would happen if I added the marbling technique as well.  I did find lighter colors work better than the dark, or at least in my play.


Thanks for stopping by my blog and taking time from your busy day.  It’s very much appreciated.  Click on the shopping cart in the upper right to go to my online store where you can order any Stampin’ Up! supplies you might want.  It’s Sale-a-Bration time until March 31 which means you can earn free product for each $50 in product you purchase.  Details can be found in my online store.  Should you have any questions, feel free to leave me a comment and I’ll be happy to answer them for you.

Please leave me a comment and give me your thoughts.  Make it a great day and happy stamping!
Teresa


Thursday, February 14, 2019

Be Mine ghosting gratitude card

For my project today, I needed a thank you card and as I was sending it out prior to Valentine’s Day, I thought I’d try this layout.  I already had the background piece completed previously and needed to get it used in a project.  This card actually came together pretty quickly with the background just waiting for a project.  I used the ghosting technique on glossy cardstock and the Meant to Be stamp set.  First I stamped the hearts in Versamark ink and let it dry.  I then sponged Petal Pink, Flirty Flamingo and Lovely Lipstick inks in layers over the hearts.  To the background I added a piece of the Lovely Lipstick ribbon from the All My Love Ribbon combo pack.  Over the top of this, I cut the large scalloped heart framelit out of the Sale-a-Bration Foil Sheet pack you can only get for FREE.  I then ran the inside heart through the Subtle Embossing Folder which added amazing texture.  I then stamped the heart in Flirty Flamingo and used the sentiment from the Itty Bitty Greetings stamp set from the annual catalog as my sentiment.  I stamped this on the center heart from the smaller scalloped heart in the set.

I love how this turned out and hope the recipient does too.  Thanks for stopping by my blog today, I know your time is valuable.  I hope you’ve been inspired.  If you would like to purchase any of the items used today, click on the shopping cart in the upper right, it will take you to my online store.  I would love to earn your business.  If you would like to earn a discount on your orders, please join my team.  You can find all the details at teresaharper.stampinup.net.  Click on the tab that says Join the Fun!

Please leave me a comment, I would love to hear from you.  Make it a great day and happy stamping!

Monday, February 11, 2019

You make me happy heart bokeh

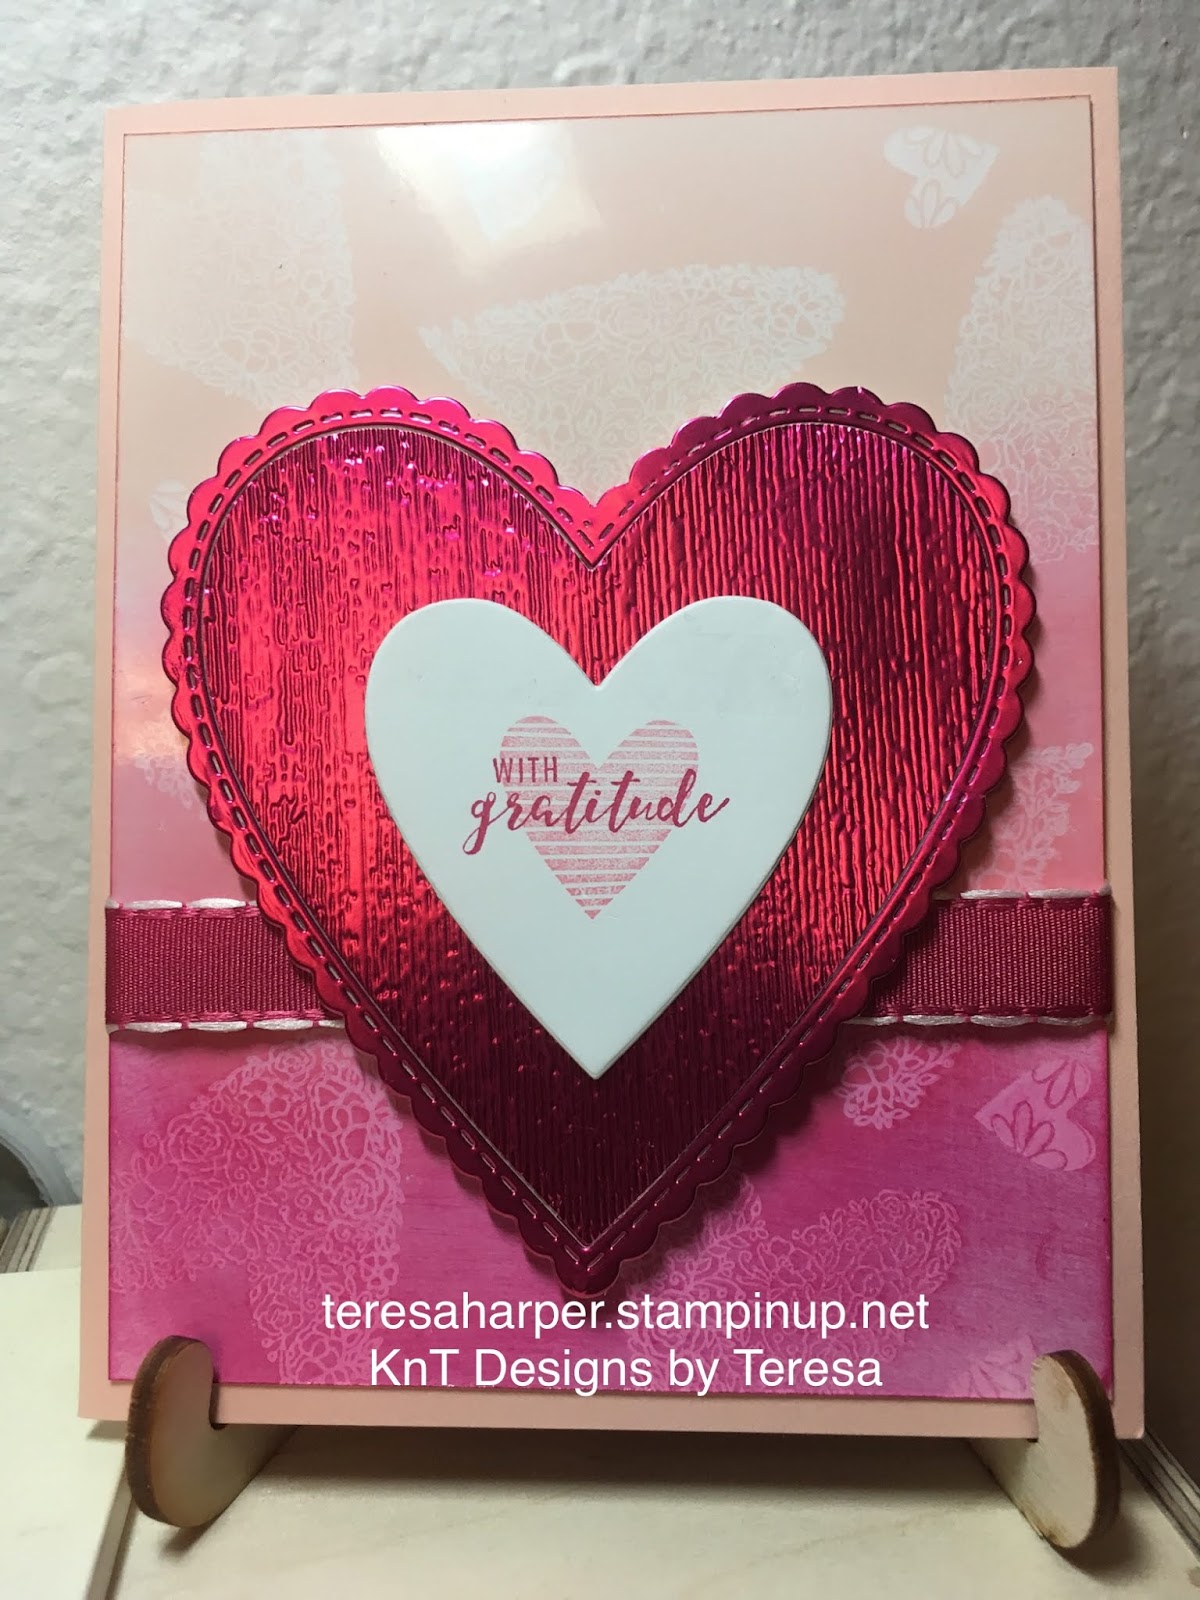
Today’s project features a technique Jenn Houston from the Artsy Fartsy Gallery showed on her Facebook Live.  She had gotten the heart bokeh idea from a friend.  I loved the idea and so I’ve reproduced it on this card.  I started with a card base in Balmy Blue and embossed it with the Hardwood Planks embossing folder.  The bokeh panel is on a 3 3/4x5 piece of Whisper White cardstock.  I used sponge daubers to sponge on Flirty Flamingo, Lovely Lipstick and Petal Pink ink randomly.  I cut the larger hearts in scrap cardstock from the Be Mine Stitched Framelits and the tiny heart from the Well Written framelit dies (a fabulous set by the way).  I then used the negative piece to sponge Whisper White craft ink through the openings randomly all over the cardstock and set it aside to dry.  The heart focal image features the Be Mine scalloped stitched die cut in Lovely Lipstick foil which is currently a Sale-a-Bration item you can only get for free, but hurry as stock is getting low and once it’s gone, it will no longer be available.  I stamped the inside heart in Momento ink on Whisper White and colored it in with my Stampin’ Blends markers in Balmy Blue, Granny Apple Green and Lovely Lipstick.  Again, I cut it out using the same die I used to cut the scalloped foil heart.

The sentiment comes from the coordinating stamp set Meant to Be and can be purchased as a bundle to save you 10% until June 3, 2019.  I masked off the word happy in the sentiment so I could use the Well Written framelit dies to cut out the larger happy die cut.  I used a layer of clear Wink of Stella and then covered with a layer of the fine tip glue pen and set it aside to dry which gave me the look of an epoxy sticker.  This is one of my new favorite technique for some die cuts.  I placed a small piece of the Whisper White flax ribbon which is available in the Occasions catalog.


I hope you’ve enjoyed my project today and that I’ve inspired you to create something of your own or CASE my project.  With Valentines Day coming, this would make a great Valentines for someone you love or perhaps even an anniversary card or just because.  If you need any of the supplies I’ve used today, I would love it if you would shop my online store by clicking on the shopping cart in the upper right.  Better yet, if you would like to earn a discount on all future purchases, please join my team.  I’d be happy to have you.  Sale-a-Bration is the very best time to join as you get $175 in product for $99 or you can choose to spend $129 and receive $175 in product and an awesome logo’d  craft bag.  All details can be found at teresaharper.stampinup.net.

Please leave me a comment, I’d love to hear from you.  Until next time, make it a great day and happy stamping.

Friday, February 8, 2019

Hey Love lollipop treat holder

I put together these treat holders after seeing a video by Darcy of Rejoice and Create.  You can check out her video over on YouTube.  I decided to use up some retired Designer Series Paper I had on hand.  I made up 34 lollipop holders.  I then decorated them with the Hey Love stamp set by Stampin’ Up! using the skunk and crocodile (or alligator) from the set.  I colored them using my Stampin’ Blends markers (which I absolutely love).  Colors used are Balmy Blue combo, Lovely Lipstick light, Granny Apple Green combo, Basic Black combo, Smokey Slate light and Ivory markers.  I fussy cut out each critter and mounted on a heart cut with the Be Mine Stitched framelits in Real Red.  The sentiment is also from Hey Love and stamped in Momento tuxedo black ink on Whisper White as are the critters.

Here is a closer look at the critters.  To ensure I didn’t lose the facial features of the skunk, I used the Stamperatus to stamp each skunk on a square piece of cardstock big enough to stamp four by rotating the cardstock then stamping until all four were on the cardstock.  I then colored each skunk and after I was finished coloring, I put the squares back on my Stamperatus and restarted each skunk, thereby ensuring the facial features were not lost in the coloring.  It also gave more definition to the body.

Thank you for stopping by my blog today.  I hope I’ve inspired you to do something creative.  Please leave me a comment, I would love to hear from you.  If you would like to purchase any supplies, please click on the shopping cart in the upper right.  It will take you directly to my online store.  Happy stamping!

Monday, February 4, 2019

You make me happy notecard

For today’s project, I used the Whisper White notecards and envelopes which are found on page 193 of the annual card.  This card is #simplestamping and makes a great card for Valentines, an anniversary or just because.  It’s so easy and quick to put together.  I started with a notecard, added a layer of Designer Series Paper from the Tropical Escape 6x6 Designer Series Paper stack then stamped my focal image and sentiment from the Meant to Be stamp set on a piece of Whisper White cardstock in Momento tuxedo black ink and colored it in with my Stampin’ Blends markers.  The colors I used were Flirty Flamingo, Lovely Lipstick and Call Me Clover.  Super simple and quick.  I used my Stamperatus for perfect placement of the sentiment.


The inside image is from the same stamp set and I used the same piece of Designer Series Paper to decorate the envelope.


Thanks for stopping by my blog today.  I hope I’ve inspired you in some way to be creative.  Please leave me a comment, I’d love to hear from you.  If you would like to purchase any of the products I’ve used today, click on the shopping cart in the upper right.  Remember, during Sale-a-Bration for each $50 increment in product you purchase, you receive one free level one Sale-a-Bration item.  If you purchase $100, you can choose, two level one OR a level two Sale-a-Bration item.  Sale-a-Bration runs until March 31.  

Friday, February 1, 2019

Hey Love You card

Today’s project features the Hey Love stamp set, Be Mine Stitched framelits and Well Written framelits.  I love all three of these products!  They are available in the Occasions catalog which runs until June 3, 2019.  I started with a card base of Flirty Flamingo and added a layer of Whisper White. The large heart and the open heart border piece are both cut with the Be Mine Stitched framelits dies out of Lovely Lipstick. Inside the heart border piece I added three Heart Epoxy Droplets which I colored with my Flirty Flamingo marker.  I stamped the ape from Hey Love in Momento Tuxedo black ink and colored him with my Stampin’ Blend markers in Basic Black light and dark, light Flirty Flamingo, light Smokey Slate and Ivory.  The works love and you are cut from the new Well Written framelits dies.  There are 24 dies in this set and they are a must have.  When combined with the Well Said stamp set of 51 cling stamps, you can make just about any card and add an inside saying for any occasion.  When you purchase these together in a bundle, you will save 10% and through March 31, you will earn a free Sale-a-Bration item when you purchase the bundle.  What an awesome deal!  Are you wondering how I made them look like an epoxy sticker?  I first adhered a piece of Basic Black cardstock to a piece of multipurpose adhesive sheet then die cut with the love and you dies.  I then brushed them with Wink of Stella and then added a layer of fine tip glue to them and let them dry.  This provided me with a sticker that looks like I purchased it from the store.


For the inside of the card, I used a sentiment from Hey Love then added another from the Meant to Be stamp set.  The scalloped hearts are from the Be Mine Stitched framelits and the center heart is stamped from Meant to Be and cut out again with the Be Mine Stitched framelits.  


Thanks for taking time from your busy day to stop by my blog.  I hope I’ve inspired you to make something creative today.  Please leave me a comment, I would love to hear from you.  As always, if you would like to purchase any of these items, please visit my online store by clicking on the shopping cart.  Make it a great day and happy stamping.