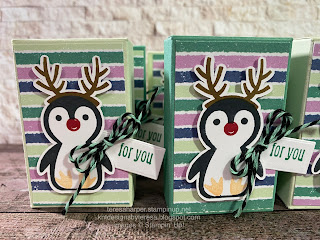
Thought I’d pop on and show you the final set of treat boxes I needed to make before Christmas. I try to send treats to my daughter’s work multiple times a year. I can’t tell you how good it feels to have these completed. She’s taking them into work today.
The treat box features the Penguin Place bundle. I tried to keep them pretty simple as I was making 20 of them. I used the Sale-a-Bration Designer Series Paper which is retired, but you could use any Designer Series Paper, change the colors, make it your own.
Supplies and measurements:
Soft Sea Foam or Just Jade cardstock 4 3/4 x 5 1/2"
Score on 4 3/4 " side at 1/2, 1 1 1/4, and 4"
Score on 5 1/2" side at 3/4, 2 1/2, 3 1/4 and 5 (cut per the template below)
Designer Series Paper (dsp) 1 5/8 x 2 5/8" (if directional, cut in portrait mode)
Penguin Place and Penguin Builder Punch or (hand cut--in my case because I had 20 to do I used my scan n cut)
Ornate Frames dies for the sentiment but you could easily just use a small strip of paper.
Brew Some Fun or other stamp with a small sentiment.
Twine or Ribbon ( I used some retired Baker's Twine I had in black and mint macaron)
Momento Tuxedo Black ink for penguin
Pale Papaya ink pad for feet
Cherry Cobbler ink pad for nose
Soft Suede ink pad for antlers
Just Jade ink pad for sentiment
First stamp in black and cut out your penguin using the penguin builder punch, add nose in cherry cobbler. Stamp the antlers in soft suede and cut out OR you could use a piece of basic white cut at 1 3/8 x 2 3/8" to stamp the penguin and add the antlers to the top of his head without cutting out. Add feet to penguin in pale papaya. Next stamp the sentiment on the small tag from Ornate Frames dies.
Prepare box according to cutting and scoring instructions in the template below. The back of the box will be the panel with the thumb tab circle punch on it. Adhesive will go on the outside of the 1/2" side tab near the score line and the inside front bottom flap near the bottom. Lay prepared cardstock on table with inside of box facing up. Fold on the second score line from the left and then fold at the first score line on the right over the top and adhere. I like to close the top of the box at this point as it's easier for me to adhere the bottom box flaps. First fold in the side flaps, then the back flap and lastly the front flap which has the adhesive on the inside of the flap.
Next add the dsp to the front panel with your preferred adhesive. Add penguin to the dsp using stampin' dimensionals to the top and bottom of the penguin leaving the center open to slide in the tag. Stamp the for you sentiment from Brew Some Fun on the ornate frames tag and side under the penguin to secure. Finally, add a baker's twine bow between the penguin and the sentiment. Now you are finished! Good job. I put two Hershey's miniatures and a Hershey's nugget in my box. I'm sure you can find lots of other things that will fit.
Should you need to order any supplies, please click on the shopping cart in the upper right corner. It will take you to my online store where you can shop 24/7. Leave me a comment and if you make this box, please send me a photo.
I want to wish you all a Merry Christmas and a Happy New Year! Until next time; be happy, stay healthy and happy stamping!
Teresa


1 comment:
These are so adorable! Great job and I know the workers will love them!
Post a Comment