Friday, January 21, 2022

Honeybee Home Fun Fold Mystery Stamping card

 I participated in a mini catalog kickoff event recently.  This card layout was part of the mystery stamping challenge put out by Barb Milliken, although I did modify it slightly.  When I saw the challenge, I immediately decided to use the Honeybee Home bundle along with the coordinating Heart and Home Designer Series paper.  This card came together so quickly for me.  I love participating in Mystery Card challenges! You can see how I put this card together over on my YouTube channel here: https://youtu.be/ukK2hPyfgSk 


This is a view of the inside of the card.  The original mystery card used a 1 x 5 1/4" strip of the dsp.  I didn't care for that look so I changed it to a 4 x 5 1/4", then added the scalloped rectangle for my message inside.


Measurements and Supplies:
Cardstock in Cinnamon Cider, Misty Moonlight and Basic White
Momento Tuxedo Black ink pad
Stampin' Blends alcohol markers in Pale Papaya, Olive,  Daffodil Delight and So Saffron
Wink of Stella
Stampin' Dimensionals 
Stampin' Cut and Emboss machine
Hive 3D Embossing folder
Honeybee Home bundle which includes the Honeybee Home stamp set and coordinating Honeybee Blooms Dies
Grassy Gove stamp set for sentiment (or you can use whatever you have on hand)
Linen Thread

1. Cinnamon Cider cardstock 5 1/2 x 8 1/2.  Cut two inches from the 8 1/2" side and save for layering.  Your base is then 5 1/2 x 6 1/2", score that piece at 2 1/4" and fold so the 2 1/4" flap is on the left front of your card.  Emboss the remaining 2" piece with the Hive 3D embossing folder and add to the 2 1/4"  front flap.  
2. Using the Stitched So Sweetly dies, cut from Misty Moonlight the largest scalloped rectangle.  Next, cut two of the second largest scalloped rectangles from Basic White cardstock. 
3. Stamp the sentiment from Grassy Grove on one of the white rectangles, then adhere it to the Misty Moonlight rectangle.  To the remaining white rectangle, stamp the flower cluster, centered at the bottom of the die cut, inside the stitching lines.  Color with Stampin' Blends.
4.  Add these pieces to the front flap, making sure to only place adhesive on the left half of the die cuts to ensure you don't accidently glue the card closed.   
5. Stamp the tallest flower image from Honeybee Home and three of the honeybees in Momento Tuxedo Black ink on Basic White card.  Color using your Stampin' Blends markers.  Die cut with the coordinating Honeybee Blooms dies.  If desired, also cut from basic white an additional flower die for layering.  
6. Layer the two flower pieces together if you cut an extra.  Add this image to the left half of the white stamped rectangle.  Now with, stampin' dimensionals adhere two of the honeybees to the flower as shown.  
7.  Next, add the 4 x 5 1/4" piece of patterned paper to the inside back of the card.  Adhere the flower stamped scalloped rectangle to the center of the dsp making sure when you close the card front, you can't see the white piece from the front.  
 8.  Next using dimensionals only in the upper portion of the final honeybee, adhere it to the upper right corner overlapping slightly with the Misty Moonlight rectangle so it will hold the card closed, but not inhibit the opening the card too much.  (See my video for exact instructions.)  Your card is now completed!  Admire and send to someone who might enjoy seeing your creation.

Thanks for spending some time with me today.  I do so appreciate it!  If you would like to purchase any of the supplies I've used today, click on the shopping cart in the upper right.  It will take you to my online store where you can click shop now and add these items to your cart.  Leave me a comment and let me know what you think of our project.

Until next time; be happy, stay healthy and happy stamping!
Teresa

Thursday, January 20, 2022

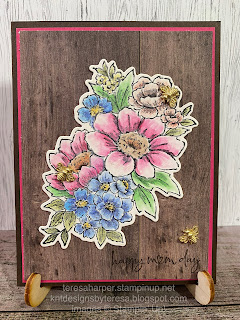
Blessings of Home Happy Mom's Day card with watercolor pencils

 When I started today's project, I thought it was time to pull out some of my old favorites which I haven't used in quite a while.  I love my Stampin' Blends markers and I tend to use them exclusively when I'm coloring stamped images.  For this card, I decided it was time to pull out my watercolor pencil assortments and get to work coloring the image.  I do love the effect and ease that watercolor pencils provide.  In addition, you get a lot of different colors for a much lower price point than the alcohol markers.  So if you're looking for a fun coloring technique, these could be your new favorite.  To see how I colored and put this card together, you can watch my YouTube video here: https://youtu.be/ukK2hPyfgSk 


For the inside of my card I used the newly released Happy and Heartfelt stamp set from the Jan-June 2022 mini catalog.  It's stamped in Early Espresso and the heart is colored in melon mambo.  


Supplies and measurements:
Watercolor Pencils Assortment 1 and 2: Old Olive, Garden Green, Melon Mambo, Calypso Coral, Night of Navy, Crushed Curry, Daffodil Delight, Cajun Crze, Early Espresso.
Blender Pen (NOT Stampin' Blends)
Ink Pads:  Stazon Black ink pad, Early Espresso Classic Ink
Cardstock:
Early Espresso for base 5 1/2 x 8 1/2"
Melon Mambo for base layer 4 x 5 1/4"
Thick Basic White 3 1/5 x 5 (will cut the large flower shape out of this)
Basic White card stock for inside 3 5/8x 4 7/8"
Shimmery White cardstock for stamping and die cutting 5 1/2" x 6" approximately
Pattern Paper: Taste of Home Designer Series Paper 3 7/8 x 5 1/8"  
Honeybee Blooms dies (optional, I used for inside grass die cut but you could just as easily use a die from the Flowers of Home dies)
Blessings of Home bundle which includes Blessings of Home stamp set and Flowers of Home dies
Happy and Heartfelt Sentiments
Bumblebee Trinkets

1. Stamp the large flower image from Blessings of Home on Shimmery White cardstock with Stazon Black ink
2. Color with watercolor pencils and then use blender pen to smooth out the color.
3. Cut out with the matching die in Flowers of Home and also cut the same die out of Thick Basic White cardstock to use as a layering piece.  Add the Basic White piece to the back of the shimmery white colored large flower to add dimension without bulk.
4. Stamp Happy mom day in the lower right corner of the wood pattern paper in Early Espresso ink.
5. Add melon mambo layer to card base, then add wood pattern paper from In Good Tase DSP to melon mambo layer.  
6.  Add colored flower image in the center of the card at an angle.
7.  Add Bumblebee trinkets to finish off the front of the card.  
For the inside of the card: I put two sentiments together from the Happy and Heartfelt stamp set.  I love this stamp set so much!  I then cut two die cuts from shimmery white card stock (the grass piece from Honeybee Blooms dies and the flower from Flowers of Home dies) and colored those with my watercolor pencils in Old Olive, Garden Green and Calypso Coral and smoothed the color out with my blender pen.  Next, I added them in the lower right corner and my card was finished!  

I sincerely hope you have enjoyed this tutorial.  If you would like to purchase any supplies, click on the shopping cart in the upper right.  It will take you to my website where you can click shop now 24/7.  Please leave me a message, I'd love to hear from you.  Thanks for taking time from your busy day to spend it with me.  

Until next time; be happy, stay healthy and happy stamping!
Teresa

Friday, January 14, 2022

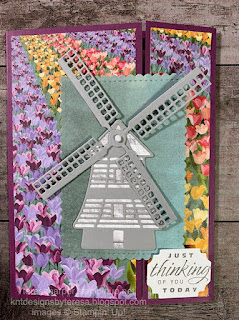
Windmill Gate Fold card

Today's project again features the Windmill Fields dies along with the Flowering Fields suite of products by Stampin' Up!  You can see how I made this card by watching my FB live replay over on my YouTube channel here: https://youtu.be/4Sgmgc1JAh8  I couldn't wait to use this bundle of products and I will definitely be making more with it.  It's so versatile.  


Supplies and measurements: 
Rich Razzelberry cardstock 5 1/2 x 8 1/2",  Score at 2 3/4"
Flowering Fields designer series paper (DSP), 2 1/2 x 5 1/4", 1 1/4 x 5 1/5", additional piece for scalloped rectangle diecut approximately  2 1/2 x 3 5/8"
Basic White 3 5/8 x 4 7/8", additional piece for scalloped rectange approximately 2 1/2 x 3 5/8", scraps for stamping and diecutting flowers for inside and sentiment piece.
In Good Tase DSP for cutting windmill base
Smokey Slate for cutting detailed windmill base and blades 4 x 5 1/4" 
Square and Round Brads
Ink pads in Basic Gray, Momento Black, Rich Razzleberry, Highland Heather and Mango Melody
Flowering Tulips bundle (Flowering Fields stampset & Tulips Dies)
Windmill Fields dies
Stitched So Sweetly dies (stitched scallop rectangles)
Ornate Frames dies (sentiment) 

Thanks for stopping by my blog today.  If you would like to order any supplies, please shop my online store by clicking on the shopping cart in the upper right.  I would love to earn your business if you don't already have a Stampin' Up! demonstrator.  Please leave me a comment and let me know if this inspires you.  

Until next time; be happy, stay healthy and happy stamping!
Teresa

Tuesday, January 11, 2022

Tulip Field Best Year thank you

Today's project features the Tulip Fields bundle of products by Stampin' Up!  As this is an image only stamp set, I brought in Best Year for the sentiments.  This bundle of projects makes some very pretty cards with little effort.  You can see how I made this card by watching the FB live replay over on my YouTube channel here: https://youtu.be/4Sgmgc1JAh8 


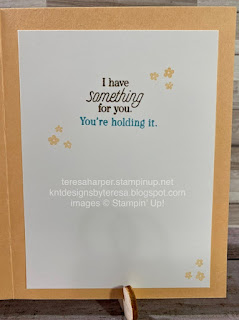
Inside view of card:  Both sentiments are from the Best Year stamp set and stamped in Momento Tuxedo Black ink.  I used the Stamperatus stamp positioning tool to stamp the outside sentiment in order to ensure a vivid image.  


Supplies and Measurements:
Card base Gorgeous Grape 5 1/2 x 8 1/2" scored at 4 1/4"
Basic Gray 5 3/8 x 4 1/8
Basic White (front panel) 4 x 5 1/4", (inside panel) 3 5/8" x 4 7/8", scrap for stamping tree and windmill
scrap Daffodil Delight, Gorgeous Grape and Poppy Parade for tulip rows inside 4 1/8 x 1/2"
Ink Pads in Granny Apple Green, Poppy Parade, Gorgeous Grape, Flirty Flamingo, Daffodil Delight, Balmy Blue (sky) and Basic Gray (windmill), Momento Tuxedo Black (sentiments)
blending brush
Stampin' Blends in Cinnamon Cider and Misty Moonlight
Stampin' Write markers in Soft Suede and Garden Green
Tulip Fields Stampset, Windmill Fields Die (aka Tulip Fields bundle)

Thank you for stopping by my blog today.  I do so appreciate it!  Leave me a comment, I'd love to hear what you have to say.  If you need to purchase any supplies, you can shop my online store by clicking on the shopping cart in the upper right.  I would love to earn your business.

Until next time; be happy, stay healthy and happy stamping!
Teresa


Saturday, January 8, 2022

Count on me with sweet conversations

 Today is another project using the newly released Sweet Conversations bundle by Stampin' Up!  This time I've paired it with Count on Me from the annual catalog.  These two stamp sets paired together are so adorable in my opinion.  I'm very happy how this card turned out.  You can see how I put this card together by watching the live replay over on my YouTube channel here https://youtu.be/yv0oyB9uIos 

The embossed piece in Highland Heather is left from the card I post on the blog Thursday.  I made two cards using the piece of 4 x 5 1/4" cardstock.  The stitching on the focal image is done with the Stitched with Whimsy dies which you will also find in the annual catalog along with the central hearts of the Hearts Punch Pack.

For the bear on the inside of the card, I used a piece of patterned paper from the Daffodil Afternoon  Designer Series Paper which you can earn for free during Sale-A-Bration with a qualifying purchase of $50.  The sentiment comes from Love and Happiness which is bundled together with the Bouquet of Love Hybrid Embossing Folder and Dies.

Supplies and Measurements:
Sweet Conversations stamp set
Hearts Punch Pack
Love and Happiness bundle
Stitched with Whimsy dies
Blushing Bride cs for card base 5 1/2 x 8 1/2"
Highland Heather cs 4 x 5 1/4"
Basic White cs 3 1/2 x 4 3/4" for front panel & 3 5/8 x 4 7/8" for inside piece
Scrap Basic White for stamping and punching the heart shape
Scrap Real Read cs for punching scalloped heart
Real Red Faux Linen Ribbon
Polished Dots
Ink Pads in Momento Tuxedo Black, Blushing Bride, Highland Heather and Real Red
Stampin' Blends in Flirty Flamingo, Cinnamon Cider, Lt. Petal Pink, Lt. Gray Granite and Dk. Pool Party
Scrap of Daffodil Afternoon DSP for bear clothes inside

Thanks for stopping by my blog today.  If you wish to order any supplies, please click on the shopping cart in the upper right corner.  

Until next time; be happy, stay healthy and happy stamping.
Teresa

Thursday, January 6, 2022

Sweet Conversations Bouquet of Love

The Stampin' Up! January-June 2022 mini catalog and Sale-A-Bration brochures launched today!  Sale-A-Bration will run through February 28, 2022.  What's Sale-A-Bration you ask?  It's a twice-yearly promotion where you earn free gifts for a qualified purchase.  In the U.S., the qualifying amount is $50.  You earn one item from the Sale-A-Bration brochure free for every $50 increment you spend.   It's the best time of the Stampin' Up! year.

Today's project features the Sweet Talk suite of products found on pages 8-11 of the January-June mini catalog.  I hope you enjoy it.  You can find a video of how I put together my project over on my YouTube channel here:   https://youtu.be/yv0oyB9uIos 


Inside view of card: The flowers are cut with the Bouquet of Love dies.


Supplies and measurements:
Basic White Thick cardstock for base 5 1/2 x 8 1/2"
Blushing Bride cs 4 1/8" x 1 5/8", scrap for ins
Real Red cs 4 1/8 x 1 5/8" & 3 3/4 x 5" (inside piece), scrap for inside flower
two pieces of the Sweet Talk pattern paper cut at 4 x 1/2"
Basic white cs 3 5/8 x 4 7/8 for inside and scraps for stamping and die cutting heart images
Highland Heather cs for embossing and die cutting large heart on front and for inside flower
Ink Pads in Highland Heather, Real Red, Blushing Bride, Petal Pink
1/8" Cotton Ribbon Combo Pack (JJ2022 mini)
Cut n Emboss machine
Sweet Conversations stamp set,
Sweet Hearts dies
Bouquet of Love Hybrid Embossing Folder/dies

Thank you for stopping by my blog today.  I truly appreciate you taking time from your day to leave me a comment.  I read each one.  If you would like to purchase any supplies, please click on the shopping cart in the upper right. It will take you to my online store.  You can follow me on Facebook here where I conduct live card class tutorials each Tuesday evening at 7:45 p.m. https://www.facebook.com/KnT-Designs-by-Teresa-276658209676338/


Until next time; be happy, stay healthy and happy stamping!
Teresa

Saturday, January 1, 2022

Happy Hedgehog birthday sneak peek

 Happy New Year everyone!  I hope you have a wonderful start to the new year.

Today's the second card of my Happy Hedgehog sneak peeks.  This stamp set and the Sale-A-Bration stamp set Special Moments will be available beginning January 4, 2022.  I hope you like it.  I didn't use the hedgehogs on this card at all.  I wanted to show how to make a #simplestamping card using only stamps, ink and paper; along with a Sale-A-Bration product.  In addition, I wanted to show the versatility of the stamp set.  If you have been following me, you will know that #simplestamping is a difficult challenge for me.  This one I think, really meets the parameters.  You can see how I put this card together, along with the card from my post on December 29, 2021, over on my YouTube channel here:  https://youtu.be/bNQWgPHSfmc 


A look at the inside of the card is below.  

 Supplies and measurements:
Pale Papaya cardstock for the card base at 5 1/2 x 8 1/2"
Sale-A-Bration DSP Simply Marbleous 3 x 4"
Basic White 2 3/8 x 3 3/8 main focal image, 3 5/8 x 4 7/8 for inside, 1/2" x 3 1/4" for sentiment strip
Just Jade cardstock 5/8 x 3 3/8"
ink pads in Momento Tuxedo Black, Soft Suede, Pale Papaya and Balmy Blue
Stamps Happy Hedgehogs, Special Moments (Sale-A-Bration free item with a $100 purchase) and Sweet as a Peach
Stampin' Blends:
Lt. Soft Suede for tree trunk
Dk. Pale Papaya for flower centers
Balmy Blue for flowers
Just Jade for leaves

Thanks for stopping by today.  I hope you enjoyed what you saw and were inspired to make something of your own.  To purchase Stampin' Up! supplies, click on the shopping cart in the upper right.  It will take you to my online store where you can shop 24/7.  Be sure to leave me a comment.  You can follow me on Facebook here where I conduct a live card tutorial most Tuesday nights at 7:45 pm PDT  https://www.facebook.com/KnT-Designs-by-Teresa-276658209676338/

Until next time; be happy, stay healthy and happy stamping!
Teresa