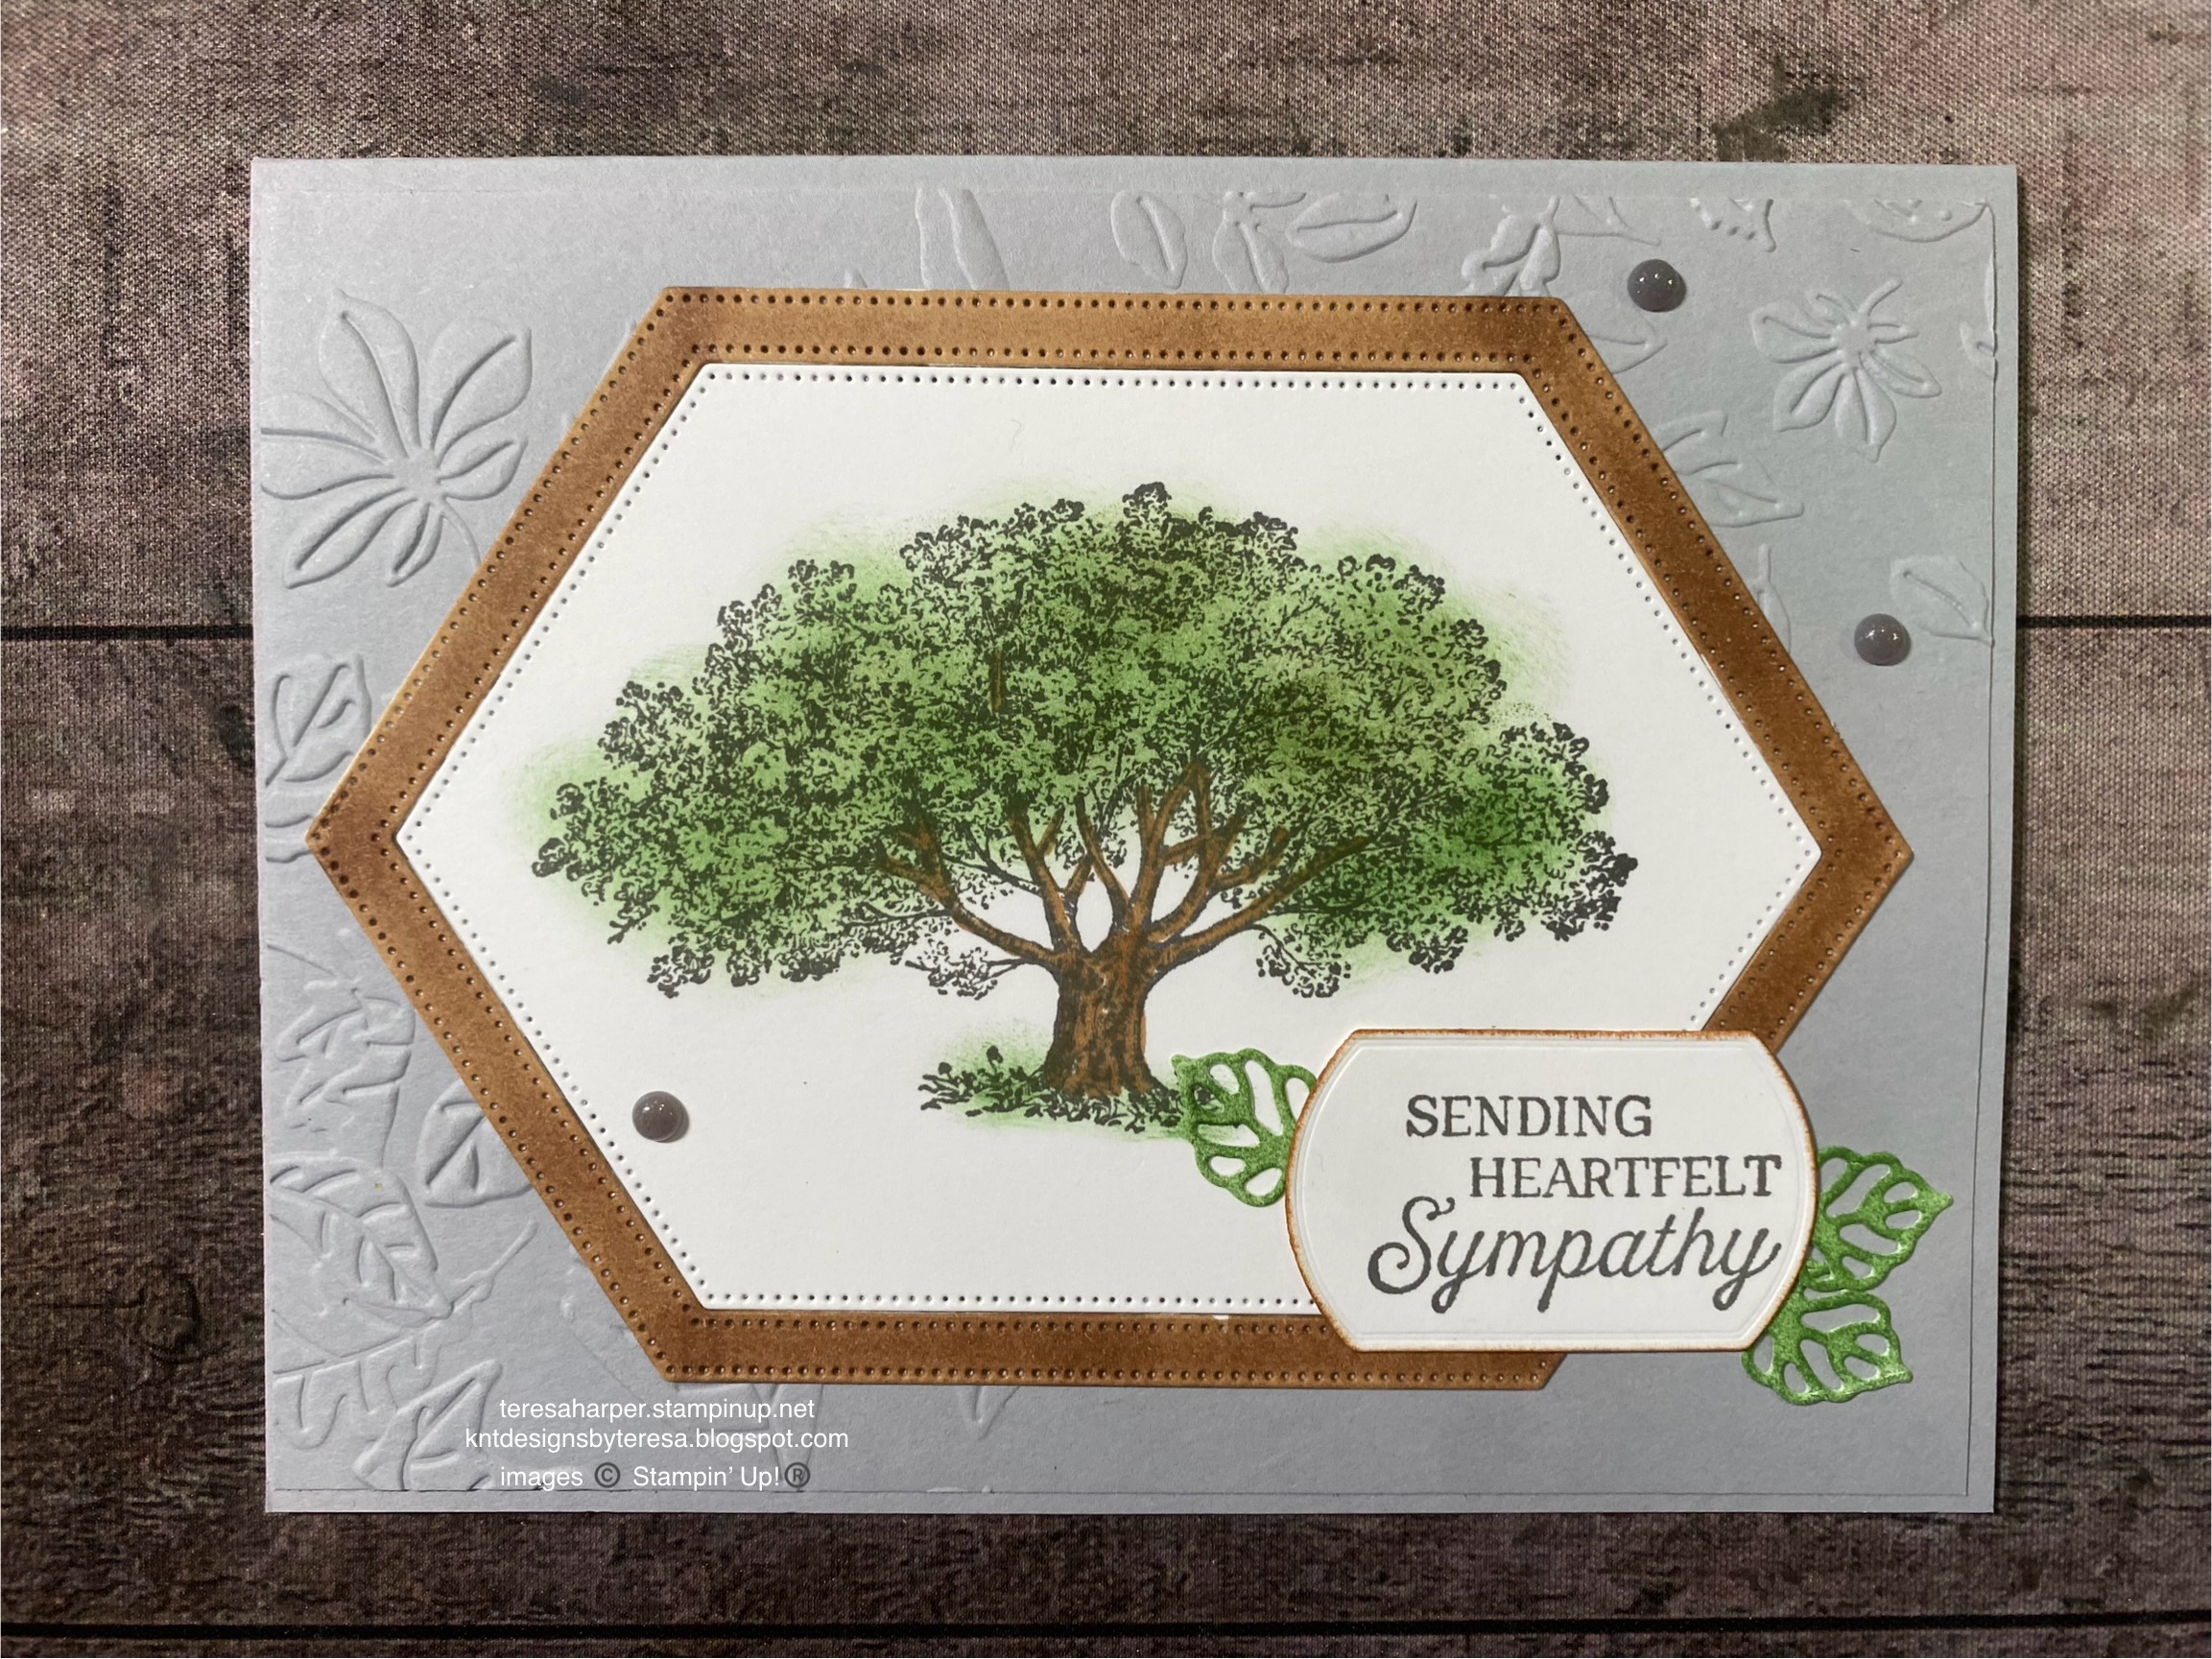
Showing posts with label masculine. Show all posts

Saturday, September 13, 2025

Lights of Aurora Scenic Adventure card

Oh my gosh!  How I do love the new 6" x 6" Designer Series Paper stack, Lights of Aurora.  It was introduced on September 3 along with a suite of products.  I decided to purchase only the gems and DSP from the suite and combine it with the Scenic Adventure bundle as I thought I would get more use from both pieces of the bundle.  I love how this card turned out and just how easy it was.  A few die cuts, the dsp, a stamped sentiment and what a beautiful card you have.  It would work for either feminine or masculine and most any occasion.  To see how I've put my card together, be sure to watch the video tutorial over on my YouTube channel.  


Supplies and Measurements:
Scenic Adventures bundle* 165468
Basic Black cardstock for card base, 5 1/2" x 8 1/2", scored in center at 4 1/4"
Basic black cardstock for die cuts [sizes are approximate] (1) 4" x 3 3/4", 1" 1 1/4" x 2" 
Secret Sea 2 1/2" x 3 for die cuts
Basic Gray cardstock 4" x 2 1/4"
Very Vanilla cardstock, tiny scrap to die cut moon
Ink Pads: Secret Sea, Basic Beige
Frosted Iridescent Dots 165766

I hope you enjoyed my share today.  Thanks so much for stopping by!  I appreciate you so much.

Until next time; be happy, good health to you and happy stamping!
Teresa

*Purchasing bundles saves 10% over the individual piece prices when combined.  You must use the bundle item code for the 10% bundle discount.  When purchasing Last Chance items; be sure to check if the individual piece prices are discounted.  Individual piece prices could be less expensive if the discounts are deep enough.

Sunday, August 31, 2025

Time to Celebrate Autumn Trees card

We are continuing on with some sneak peeks from the upcoming Stampin' Up! product release launching on September 3.  Along with that, I'm featuring some designer series paper techniques to enhance and make the paper your own.  You will find some suggested techniques in the September-December mini catalog on page 43, I hope you will give them a try.  I used an ink blending and coloring technique on my card today.  You can find the card tutorial video on my YouTube channel.  


Measurements and Supplies:
Autumn Trees bundle *165900 **Sneak peek
More Messages bundle* 165473 (outside sentiment)
Traditional Labels dies 165864 (can be purchased in a bundle* with sentiment stamps) **Sneak peek
Autumn Toile 12 x 12 DSP 165882 4" x 5 1/4" **Sneak peek
The Right Words stamp set 165316 (inside sentiment)
Streaked Dots 165902 **Sneak peek
Old Olive cardstock for card base 5 1/2" x 8 1/2", scored in center at 4 1/4"
Old Olive cardstock for label die
Very Vanilla cardstock for stamping & inside layer 3 5/8" x 4 7/8"
Ink Pads: Old Olive, Early Espresso
Stampin' Blends alcohol markers: Old Olive, Dark Cloud Cover, Light Pecan Pie & Natural Tones Medium Deep SU 300
blending brushes 160518

I hope you have liked this quick and easy card and that you learned some techniques from it.  I enjoyed teaching them.  

Until next time; be happy, good health to you and happy stamping!
Teresa

*Purchasing bundles saves 10% over the individual piece prices when combined.  You must use the bundle item code for the 10% bundle discount.  When purchasing Last Chance items; be sure to check if the individual piece prices are discounted.  Individual piece prices could be less expensive if the discounts are deep enough.

**Sneak peek items will be available to the general public beginning September 3, 2025.  If you would like to join my team, you can add them to your starter kit today!  

Saturday, May 31, 2025

Turtle-y Grateful For You all year

For my card today, I've made a card that is both quick and easy.  It has very little stamping and uses mostly Designer Series Paper for the decorations.  When I was making it, I was thinking that it could be a Father's Day card, but for those who don't have father's, it could be for any BBQ chef in your life.  To see how easy it is to put together, be sure to watch the video replay over on my YouTube channel. 


Measurements and Supplies: 
Textured Notes dies 165555
Around It All dies 164725
Turtle-y Cute Designer Series Paper, 4 x 5 1/4" approx. & images fussy cut
Basic White cardstock for smaller circle & sentiment 
Thick Basic White cardstock, 5 1/2" x 8 1/2", scored in center at 4 1/4" for card base
Darling Duckling cardstock, 1" x 4 1/2"
Shades of Green Hexagons 165233
Ink Pads: Darling Duckling, Memento Tuxedo Black
Blending Brushes 160518

I hope you have enjoyed seeing how quick and easy this card is and doesn't take all that many supplies.  Until next time; be happy, good health to you and happy stamping!
Teresa


Sunday, March 30, 2025

Arched Wishes geometric birthday card

I’m finishing up with Arched Wishes today with a geometric design that has a masculine feel.  It’s a fairly simple layout and goes together quickly.  You can watch the video replay over on my YouTube channel to see what I’ve done.  I also shared my first preorder mini haul for the new products being released in May.  I didn't preorder all that much.  I'll have a much larger haul in April.  Stay tuned for that.  


Measurements and Supplies:
Arched Wishes stamp set 165428
Mixed Labels stamp set 164643 (inside sentiment--use what you have)
Stylish Shapes Dies 159183
Adhesive-backed Iridescent Discs 161954
Thick Basic White cardstock 5 1/2" x 8 1/2", scored in center at 4 1/4"
Balmy Blue cardstock for die cutting squares
Ink Pads: Balmy Blue, Azure Afternoon, Granny Apple Green & Memento Tuxedo Black
Stampin' Blends alcohol markers: Balmy Blue, Azure Afternoon, Granny Apple Green
Sponge Dauber 133773
Paper Snips103579

Thanks so much for stopping by today.  The shopping cart in the upper right will take you to my online store where you can order all your Stampin' Up! supplies.  Thanks in advance, I appreciate you!

Until next time; be happy, be healthy and happy stamping!
Teresa


Monday, August 26, 2024

Frosted Forest Masculine Thinking of You/Birthday card

 Hello everyone! I hope you had a fabulous weekend.  For the kids here in Sheridan, this is the last week of summer vacation.  I plan to soak up the most of it with our grandkids and spend some time at the beach this week.  The weather is supposed to be nice, but often when it's nice here at home, it's not so nice at the beach.  Hopefully, we'll have good enough weather to play in the sand. 

Now onto my card for today.  I made the original card you see here for my husband for our 44th wedding anniversary last Friday.  When I made the card during my YouTube live, I switched out the inside sentiment for a birthday card.  Either way, the design works well without changing the sentiment on the front.  I do love how it turned out.  You can watch the YouTube replay to see how I put the card together.


Supplies & Measurements:
Frosted Forest bundle 164137* (includes stamps 164344,  dies 164136 & masks 164350) **
In The Grove bundle 163512* (includes stamps 164459 & dies 163511)
Thoughtful Journey DSP, 4 x 5 1/4"
Basic White cardstock for stamping/die cutting, inside piece 3 5/8" x 4 7/8"
Pretty Peacock cardstock for card base, 5 1/2" x 8 1/2", scored in the center at 4 1/4"
Old Olive cardstock for die cutting trees
Ink Pads: Old Olive, Mossy Meadow, Early Espresso, Pecan Pie, Pretty Peacock, Gray Granite, Wild Wheat
Blending Brushes
Adhesive-backed Dragonflies & Birds, 162743
Basic White Medium Envelopes

Thanks so much for stopping by today.  I do so appreciate you taking time from your busy day to spend a little with me.  

Until next time; be happy, stay healthy & happy stamping!
Teresa

Wednesday, August 21, 2024

Frosted Forest Birthday Wishes

 I'm back this week to share some cards made using the Frosted Forest bundle by Stampin' Up!  For my card today, I've paired it with a fox from In The Grove.  I was looking for a small animal to fit in my wintery scene and this one worked great!  To see the video replay on how I put my card together, please hop on over to my YouTube channel and watch as I walk you step-by-step through the process.


Supplies & Measurements:
Frosted Forest bundle 164137* (includes stamps 164344,  dies 164136 & masks 164350) **
In The Grove bundle 163512* (includes stamps 164459 & dies 163511)
Boho Blue cardstock for card base 5 1/2" x 8 1/2", scored in center at 4 1/4"
Night of Navy cardstock 4 7/8" x 5 1/8"
Thoughtful Journey DSP 3 1/2" x 4 3/4"
Basic White cardstock 3 7/8" x 4 7/8" for inside & scraps for die cutting
Early Espresso cardstock scrap for die cutting
Ink Pads: Night of Navy, Smoky Slate
Wink of Stella Glitter Brush 141897

Thanks so much for stopping by today.  I truly appreciate you taking time from your busy schedule to share a little with me.  To order your Stampin' Up! supplies from my online store, simply click on the shopping cart in the upper right.

Until next time; be happy, stay healthy & happy stamping!
Teresa

*purchasing bundles saves 10% over the individual piece prices when combined.  You must use the bundle item code for the 10% bundle discount.

**Online Exclusives items can be while supplies last.  If they are in the store, they are available for purchase.  If they say Currently Unavailable, the stock will be replenished.  If they are no longer in the store, unfortunately, they will not return. 

Monday, June 3, 2024

Loveliest Tree birthday sketch card

 Hey there, today’s project features a sketch from page 22 of the Stampin’ Up!®️ annual catalog.  I’ll be using the featured bundle Loveliest Tree again.  By the way, did you know that beginning June 5-30, Stampin’ Up!®️ is having a sale on all bundles, suite collections and Stampin’ Cut & Emboss machines?  This is a very good sale and I expect that lots of items will sale out, so be sure to get your order in sooner rather than later.  All items are while supplies last.  You can watch the live video replay for this card over on YouTube.


Measurements and supplies:
Loveliest Tree bundle 163716 (includes stamps 163714 & coordinating dies 163715)*
Spotlight on Nature dies 163580
Nested Essentials dies 161597
Timber 3D Embossing Folder 156406
Heartfelt Hexagon stamp set 162882 (inside sentiment or use what you have)
Adhesive-Backed Textured Dots 163338
Linen Thread 104199
Stamp Pads: Early Espresso, Versamark clear ink
Basics Embossing Powder in Clear 165679
Card base: Crumb Cake cardstock 5 1/2" x 8 1/2", scored at 4 1/4" & scrap
Basic White cardstock for stamping and die cutting
Early Espresso cardstock 4" x 5 1/4"
Stampin' Blends markers: Pretty Peacock, Mossy Meadow, Pecan Pie

Thanks so much for stopping by today!  I'm so happy you did.  To purchase your Stampin' Up! supplies, please shop my online store by clicking on the shopping cart in upper right.  I'd be ever so grateful for your business.

Until next time; be happy, stay healthy and happy stamping!

*Bundle pricing saves 10% over the combined prices of the individual pieces


Saturday, June 1, 2024

Sending Heartfelt Sympathy with Loveliest Tree

 The Loveliest Tree bundle by Stampin' Up! lends itself well to creating cards for many different occasions and works extremely well for masculine cards.  Today, I'm using the large tree for a sympathy card.  I paired it with the Wildflower Designs dies and the Leaf Fall 3D embossing folder.  It makes the perfect background for the focal image.  To see how I've put this card together, you can watch the video replay over on YouTube.


Measurements and Supplies:
Loveliest Tree bundle 163716 (includes stamps 163714 & coordinating dies 163715)*
Leaf Fall 3D Embossing Folder 159847
Comforting Thoughts (inside sentiments) 163691
Unbounded Love dies 163383
2023-2025 In Color Opaque Sparkle Dots 163782
Sponge Daubers
Ink Pads: Garden Green, Mossy Meadow Basic Gray, Pecan Pie
Stampin' Blends markers: Pecan Pie
Card Base: Smoky Slate cardstock, 5 1/2" x 8 1/2", scored in center at 4 1/4"
Smoky Slate cardstock 4 1/8" x 5 3/8"
Basic White cardstock for stamping & die cutting

I'm so glad you stopped by today!  Thanks for spending some of your time with me.  To shop my online store for all your Stampin' Up! supply needs, click on the shopping cart in the upper right.

Until next time; be happy, stay healthy and happy stamping!
Teresa 

*Bundle pricing saves 10% over the combined prices of the individual pieces

Saturday, June 24, 2023

Hey Chuck, Rise & Shine gift card pocket fun fold

 Happy Saturday!  Today is a fun fold gift card project.  I love to make these little surprise fun fold cards.  The Mini Pocket dies by Stampin’ Up! makes them so quick and easy to do!  Everyone should have this die set in their stash.  I hope you like this project and give it a try.  To see how I put it all together, watch the video replay on my YouTube channel HERE:


Measurements and Supplies:
Hey Chuck bundle (161553 stamps & dies with 10% savings)
Rays of Light stamp 158925
Mini Pocket dies 159167
Exposed Brick 3d Embossing Folder
Inked Botanicals Designer Series Paper 161157, approx 4 1/2 x 6  for die cutting
Crushed Curry card stock 5 1/2 x 8 1/2", scored in center at 4 1/4"
Basic White card stock 3 1/4 x 9 1/2", scored in center at 4 3/4", 2 3/4" x 4", (2 pieces each) 3 x 4 1/4" & scraps for stamping and die cutting
Pecan Pie cardstock 3 1/4 x 4 1/2"
Ink Pads: Pebbled Path, Crushed Curry
Stampin' Blends alcohol markers for coloring: Real Read, Boho Blue, Lt Gray Granite, Ivory, Pecan Pie, Lt Pebbled Path, Lt Lost Lagoon
Crushed Curry Stampin' Write marker

Thank you so much for stopping by today!  Please order your Stampin' Up! supplies from my online store by clicking on the shopping cart in the upper right.  Click the menu icon and shop products.  I would be ever so grateful for your business!

Until next time; be happy, stay healthy and happy stamping!
Teresa


Saturday, March 19, 2022

Beauty of Friendship Wildlife Wonder

 Happy Saturday to all of you!  I have a fun fold for you today.  My project utilizes a fabulous pack of Designer Series Paper (DSP) for the background.  You can watch the FB live replay of how I put this card together here: https://youtu.be/j8KF4U-Ixv4 

The above photo is the center fold of the card (sort of).  It features the tree and bird from Beauty of Friendship (currently on sale through March 31, 2022 for 20% off when you purchase the bundle) stamped on the beautiful New Horizons DSP all by Stampin' Up!  I love how easy it is to work with DSP to make beautiful scenery cards.

The photo above shows what the card looks like when it's closed and the side flap is over the card base as intended.  The DSP is again the New Horizons 6x6 DSP and the detailed bear comes from the stamp set called Wildlife Wonder.  Such a great stamp set to make masculine or nature cards with.  This bear is my favorite image.  
The photo shown here is the inside card.  I used a 1" x 5 1/4" strip of the same DSP I used on the card base to add to the right side of the inside layer.  The owl image is from the Wildlife Wonder stamp set.  I didn't add an inside sentiment to this card as I feel it can be used for many things and I will add the appropriate sentiment when I have a recipient and occasion in mind.

Supplies and Measurements:
Card Base 5 1/2" x 7 1/2", scored at 4 1/4" Evening Evergreen
Blackberry Bliss cardstock, 2 5/8" x 4", scored at 1 /2" and 3 1/8" x 5 3/8"
Basic White for inside layer 5 x 5 1/4" and scrap for stamping bear and cutting out bird
DSP- New Horizons 6 x6, 3  
 x 5 1/4" and 1" x 5 1/4" from same sheet, scrap to stamp tree top image on, 2 1/2" x 3 3/8" for flap layer
Beauty of Friendship bundle (includes Beautiful Tree dies) 155834
Wildlife Wonder stamp set 157923
Inks: Evening Evergreen, Smokey Slate, Blackberry Bliss
Stampin' Blends: Misty Moonlight, Blackberry Bliss, Mango Melody or Daffodil Delight, Gray Granite, color lifter for blending
Stampin' Write Markers: Evening Evergreen, Blackberry Bliss, Soft Suede and Basic Black


I hope you are inspired today.  Please leave me a comment and let me know what you think.  If you would like to order any Stampin' Up! supplies, click on the shopping cart in the upper right corner.  I'd love to earn your business.  

Until next time; be happy, stay healthy and happy stamping!
Teresa


Thursday, March 17, 2022

Wildlife Wonder After the Storm

 Happy St. Patrick's Day everyone!  I'm a little late with my post.  I was very busy yesterday, and forgot to get this scheduled, so I'm doing it now!  Hope you are inspired by the card I have for you today.  It's one of those cards you can have on hand for those times when you need to let someone know you're there if they need you in the darker times.  To see how I put this card together, watch my FB live replay here on YouTube: https://youtu.be/j8KF4U-Ixv4 


Measurements and Supplies:
Mossy Meadow card base 5 1/2" x 8 1/2"
Basic White 4" x 5 1/4" focal layer
Inside layer Basic White 3 5/8" x 4 7/8"
Stamps: After the Storm, Wildlife Wonder, Grassy Grove
Stitched Rectangle Dies
Inks:  Mossy Meadow, Balmy Blue, Smokey Slate, Crushed Curry, Basic Gray, Soft Suede, Crumb Cake, Old Olive

Thanks for stopping by!  Please leave me a comment, I'd love to hear from you.
Until next time; be happy, stay healthy and happy stamping!
Teresa


Monday, January 28, 2019

Enjoy Life ghosting

 This is my card today.  I love how it turned out.  It utilizes the Enjoy Life photopolymer stamp set I. The 2018-2019 Stampin’ Up! Annual catalog.  My girl friend challenged me to teach our little group how to make cards with this stamp set.  This is one of them I came up with.
I started with a card base of crumb cake.  The main focal point is a piece of glossy cardstock.  I first stamped my images in versamark ink, then set them aside to dry.  I then started in the center of the card and sponged crumb cake ink across the image.  Then went to the bottom sponging granny apple green ink and finally finished the top portion with Balmy Blue.  I blended the green and crumb cake, but didn’t worry so much with the blue as I rather liked the lighter horizon line between those two.  Finally I stamped the sentiment also from the same stamp set in Stazon black in using the Stamparatus to ensure the stamp didn’t slip on the glossy card for a clean crisp image.  The focal image image is then mounted a piece of whisper white card 5 3/8 x 4 1/8 for the thinnest of borders.

I will use this as a make-n-take in an upcoming workshop.  I know the gals will love it.  It makes for a great masculine card that could be used for most any occasion.  I also think this qualifies for #simplestamping with one stamp set, ink and paper.  I did add a piece of linen thread to the bottom to dress it up just a bit.  I didn’t want to overwhelm the beauty of the focal image.

Thanks for stopping by my little blog today.  Should you want any Stampin’ Up! Supplies, please click on my shopping cart and it will take you directly to my online store where you can place your order.  Now is the best time to purchase your crafting supplies as it Sale-a-Bration until March 31.  For each $50 increment of product, you can choose one item out of the SAB brochure for free.  If you spend $100, you can choose 2 level one items or one level 2 item.  Free is the only way to get the pose products.  They can’t be purchased.  If you have any questions, please feel free to leave me a message.

Please leave me a comment, I would love to hear your thoughts.  Make it a great day and happy stamping.
Teresa