Showing posts with label Thanksgiving. Show all posts

Saturday, October 3, 2026

Hello, grateful for you fold-flat oatmeal cookie box

 For my treat box today, I've taken one of my previous fold-flat boxes and used current fall products to make this beautiful box you could use at your Thanksgiving table as a place holder or treat to take home.  It's a mash up of several bundles used to achieve a very unique look.  I do love how it turned out don't you!?  You will find a video tutorial on how to put this box together over on my YouTube channel by clicking this direct link.


Supplies and measurements:
Elegant Leaves bundle*168303 (includes stamps & dies)
Painted Pumpkins bundle* 168349 (includes stamps, dies & decorative masks/stencils)
Radiant Sunflowers bundle* 168352 (includes stamps & dies)
Design a Tag stamp set 168406 (for random stamping on box base)
Three Banner Punch for sentiment label 167050
Metal Effects Specialty DSP scrap 167105 
Sunflower Fields DSP 168351 2 7/8" x 3 3/8" 
Basic White cardstock for stamping images
Early Espresso cardstock for box 6" x 10"
    score on the 6" side at 1/2" & 1 1/2" on each end
    score on the 10" side at 1" & 4 1/2" on each end
Earthy Matte dots 167213 (sorry, retired use what you have on hand or color the white Natural Matte Dots 167510 with an SU 100 Natural Tone Stampin' Blend as an alternative)
Thin Velcro fasteners 3/8" for closure not available through SU!
Ink Pads: Early Espresso, Cajun Craze, Timid Tiger, Pumpkin Pie Golden Glow, Crushed Curry, VersaMark (optional needed for scented pumpkins only)
Stampin' Blends markers: Pecan Pie, Cherry Cobbler, Golden Glow, Cajun Craze
Golden Glow Shimmer Brush 167662
Blending Brushes 160518
WoW! Basics embossing powders (clear) 165679 (optional if you want scented pumpkins.  You will also need a dash of cinnamon and cloves) See YouTube video tutorial here: this part is at about 10:30 seconds.
Golden Glow Bordered Ribbon 167548
Neutrals Jute Combo Pack 168468 (Early espresso, divided into one or two strands)

I hope you like this project and will give it a try.  You can purchase most of the products I've used today in my online store by clicking on the shopping cart to the right.  I would appreciate your business as it keeps these tutorials coming to you free of charge.

Until next time; be happy, good health to you and happy stamping!
Teresa


*Purchasing bundles saves 10% over the individual piece prices when combined.  You must use the bundle item code for the 10% bundle discount.  When purchasing Last Chance items; be sure to check if the individual piece prices are discounted.  Individual piece prices may be less expensive if the discounts are deep enough.

Shop these links for the


Sunday, September 27, 2026

Happy Thanksgiving Scalloped rectangle shaped card with hot foil

This card came about during a phone call to my friend when this idea popped into my head.  I wrote it down, finished my phone call, then came inside and went to work on the idea which involved a foiled brick wall, the little mouse, and leaves.  This is the final result.  During the working phase I decided to try to make a scalloped rectangle card...I will definitely be making more of those.  It's so easy to put together and it's something different than your every day card.

Be sure to watch the video tutorial for the scented pumpkin technique, inspired by Lisa Bowden, and how to put this card together.  You can find it over on my YouTube channel by clicking this direct link.


Supplies and measurements:
Painted Pumpkins bundle* 168349 includes stamps & dies)
Christmas Mice bundle* 168422 (includes stamps & dies)
Echoes of Detail Hot Foil dies 170048
Scalloped Christmas Cheer dies 168544
Soiree Salutations168337
Lustrous Leaves Hot Foil dies 170559
Design a Tag 168406
Elegant Leaves stamp set 168300 (can be purchased in a bundle* 168300 with coordinating dies)
Hot Foil in: Red, Copper, Gold and Silver Opal
Ink Pads: Timid Tiger, Pumpkin Pie, Cajun Craze, Darling Duckling, Crushed Curry, Golden Glow, Old Olive, Early Espresso, Basic Gray, VersaMark
Stampin' Blends markers: Barely Blush, Smoky Slate, Blueberry Bushel or Cherry Cobbler (scarf colors), Bronze
Golden Glow Shimmer Brush 167662
blending brushes 160518
Only if making scented pumpkins: clear embossing powder with cloves & cinnamon
Painted Patch adhesive-backed dots 168443
Linen Thread
Stampin' Hot Foil system 
Stampin' Cut & Emboss machine

Thanks for stopping by.  You will find all the supplies to make this card in my online store by clicking on the shopping cart to the right or use what you have on hand already.  Let's have some fun being creative.  Then don't forget to mail your card to spready a little cheer.

Until next time; be happy, good health to you and happy stamping!
Teresa

*Purchasing bundles saves 10% over the individual piece prices when combined.  You must use the bundle item code for the 10% bundle discount.  When purchasing Last Chance items; be sure to check if the individual piece prices are discounted.  Individual piece prices may be less expensive if the discounts are deep enough.

Shop these links for the

Wednesday, September 23, 2026

Hello Gourd-geous double wedge center panel fun fold card

I have a very cool new fun fold card for you today.  I was inspired by Sam Calcott, UK (not affiliated with SU) for this fold.  I saw a video she made using a 6"x6" card base and modified to fit our A2 card base here in the states.  I hope you like this fold and will give it a try.  Be sure to watch the video tutorial to see how to put it all together.  I've given several tips and tricks to make it go together easily for you.  You'll find that video over on my YouTube channel by clicking this direct link.


Supplies and measurements I used:
Painted Pumpkins bundle* 168349 (includes stamps and dies)
Everyday Arches dies 164629
Painted Patch Designer Series Paper 168430
    8 pieces each 5/8" x 4 1/8" (all the same pattern)
    2 pieces each 1 5/8" x 4 1/8" (same pattern)
    1 piece 2" x 4 1/8" (I used the same pattern as the two pieces above)
    1 piece approx 1 1/8" x 3", cut with the 4th largest arch die at the bottom
    Pumpkins cut from the DSP using the Painted Pumpkins dies
Crushed Curry two-tone cardstock scraps
Thick Basic White cardstock for card base 4 1/4" x 11", scored in center at 5 1/2"
Early Espresso cardstock for 4th largest arch & for fence die
Bubble Bath two-tone cardstock (I used the light side)
    2 pieces each 4 1/4" x 5 1/2" scored on the 5 1/2" side at 1 3/4", 2 1/2", 3 1/4" & 5"
    Fold beginning on the 1 3/4" end mountain, valley, mountain, mountain
    1 piece 4 1/4" x 7 1/2" scored on the 7 1/2" side at 2", 2 3/4", 3 1/2", 5 1/2" 6 1/4" & 7"
    Fold beginning at the 2" end mountain, valley, mountain, mountain, valley, mountain
Ink Pad: Secret Sea
linen thread
Painted Patch adhesive-backed dots 168443

You will all the supplies I've used today in my Stampin' Up! online store.  Click on the shopping cart to the right.  I would be ever so grateful for your help in keeping my channel going.

Until next time; be happy, good health to you and happy stamping!
Teresa


*Purchasing bundles saves 10% over the individual piece prices when combined.  You must use the bundle item code for the 10% bundle discount.  When purchasing Last Chance items; be sure to check if the individual piece prices are discounted.  Individual piece prices may be less expensive if the discounts are deep enough.

Shop these links for the


Saturday, September 19, 2026

Grateful for you sketch card for scraps with Autumn Opulence

For my card today, I took the sketch I used on Wednesday and altered it slightly to make this card.  After I made the sending caring thoughts card, I looked over at the layout and wondered if I could fit the Scalloped Christmas Cheer dies in that center section.  My original thought was to use the second largest die; however, it was just too big for the space so I grabbed the next one down.  It was a little small but then I thought, what if I use a rectangular piece of dsp to fill the center.  How would that same 2 5/8" high piece work along with a 4" wide measurement?  The Scalloped Christmas Cheer die fit that measurement perfectly!  I then decided to cut the inside rectangle on the scalloped in a different color to add more interest.  I do love how this turned out!  Of course, you can use this layout for any season, occasion with any papers and stamps!  Let's see what you make.  Share with me over on my Facebook social page at kntdesigns stampers group social.  To watch the video tutorial replay over on my YouTube channel, click this direct link.


Supplies and measurements:  
Autumn Opulence Specialty DSP 168336
    2 pieces each of three designs, each piece cut to 1 1/4" x 1 1/4"
    1 piece 2 5/8" x 4"
    1 piece 1/2" x 3 3/4" for inside layer, trim to fit
    various ephemera cut outs from the dsp
Soiree Salutations 168337
Three Banner Punch 167050
Scalloped Christmas Cheer dies 168544 (3rd largest)
Very Vanilla cardstock
    4 1/8" x 5 3/8", 3rd largest scalloped die trimmed to approx. 1 1/4" x 2 3/4"    
    inside layer 3 5/8" x 4 7/8"
Petal Pink two-tone cardstock (lighter side) scrap for sentiment label
Gold dots 168467
Blackberry Bliss ink pad

Thanks so much for stopping by today, I appreciate it more than you know!  
Until next time; be happy, good health to you and happy stamping!
Teresa

*Purchasing bundles saves 10% over the individual piece prices when combined.  You must use the bundle item code for the 10% bundle discount.  When purchasing Last Chance items; be sure to check if the individual piece prices are discounted.  Individual piece prices may be less expensive if the discounts are deep enough.

Shop these links for the


Sunday, August 16, 2026

Glow of Harvest POTM & hot foiling Grateful for You

Hello and welcome back to my blog.  I'm so glad you stopped by.  Today, I'm combining the new hot foil system by Stampin' Up! with the August Product of the Month, Glow of Harvest DSP.  I've used two hot foiling plates, one for the background and one to frame the focal image in this card.  I really like how it came out, and I hope you do as well.  You will find a video tutorial on how to put this card together over on my YouTube channel by clicking this direct link.


Supplies and measurements:
Glow of Harvest 12" x 12" Specialty Paper (August POTM, $5USD with a $75 purchase)
Flourish & Frames Hot Foil dies 170064 (can be purchased in a bundle* with stamps)
Swiss Dots Hot Foil die 170075
Seasonal Cheer embossing folders168221 (I used the leaf folder)
Soiree Salutations 168337 (sneak peek item, available 9/1/26)
Crumb Cake cardstock for card base, 5 1/2" x 8 1/2", scored at 4 1/4"
Crumb Cake two-tone cardstock approx 4 1/8" x 5 1/2" (hot foil with Swiss Dots foil plate)
    Cut off two pieces 1 1/2" X 4 1/8" & one 1/2" x 4 1/8" after hot foiling
Cajun Craze two-tone cardstock approx 3 1/2" x 4 1/2" for hot foiling
Golden Glow two-t0one cardstock 3" x 4 1/8"
Very Vanilla cardstock for inside layer 3 5/8" x 4 7/8" & scrap for sentiment banner
Copper hot foil 170553
Stampin' Hot Foil™️system 170009
Stampin' Cut & Emboss machine 149653
Linen Thread (colored with Stampin' Blends in Dark, SU 100
2026-2028 In Color Dots 167546 (I colored the Crisp Cantaloupe with a light Cajun Craze Blend)
Ink Pads: Golden Glow, Early Espresso
Detail Scissors for cutting 170902

I hope you are loving the hot foil system as much as I am!  It adds so much with such little effort.  Until next time; be happy, good health to you and happy stamping!
Teresa

Saturday, November 8, 2025

I'm so grateful sunflower bouquet pop-up card

For my card today, I'm continuing on with some of the newly released Online Exclusives products by Stampin' Up!  Pop-Up Petals bundle is the featured product.  To see how easy it is to make pop-up cards with this bundle, be sure to watch the video tutorial over on my YouTube channel where I show tips and tricks on how to use the dies.  You can watch the video by clicking this link.


Supplies and measurements:
Pop-Up Petals bundle* 168010 (includes stamps & coordinating dies)
Banner Sayings bundle* 167051 (includes stamps & Three Banner punch)
Creative Haven dies 167208 (can be purchased in a bundle with coordinating stamps)
Autumn Toile Designer Series paper 165882
    4" x 5 1/4" & two pieces each 1" square
Vellum 12 x 12" Specialty Paper 167099 (approximately 2" x 3")
Early Espresso & Old Olive linen thread pack 165986
Basic White cardstock for stamping
    inside layer 5" x 8", scored in center at 4"
Early Espresso cardstock for card base 5 1/2" x 8 1/2", scored in center at 4 1/4"
Ink Pads: Cajun Craze, Crushed Curry, Early Espresso, Pecan Pie
Stampin' Blends markers: Old Olive
Earthy Matte Dots 167213

Thanks so much for stopping by!  Click on the shopping cart to the right.  It will take you to my online store where you can purchase all of your Stampin' Up! supplies.  I appreciate you so much.

Until next time; be happy, good health to you and happy stamping!
Teresa

*Purchasing bundles saves 10% over the individual piece prices when combined.  You must use the bundle item code for the 10% bundle discount.  When purchasing Last Chance items; be sure to check if the individual piece prices are discounted.  Individual piece prices could be less expensive if the discounts are deep enough.

Saturday, October 4, 2025

Fall for Toile Paper Pumpkin alternative treat box

 For my share today I've taken one of the card fronts from the Fall for Toile Paper Pumpkin kit and turned it into a treat box (with additional supplies of course).  To see just how I put my box together, be sure to watch the video tutorial over on my YouTube channel.


Measurements and Supplies:
Fall for Toile Paper Pumpkin kit, September 2025
Autumn Toile Designer Series Paper (I used the pumpkin patch piece) 3 1/4" x 2" approx.
Early Espresso cardstock 4 3/4" x 7" 
    score on 4 3/4" side at 1" from each end
    score on 7" side at 1" & 3" from each end
Early Espresso cardstock for die cutting labels & sentiment
Basic White cardstock scrap for stamping
Branching Out dies 165775 (can be purchased in a bundle* with coordinating stamps)
Cajun Craze & Gold Dots 165984
Irregular Weave Trim 165903
Ink Pads: Early Espresso, VersaMark
Basics Wow! Embossing Powder (white) 165679
small circle punch for punching out finger notch.  I used a 1" punch (non-SU)

Thanks so much for stopping by.  Do shop my online store for all your Stampin' Up! supplies.  I would really appreciate your business.  You can click on the shopping cart and it will take you to my online store.

Until next time; be happy; good health to you and happy stamping!
Teresa

*Purchasing bundles saves 10% over the individual piece prices when combined.  You must use the bundle item code for the 10% bundle discount.  When purchasing Last Chance items; be sure to check if the individual piece prices are discounted.  Individual piece prices could be less expensive if the discounts are deep enough.


Saturday, November 9, 2024

Light the Year Lantern Wreath card

We are continuing on with our Light the Year cards today.  I've made a fall card for today and then made the same card again in Christmas colors so you can see its versatility.  To see how I've put these cards together, be sure to visit my YouTube channel and watch the video replay.


Supplies and Measurements:
Light the Year bundle 164092* (includes stamps 164284 and dies 164091) 
Peaceful Seasons bundle 164021 (includes stamps 164145 and dies 164020)
Encircled in Nature dies 163628 (for wreath)
Cajun Craze cardstock, 5 1/2" x 8 1/2" for card base, score in center at 4 1/4"
Country Woods 12 x 12 DSP 163393 (4" x 5 1/4") 
Silver & White Sheer Ribbon 162149
Ink Pads: Cajun Craze, Old Olive, Crushed Curry, Pebbled Path
Stampin' Blends alcohol markers: Old Olive, Wild Wheat, Cajun Craze, Pecan Pie, Pumpkin Pie, Daffodil Delight
Wink of Stella Glitter brush 141897
Blending brushes 160518

Be sure to watch the video replay so you can see my Christmas card version using this same layout and wreath design.  I hope you'll love it.

Until next time; be happy, stay healthy and happy stamping!
Teresa

*purchasing bundles saves 10% over the individual piece prices when combined.  You must use the bundle item code for the 10% bundle discount.

**Online Exclusives items can be while supplies last.  If they are in the store, they are available for purchase.  If they say Currently Unavailable, the stock will be replenished.  If they are no longer in the store, unfortunately, they will not return. 

Thursday, October 27, 2022

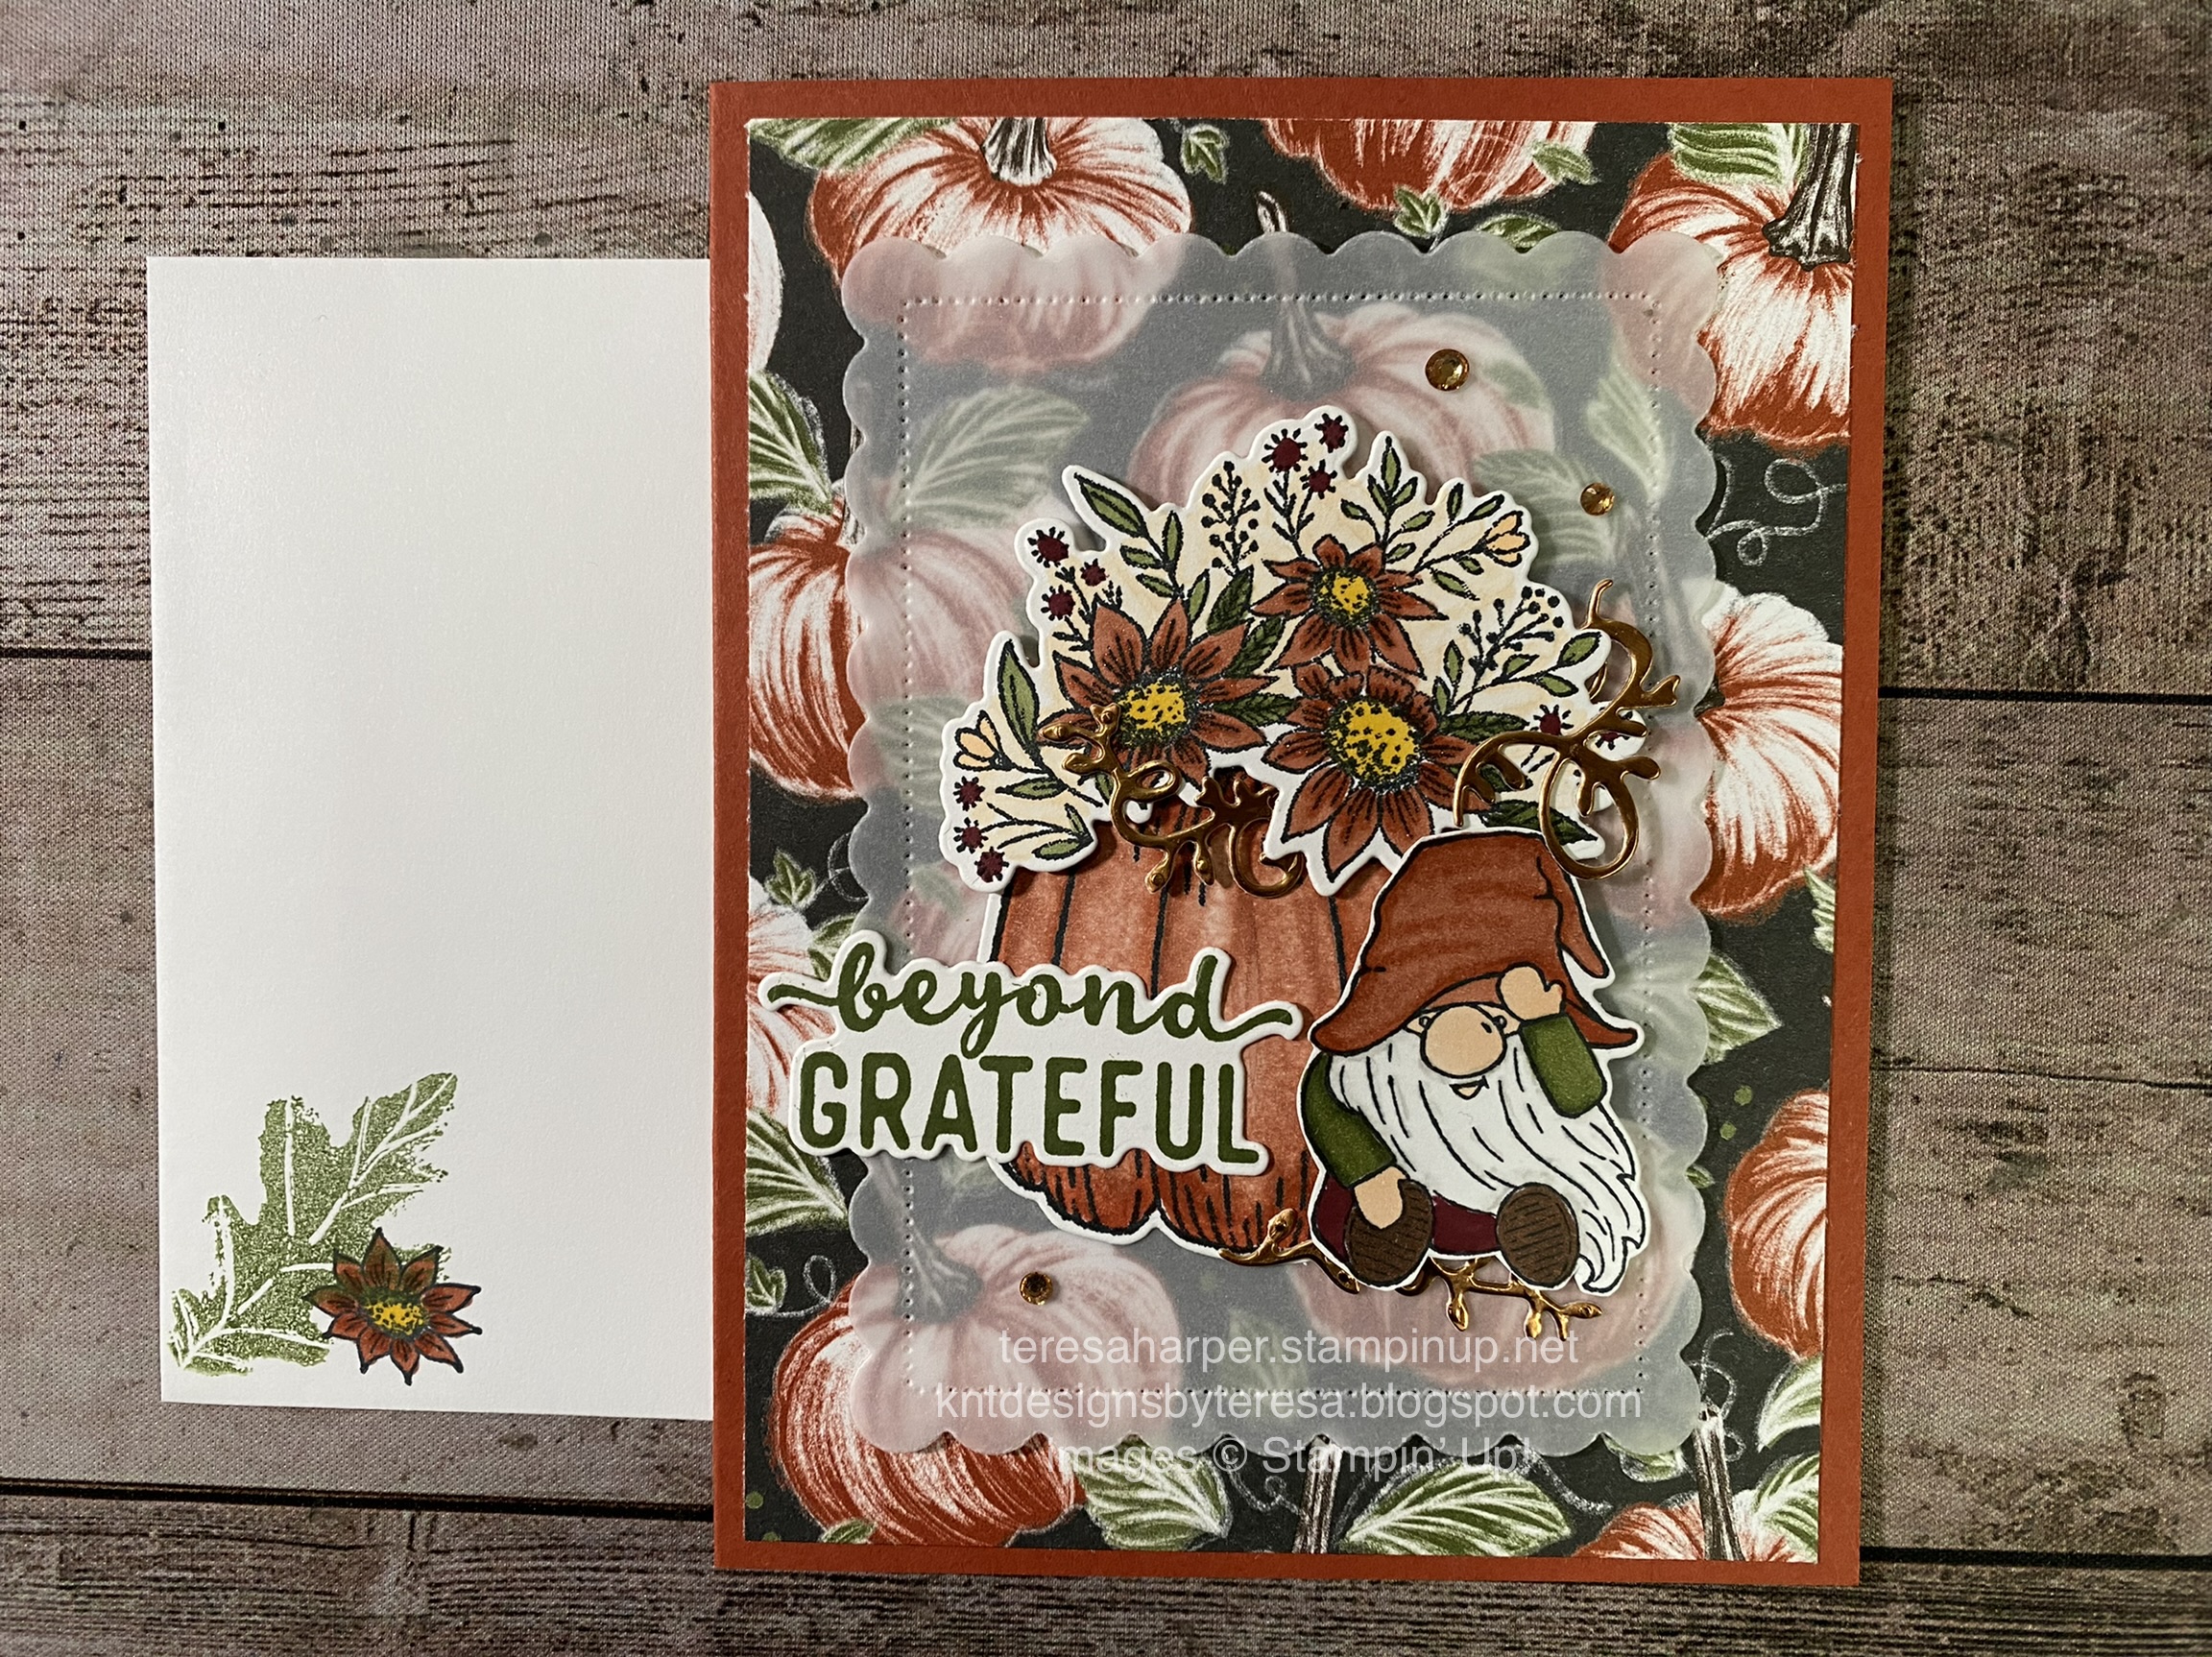
Beyond Grateful Gnome Hello Harvest card

Hello and thank you for stopping by my blog today!  I appreciate your time and interest.  Today’s project is my final Autumn card for the season.  I’ve used Hello Harvest along with the Kindest Gnomes to create this beautiful card you could send for Thanksgiving or just as a thank you to someone.  To watch how I put this card together, you can watch the replay over on my YouTube channel HERE:


Measurements and Supplies:
Hello Harvest Bundle (includes Rustic Pumpkin dies)
Kindest Gnomes bundle (includes Gnome dies)
Charming Sentiments bundle (includes Sentiment Silhouettes dies)
Scalloped Contours dies
Wink of Stella clear glitter pen
Champagne Rhinestones
Cajun Craze cs 5 1/2 x 8 1/2", scored in the middle at 4 1/4" 
Basic White cs 3 3/4 x 5 1/2" for stamping and die cutting images
Basic White cs for inside layer 3 5/8 x 4 7/8"
Cardstock Vellum 3 1/2 x 4 3/4" for die cutting scalloped rectangle
Autumn Harvest DSP (pattern paper) 4 x 5 1/4" & 1/2 x 4 7/8"
Scrap of Copper Foil sheets  approx 2 x 1 5/8"  
Ink pads in Mossy Meadow and Memento Tuxedo Black
Stampin' Blends alcohol markers: Pale Papaya, Cajun Craze, Mossy Meadow, Natural Tones Deep (SU 200) and Light (SU 900), Lt. Gray Granite, Dk Daffodil Delight, Color Lifter
Stampin' Write marker in Merry Merlot

To shop my online store for Stampin' Up! supplies, please click on the shopping cart in the upper right corner.  I would be every so grateful for your business.  Please leave me a comment.  

Until next time; be happy, stay healthy and happy stamping!
Teresa