Saturday, October 30, 2021

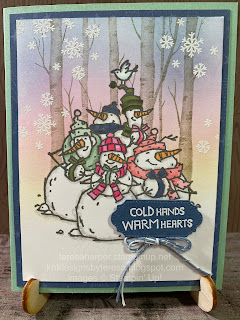
Warm winter wishes with Snowbody Better

 Here it is Saturday already!  I have another project for you today I made during my weekly Tuesday night live over on Facebook.  I would love it if you followed me there.  I usually make two projects every Tuesday evening live at 7:45 pm PDT.  You can always watch the replay over on my YouTube page at Teresa Harper kntdesignsbyTeresa.  

I started this project by stamping and coloring the snowman image in Momento Tuxedo black ink as I colored with Stampin’ Blends markers which are alcohol based.  I then fussy cut out the image with my paper snips.  I die cut a piece of basic white cardstock using the second largest Scalloped Contour die.  To this I stamped the snowflake image from Welcoming Woods stamp set in Versamark ink randomly on the top 2/3 of the die cut, added white embossing powder and heat set the powder.  Next, I used a blending brush and Misty Moonlight ink to add a little color to the “sky”.  I then began building my card layers.  To the Night of Navy cardbase, I added a piece of Beauty of the Earth Designer Series Paper, then added my scalloped die cut.  The snowmen were then added to the scalloped die cut using Stampin’ Dimensionals to give added depth.  The sentiment piece is stamped in Night of Navy ink on Misty Moonlight cardstock, then clear embossing powder was immediately added and heat set.  It must be done very fast as our classic ink dries quickly so you need to have all your supplies open and ready to go.). The sentiment was then cut out with a die from Beautiful Trees dies.  Finally, I added some white gems from Elegent Gems.   


Supplies used:
Beauty of the Earth Designer Series Paper 4 x 5 1/4”
Night of Navy cardstock 5 1/2 x 8 1/2”
Basic White Cardstock, half sheet for stamping and die cutting 
Misty Moonlight cardstock scrap for sentiment
Stampin’ Blends in Misty Moonlight light, Balmy Blue light, Flirty Flamingo, Fresh Freesia, Evening Evergreen and Soft Succulent
Blending Brush
ink pads in Momento Tuxedo black, Versamark clear and Night of Navy
White and clear embossing powders
Scalloped Contour Dies
Snowbody Better stamp set
Welcoming Woods stamp set

Thanks for stopping by my blog today.  Please leave me a comment to let me know your thoughts.  If you would like to purchase any of the products I’ve used, please click on the shopping cart in the upper right corner.  It will take you directly to my online store where you can shop 24/7.  I would really appreciate your business.

Until next time, happy stamping!
Teresa


Thursday, October 28, 2021

Easy Frightfully Cute Halloween treat bags

 It’s almost the end of October already can you believe it?  My how time seems to have flown by.  With that, it’s time to get busy and get the Halloween treat bags ready.  If you’re running out of time, these treat bags are fast and easy!  I made 48 treat bags for my grandkids’ classrooms in about two hours from design to completion.  They also require very little supplies.  I picked up the printed treat bags at Dollar Tree, but you could use plain ones.  These treat bags are 3.8 inches wide and have a ziplock type closure.  They came 30 to a package.

I started with a 12x 12” sheet of Basic White cardstock.  I scored it at 2, 6 and 10”, then cut into 4” squares.  You can get nine from one sheet of cardstock.  Next I grabbed my Stamperatus stamping tool and placed the moon image from Frightfully Cute on the bottom left of the 4” square below the score line.  I then picked the stamp up with the cover plate, inked in So Saffron and pressed the cover/stamp down on the cardstock.  I repeated with each square.  Next I flipped the cover plate over, placed the witch stamp on top of the moon, placed my sentiment to the right and picked those stamps up with the cover plate.  I then inked both stamps in Momento Tuxedo black ink and stamped onto the cardstock.  Repeating with a second inking when necessary.  I repeated this process for all 48 squares.  I was completely finished with the cutting and stamping in just under an hour and a half!  All that was left was to fold and burnish on the score lines.  I stacked them on top of each other as I folded each one, standing them up like a tent to save room on my desk.  Finally, each treat bag was filled, then the topper stapled to the bag.  


Supplies used:
12 x 12 Basic White cardstock
So Saffron ink pad
Momento Tuxedo Black ink pad 
Frightfully Cute stamp set
Stamperatus

Hope you enjoyed the project today and that if you have some last minute treats to make, this will help you out.  Thanks for stopping by my blog, please leave me a comment I’d love to hear what you have to say.  Should you need to purchase any Stampin’ Up! supplies, please click on the shopping cart in the upper right corner.  Until next time, happy stamping!
Teresa

Wednesday, October 27, 2021

Welcoming Woods Snowbuddy Better

 Happy Wednesday everyone!  Hope your week is going well.  Today I have a card featuring Snowbuddy Better and Welcoming Woods by Stampin’ Up!  I hope you love this card as much as I do.  I’m a sucker a stamp set with snowflakes and/or snowmen, so it’s no surprise this stamp set made it into my collection.  When I purchased the Welcoming Woods stamp set, I had this idea in my head.  

I first stamped and colored the snowmen, then masked the snowmen and stamped the birch trees from Welcoming Woods over the top.  Leaving the mask in place, I then used blending brushes and added ink in Bumblebee, Polished Pink, Fresh Freesia and Misty Moonlight to get the colored sky.  After the ink was fully dry, I stamped the snowflakes in Versamark ink, then added white embossing powder and set with my heat tool.  I also stamped my sentiment on a scrap of Misty Moonlight cardstock in Versamark, added white embossing powder and heat set.  I then cut it out with one of the smaller frames from Ornate Frames dies.

Supplies used:
Mint Macaron card base 5 1/2 x 8 1/2 scored @ 4 1/4”
Misty Moonlight cardstock layer 4 x 5 1/4” and scrap for sentiment
Focal layer Basic White 3 3/4 x 5”
Flowers for Every Season ribbon pack
White embossing powder from the Basics package of three
Versamark ink pad
Basic Grey ink pad
Stampin’Blends in Mint Macaron, Polished Pink, Mossy Meadow, Misty Moonlight Flirty Flamingo, light Grey Granite and light Balmy Blue.
Ink pads in Polished Pink, Basic Grey, Bumblebee, Fresh Freesia and Misty Moonlight
Blending Brushes
Ornate Frames to cut out the sentiment.

If you would like to see how I made this card, you can watch my Facebook live replay at KnT Designs by Teresa over on Facebook or on YouTube at Teresa Harper kntdesignsbyTeresa.  Thank you for stopping by today.  If you would like to purchase any Stampin’ Up! supplies, click on the shopping cart in the upper right corner.  I would love to earn your business if you don’t already have a Stampin’ Up! Demonstrator.

Until next time, happy stamping!
Teresa


Wednesday, October 20, 2021

Evergreen friendships are deer

 Good morning everyone!  Today is the final day of our 5-night craft retreat.  We will all be returning to our prospective busy lives but it was very nice to get away from reality if only for a short time.  I want to thank all the ladies for such a wonderful getaway.  Today’s project is one that I shared with the ladies during one of two make-n-take sessions.  It features the Peaceful Dear bundle of products by Stampin’ Up!  I call this a #simplestamping project as it uses, stamps, ink, and paper. I did add an embellishment in the rhinestones.  You can punch your dear out with the coordinating punch, but honestly I forgot I had the punch, so I fussy cut the deer.  I also fussy cut the sentiment.  When the girls made their cards, we used a frame from the Ornate frames die set to cut out the sentiment and we used the punch!  

Products used 
Cardstock in Evening Evergreen, Cherry Cobbler and Basic White
Inks in Pool Party, Cherry Cobbler and Momento Tuxedo Black
Stampin’ Blends in Soft Suede combo, Lt Petal Pink
Red Rhinestones

Thought I would share this photo I took Monday night as a few of us walked down the lane to lock the gate.  It was a beautiful night, if a bit on the chilly side here in Oregon.


Thanks for taking time from your busy day.  Please leave me a comment and let me know what you think. Should you need to order any supplies, I would be appreciative of your business.  Just click on the shopping cart in the upper right corner and it will take you to my online store.  

Have a great day, stay healthy and happy.  Happy stamping!

Teresa


Tuesday, October 19, 2021

Biggest sale of the Stampin’ Up! Year is upon us!


 I hope you are as excited as I am!  FOR 24 HOURS ONLY!!!! Begins at 12:01 am MT on October 21, 2021 until 11:59 pm MT October 21, 2021, every single cling stamp (aka as red rubber) in the 2021-2022 Annual Stampin’ Up! Catalog is on sale for 15% off (excludes host sets).  Click here to download the flyer.

If you would like to place an order for the sale, please click on the shopping cart in the upper right corner. It will take you directly to my online store.  For any orders under $150, please use host code FTH96BN6.  

Hope everyone has a fabulous time shopping the sale.  I know I have a few stamps sets on my list.  

Happy shopping!

Teresa

Thursday, October 14, 2021

Frightfully Cute Swing Fold card

 Hello and welcome!  Today’s project features the Frightfully Cute bundle of products from Stampin’ Up!   I originally made this card as a mystery stamping project and had so much fun, I had to make another card during my Facebook Live at KnT Designs by Teresa on October 11, 2021.  Feel free to check out my FB video.  The replay is also posted on my YouTube channel at Teresa Harper KnTdesignsbyTeresa.  

For this card, you will need a card base in Highland Heather cut at 5 1/2 x 8 1/2”.  You will also need an additional piece of Highland Heather cut at 5 x 6 and scored on the 6” side at 2” and 4”.  You will need to accordion fold this piece.  Cut a piece of Designer Series Paper at 4 x 5 1/4 and adhere only around the outside edges to the card front.  Then I diecut the largest swoopy square from the Hippo dies from the front panel using my Stampin’ Cut and Emboss machine.  You will also need to cut this same die from the Black Glitter Paper.  Cut the next smaller swoopy square in Basic White, then using my blending brushes, I added Flirty Flamingo ink to the bottom of the white, Gorgeous Grape to the center and Misty Moonlight and Night of Navy ink to the top.  Using my Stamperatus, I stamped three bats and the witch from Frightfully Cute stamp set in Momento Tuxedo black ink and fussy cut out those images.  I then used the Stampin’ Cut and Emboss Machine to cut out the spider web and witches hat in black Glitter paper, the owl from Basic Grey and the tree from Basic black cardstock.  You will need two pieces of Basic White cardstock for the inside panels.  These are cut at 1 7/8” x 4 7/8”.  Stamp your sentiment and the cat image on one panel and stamp the spider image on the other.  Then add your diecut pieces to the panels.  Your card is now ready for assembly.  Add the highland heather scored cardstock to inside of the card base using a strong adhesive ( I used Tombow multipurpose liquid glue so I could slide it into place) only on the right side panel, ensuring an even border on the top, bottom and right side.  With the panel you just added in it’s accordion fold, close the card front.  Add adhesive to the right side of the diecut hole in the front panel, then slide your matching black glitter diecut into place.  Now you can decorate with the remaining pieces as show in the photos!  


Thank you for taking time from your busy day to stop by.  Please leave me a comment, I would love to hear from you.  If you would like to purchase any Stampin’ Up! Supplies, you can click on the shopping cart in the upper right corner, it will take you to my online store. Please join me for my Facebook Lives every Tuesday at 7:45 pm Pacific time where I usually make two projects.  

Tuesday, October 12, 2021

Cute Halloween treat box

 Hello everyone, it’s been a very long time since I have blogged.  Life got in the way….I’ve spent months watching the grandkids while my daughter went to work throughout the pandemic.  2-4 little ones can really take it out of you.  While I worked on doing Facebook live videos, the blogging went by the wayside.  I’m definitely going to try to be better about it.  With kids physically back in school, I don’t feel quite so exhausted.  So let’s give this a try!  

Today, I am sharing a treat box I designed specifically to hold three Linder truffles, but when I got it finished, I discovered it fits two fun size candy bars, as well as a fun size candy bar and a 2 pack of Biscoff cookies.  It is perfect for those extra special people in your life you’d like to give a little treat to this Halloween.

First you will want to stamp the front panel for your box.  I cut a piece of Basic White cardstock 1 7/8 x 3 3/8 for the front.  To this I used my blending brush to add some Granny Apple Green ink, then using the Banner Year stamp set by Stampin’ Up!, I stamped the cobweb image all around the outside edges.   Set this aside.  For the treat box, start with a piece of cardstock 6 1/2” x 7”.  With the 6 1/2” side at the top of your Simply Scored tool, score at 1 1/4, 4 3/4 and 6.  Rotate clockwise 1/4 turn.
On the 7” side, score at 1 1/4, 3 1/4, 4 1/2 and 6 1/2”.   See template for cutting.  You can also watch my YouTube video over at Teresa Harper KntdesignsbyTeresa or check out my Facebook Live replay at KnT Designs by Teresa.  I found it easiest to add my front panel to the box prior to putting the box together.  Add the stamped panel to the portion of the box with the box flap at the top.  You can add after you have made the box if you wish.  

I used Basic black cardstock for my box base.  After putting my box together, I stamped the sentiment which is also included in the Banner Year stamp set, in Momento Tuxedo Black ink on Basic White cardstock and cut with a die from the Frightful Tags dies and also cut the same tag in basic black then adhered them together and glued directly to the front panel.  From the Cute Halloween Designer Series Paper, I fussy cut the three ghost images and added them to the stamped layer.  
The finished box size is 2” x 3 1/2” x 1 1/4”.


Thanks for taking time out of your day to spend a little time with me.  I hope you are inspired to make a treat box for someone special.  Leave me a comment and let me know what you think.  I’d love to hear from you.  If you’d like to purchase any of the items I’ve used, you can shop my online store by clicking on the shopping cart in the upper right.  Thank you in advance.