Wednesday, January 29, 2025

Hexagon Shaped birthday card with Darling Dinos

 For today's project I've used some new dies by Stampin' Up! to make a hexagon shaped birthday card for my youngest grandson.  He'll be seven in March and is absolutely obsessed with dinosaurs so when Stampin' Up! released the Darling Dinos bundle in January, I knew I would have to have it.  Thanks for taking a look.  To see how I've put this card together, there is a video replay over on my YouTube channel.


Measurements and Supplies:
Meant to Bee dies 166582 (Can be purchased in a bundle 167243* with coordinating stamps 166583)
Darling Dinos bundle 164735* (includes stamps 164728 and coordinating dies 164734)
Thick Basic White cardstock 5 1/2" x 8 1/2", scored in center at 4 1/4"
Basic White cardstock multiple pieces 
Basic Black cardstock
Ink Pads: Crushed Curry, Pumpkin Pie, Highland Heather, Azure Afternoon, Misty Moonlight, Old Olive & Memento Tuxedo Black
Blending Brushes
Stampin' Blends alcohol markers: Gray Granite, Azure Afternoon, Soft Sea Foam, Balmy Blue

to shop my online store for all your Stampin' Up! supplies, click on the shopping cart in the upper right.  I would really appreciate your business.  Thanks so much.

Until next time; be happy, stay healthy and happy stamping!
Teresa

*purchasing bundles saves 10% over the individual piece prices when combined.  You must use the bundle item code for the 10% bundle discount.  When purchasing Last Chance items; be sure to check if the individual piece prices are discounted.  Individual piece prices could be less expensive if the discounts are deep enough.

Saturday, January 25, 2025

To The Point Label topped box in a bag

 I saw an idea making a large box in a bag that used a 9” piece of Designer Series Paper which gave me the idea to alter the dimensions in order to make better use of a 12 x 12 sheet.  I usually make multiples so using a piece of Designer Series Paper that size wasn’t to my liking.  First, I altered it to make a bag that had a 1 1/4” square bottom and I really liked the size.  Then, I thought it might be less wasteful to make it a bit bigger and still get six from a 12 x 12 sheet but with no waste.  I went back to the math and came out with my larger bag measurements.  To see how I put both bags together, be sure to watch the video replay on my YouTube channel.


Supplies and Measurements:
Marbled Elegance Designer Series Paper 164919
    For Small Bag 3 1/2" x 5 1/2"
    Score on 3 1/2" side at 1 1/4".  If directional paper, the bottom of the pattern should be where you are scoring at (if using a Simply Scored, pattern bottom should be on the left.)  Rotate DSP clockwise to the 5 1/2" side.  Your scoring line should be at the top of the scoring tool.  Score only down to the score line at 1 1/4", 2 1/2", 3 3/4" and 5"
   
 For Larger Bag 4" x 6"
    Score on the 4" side at 1 3/8" (If directional, pattern should be on the left of the Simply Scored tool).  Rotate clockwise (score line should be at the top of the tool) and score only down to the score line at 
1 3/8", 2 3/4", 4 1/8" & 5 1/2"

Additional supplies for small bag:
Hugs For Love bundle* 165738 (includes stamps 1164559 & To The Point Label Punch 164568)
Basic White cardstock scrap
Inks: Summer Splash & Real Red
Adhesive-backed Heart Sequins 164920

Additional supplies for larger bag:
Latte Love stamp set 163455 (Last Chance item while supplies last)
Around It All dies 164725
Keeping Tabs Punch 163538 (available in a bundle 163540* with coordinating stamps)
Wonderful Thoughts stamps 161899 & coordinating dies 161491 for sentiment
Cardstock scraps in Basic White and Melon Mambo
Ink: Melon Mambo, Early Espresso
Blending Brush
Gold Twisted Thread 164603
Tear & Tape 154031
Non-Stampin' Up! Supplies:  Velcro 3/8" Thin Clear Fasteners

These little bags are really quick and easy to make.  You can make them super simple or step them up as I've shown here.  I hope you give them a try.  They're the perfect little table favor for most any occasion just by changing the paper and decorations.  To order your Stampin' Up! supplies, click on the shopping cart in the upper right.  My online store is always open.  I thank you in advance for your support of my small business.  It helps me to keep making videos and projects for all of you.

Until next time; be happy, stay healthy and happy stamping!
Teresa

*purchasing bundles saves 10% over the individual piece prices when combined.  You must use the bundle item code for the 10% bundle discount.  When purchasing Last Chance items; be sure to check if the individual piece prices are discounted.  Individual piece prices could be less expensive if the discounts are deep enough.

Wednesday, January 22, 2025

Delicate heart shaped chocolates treat box

 I thought it would be a good time to make a small box to fit the Ghirardelli heart shaped chocolates which are currently available at my local Costco.  Of course, you can find them in most grocery/department stores now as well.  As Stampin’ Up!®️ is offering the  Heart Shaped bundle for free during Sale a-bration, it seemed like a great time to design a box to fit both products.  This is the result and I hope you will find it useful.  Watch the video replay on my YouTube.  channel and I’ll show you just how easy it is to put together.  


Measurements & Supplies:
Heart Shaped bundle 164953 (SAB free offering with qualifying purchase thru 2/28/25)
Timeless Plaid 6x6 DSP 164678
    (2) 2 7/8" x 2 5/8"
    (2) 3/8" x 2 5/8"
    (1) 3/8" x 2 7/8"
Basic White cardstock 2 5/8" x 2 3/8" 
Gold Foil scrap for heart
Cardstock scraps in Balmy Blue, Calypso Coral and Basic White
Ink Pads: Balmy Blue, Misty Moonlight 
Heart Sequins 164920

Thanks so much for stopping by my blog today.  To order your Stampin' Up! supplies, click on the shopping cart in the upper right.  Thanks so much!

Until next time; be happy, stay healthy and happy stamping!
Teresa


Sunday, January 19, 2025

Bee Gabled You Make Me Smile Box

Hello everyone!  I'm continuing this week with my series using the Meant to Bee bundle from the January 2025 Scrapbooking Brochure and combining it with the Hugs for Love punch bundle from the January - April 2025 Stampin' Up! mini catalog.  My project for you today is inspired by Marisa Alvarez.  She made a gabled treat box last week that I loved.  It didn't quite fit the To The Point Label Punch I wanted to use, so I altered the dimensions and created a different sized box perfect for your Valentine treats or for any other occasion.  To see how I put the box together, be sure to watch the video replay over on my YouTube channel.


Supplies and Measurements:
Meant to Bee bundle 167243* (includes stamps 166583 and coordinating dies 166582)
Hugs for Love bundle 165738* (includes stamps 164559 & coordinating To the Point Label punch 164658)
Spring Is in the Air Paper Pumpkin add-on dies 166237
Cute as Can Bee 12x12 Designer Series Paper 166621
    (2) 1 7/8" x 2 3/8" (if directional paper, in Portrait) Box front & back
    (2) 1 1/8" x 2 3/8" (if directional paper, in Portrait) Box sides
    (3) 1 7/8" x 3/4" (if directional paper, in Landscape) Top gabled sections    
Petunia Pop cardstock, 5 1/2" x 7"
    Score on 7" side at 1/2", 2 1/2", 3 3/4" & 5 3/4" Rotate clockwise
    Score on 5 1/2" side at 1 1/4", 3 3/4" & 4 5/8"
Basic White for stamping
Petunia Pop cardstock scrap for hexagon die cut if using
Ink Pads: Petunia Pop, Daffodil Delight, Pool Party, Bubble Bath, Memento Tuxedo Black
Blending Brush
Tiny Bee Trinkets 164714
2024-2026 In Color Resin Dots 163389

Thanks so much for stopping by!  I hope you are inspired to make some of these for your friends and family.  They would make wonderful table favors or just treat boxes to give to loved ones.  As you can get two boxes from one sheet of cardstock, they are very economical to make.  Thanks so much for shopping my online store for all your Stampin' Up! needs.  Click on the shopping cart in the upper right.

Until next time; be happy, stay healthy and happy stamping!
Teresa

*purchasing bundles saves 10% over the individual piece prices when combined.  You must use the bundle item code for the 10% bundle discount.  When purchasing Last Chance items; be sure to check if the individual piece prices are discounted.  Individual piece prices could be less expensive if the discounts are deep enough.  

Saturday, January 18, 2025

You'll Always Bee the Friend For Me

 My card today is again top heavy on product.  I know, it is possible to use just one stamp set, but where's the fun in that? One of my favorite things to do is to grab some sets and explore the possibilities that haven't been created yet, to see where my creative juices take me.  To see how I've put this card together, be sure to watch the replay over on my YouTube channel.  


Supplies and Measurements:
Meant to Bee bundle 167243* (includes stamps 166583 and coordinating dies 166582)
Bee My Valentine stamps 162547 
Spring Is in the Air Paper Pumpkin add-on dies 166237
Elements of Text 164774
Hearts of Elegance dies 164915
Storybook Friends stamp set 164668 (I only used the sentiment FRIEND from this set)
Timeless Plaid 6 x 6 Designer Series Paper 164678
Basic Black cardstock for card base, 5 1/2" x 8 1/2", scored in center at 4 1/4"
Basic White cardstock for stamping & inside layer 3 5/8" x 4 7/8"
Ink Pads: Lost Lagoon, Crushed Curry, Petunia Pop, Memento Tuxedo Black
Stampin' Blends alcohol marker: Dark Petunia Pop
Blending Brush
Purple Sequins 164970 (Free Sale a-bration choice with qualifying purchase thru 2/28/25)

Thanks so much for stopping by today.  I hope you liked my project.  To order your Stampin' Up! supplies from my online store, click on the shopping cart in the upper right.  You can shop 24/7 and I would love to earn your business.

Until next time; be happy, stay healthy and happy stamping!
Teresa

Wednesday, January 15, 2025

Meant to Bee, Life is Better with You card

 Let's take a look at some newly released products.  I LOVE the new Meant to Bee bundle which is included in the January 2025 Scrapbooking Brochure by Stampin' Up!  If you already own the Bee My Valentine bundle, it might look familiar to you.  It's a coordinating set that when paired with each other, you have three sizes of bees, extra faces and other coordinating stamps to mix and match with each other.  This bundle; unlike Bee My Valentine, is a stamp and die bundle and the dies alone are so worth the bundle!  To see how I've put this card together and to take a look at all the dies cut out, be sure to watch my live replay over on my YouTube channel.


Supplies and Measurements: (warning....it's supply heavy as I love to mix and match my sets!)
Meant to Bee bundle 167243* (includes stamps 166583 and coordinating dies 166582)
Spring Is in the Air Paper Pumpkin add-on dies 166237
Heart Sequins 164920
Hugs for Love bundle 165738* (includes stamps 164559 & coordinating To the Point Label punch 164658)
Starstruck Embossing Folder 164972 (Sale a-bration free choice with qualifying purchase)
Cute As Can Bee 12x12 Designer Series Paper 166621 (bee images fussy cut from one sheet)
Basic Black cardstock for card base, 5 1/2" x 8 1/2", scored in center at 4 1/4"
Basic Black cardstock 1 1/2" x 5 1/4"
Daffodil Delight cardstock 4" x 5 1/4"
Scraps of cardstock in Pool Party & Petunia Pop
Basic White cardstock for stamping & inside layer 3 5/8" x 4 7/8"
Ink Pads: Pool Party, Petunia Pop, Memento Tuxedo Black
Wink of Stella Glitter Brush
Paper Snips 103579
Take Your Pick tool (optional but very useful) 144107
blending brush

I hope you like this card as much as I do.  I'm loving those little bees!  To shop my online store for your Stampin' Up! needs, please click on the shopping cart.  You can shop 24/7.

Until next time; be happy, stay healthy and happy stamping!
Teresa

*purchasing bundles saves 10% over the individual piece prices when combined.  You must use the bundle item code for the 10% bundle discount.  When purchasing Last Chance items; be sure to check if the individual piece prices are discounted.  Individual piece prices could be less expensive if the discounts are deep enough.  


Sunday, January 12, 2025

Floating Vertical Pop-up Card with Garden Wishes

 I have a super fun and easy fun fold card that will wow your recipient today.  The pop-up fold came from Susan Campfield.  I couldn’t wait to try out this fun fold.  It’s so incredible.  Your recipient will be wowed and amazed by your creativity and best of all, it really is pretty easy to put together.  Cutting the pieces takes the most time.  

To see how I put this card together, be sure to watch the video replay on my YouTube channel.


Supplies and measurements:
Garden Meadows stamps 162736 & dies 162740.  (Last Chance items heavily discounted while supplies last). Do NOT purchase the bundle as individual items are far less than the bundle)
Meandering Meadows Designer Series Paper 162735 (Last Chance with no discount)
5 3/4” tall x 6” wide, then cut in order on 6” side @ 5/8”, 2 1/2” & 5/8”
For each band (2) 6” x 1 1/8”, then cut in order on 6” side @ 5/8”, 1 1/8”, 1 5/8”, 1 1/8”, & 5/8”
Basic White cardstock for stamping & if desired I used a 2 1/2" x 2 7/8" piece on the back for signing the card.  
Thick Basic White cardstock for card base 4 1/8” x 5 1/2”, score on 4 1/8” side at 3/4” & 3 3/4”
(2 pieces) Thick Basic White cardstock 1 1/4” x 5 3/4”, score @ 3/4”, 2”, 3 3/4” & 5”
Window Sheet 142314, 1 5/8” x 4”
Ink pads: Melon Mambo, Pumpkin Pie, Granny Apple Green, Early Espresso, Garden Green
Stampin’ Blends alcohol markers: Crumb Cake, Melon Mambo, Lt Petal Pink or Natural Tones SU 1000
Mini glue dots, Tombow Monoadhesive Liquid glue and/or Tear & Tape

I hope you'll give these a try.  They aren't difficult and the results are pretty amazing.  To order your Stampin' Up! supplies, please click on the shopping cart in the upper right.  It will take you to my online store where you can shop 24/7.  

Until next time; be happy, stay healthy and happy stamping!
Teresa


Wednesday, January 8, 2025

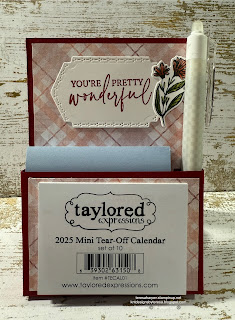
Mixed Labels Easel Calendar with sticky note pocket and pen holder

Hello and welcome back to my blog!  I hope you find today's 3D project useful.  I've used new product just released today by Stampin' Up! today.  I was inspired by other demonstrators who had made easel cards but couldn't quite make their designs work for me, so I took a couple different ones, added my own dimensions and my own design for the pen pocket, along with some help from my friend Tracy and came up with this design I'm very happy with.  My original prototypes were too front heavy and wouldn't stand up.  This one works perfectly and doesn't fall forward.  It's not really very difficult and I've provided some tips and tricks in the video, so be sure to watch how I've put this together.  The replay is over on my YouTube channel.


Supplies and Measurements:
Mixed Labels bundle 164653* (includes stamps 164643 and coordinating dies 164652)
Wildflower Designs bundle 163334* (includes stamps 163325 and coordinating dies 163333) or use a small flower set you have in your stash.
Timeless Plaid 6x6 DSP
    3 1/2" x 5 3/4", cut the top at 3 3/8" which leaves a section for the pocket of 2 3/8"
    You will have a 1/4" strip left after cutting the 6 x 6” dsp .  I've used it to decorate the back of my easel.   
Cherry Cobbler cardstock (4 pieces)
    3 5/8" x 10", score in half at 5"
    5 1/2" x 8 1/2", score on 8 1/2" side at 2 5/8" & 3 1/8"
        score on 5 1/2" side at 4 5/8" & 5 1/8" from each end
    3 1/2" x 4", score on 4" side at 1/2", 2" and 3 1/2"
    1 1/2" x 2 1/2", score on 1 1/2" side at 1/2" and 1"
Basic White cardstock for stamping images
    If desired, Basic White 3 3/8" x 4 3/4" for back of easel
Ink Pads: Cherry Cobbler, Memento Tuxedo Black
Stampin' Blends alcohol markers: Old Olive, Calypso Coral

Thanks so much for stopping by.  To shop my online store for all your Stampin' Up! supplies, click on the shopping cart in the upper right.  Beginning today, through February 28, 2025, is Sale a-bration where you can earn free products with a qualifying purchase (before tax & shipping).  There are no limits to the number of free products you can earn during this period.  Who doesn't love free product?

Until next time; be happy, stay healthy and happy stamping!
Teresa

*purchasing a bundle saves 10% over the individual piece prices when combined.  You must use the bundle item code for the 10% bundle discount.

Sunday, January 5, 2025

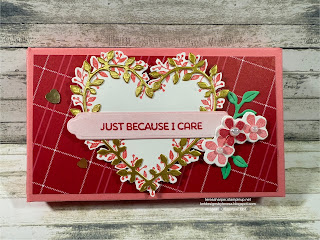
Sneak Peek of Heart Shaped Just Because I Care fold over treat box

 Hello everyone.  I hope you like the sneak peek of one of this year's Sale a-bration offerings by Stampin' Up!  This is a level 2 set which includes a photopolymer stamp set and coordinating dies.  I found some Italian milk chocolate hearts at my local Home Goods store and knew I would need to make a treat box to share them in.  I designed two boxes, one with reinforced sides and front and the other with just a reinforced front so I could get two boxes from one sheet of cardstock if I were to make a bunch of them.  I like to design boxes which allow me to get multiples from one sheet of cardstock.  If you would like to see how I've put this box together, be sure to watch the replay over on my YouTube channel.  


Supplies & Measurements:
Heart Shaped bundle 164946 (free with qualifying purchase Jan 7-Feb 28, 2025)
Just Adored DSP (Last Chance item 162976 while supplies last)
    (1) 4" x 2 1/4", (2) 4" x 3/8" & (2) 2 1/4" x 3/8"
Flirty Flaming Cardstock 7" x 6 1/4" Reinforced sides and front box (1 box from 8 1/2" x 11" sheet)
    Score on 7" side at 1/2", 1", 3 1/2", 4" & 6 1/2"
    Score on 6 1/4" side at 1/2" & 1" from each end
Flirty Flamingo Cardstock 7" x 5 1/4" for Reinforced front only box (2 boxes from 8 1/2" x 11" sheet)
    Score on 7" side at 1/2", 1", 3 1/2", 4" & 6 1/2"
    Score on 5 1/4" side at 1/2" each end
Basic White cardstock for stamping
Brushed Silver & Gold 12 x 12 Specialty Paper 164861
Ink Pads: Flirty Flamingo, Real Red 
Stampin' Blends: DK Shy Shamrock
Adhesive-Backed Heart Sequins 164920
Iridescent Pearls Basic Jewels 158987
small blending brush 160518

Thanks so much for stopping by.  I hope you find this treat box useful.  If you make one, I hope you will share on the Stampers Group Social on Facebook.  Tell us what you found to fit inside the box.  We would love to hear.

Until next time; be happy, stay healthy and happy stamping!
Teresa