Showing posts with label quick and easy. Show all posts

Sunday, February 15, 2026

Z-fold thank you card and Seashells

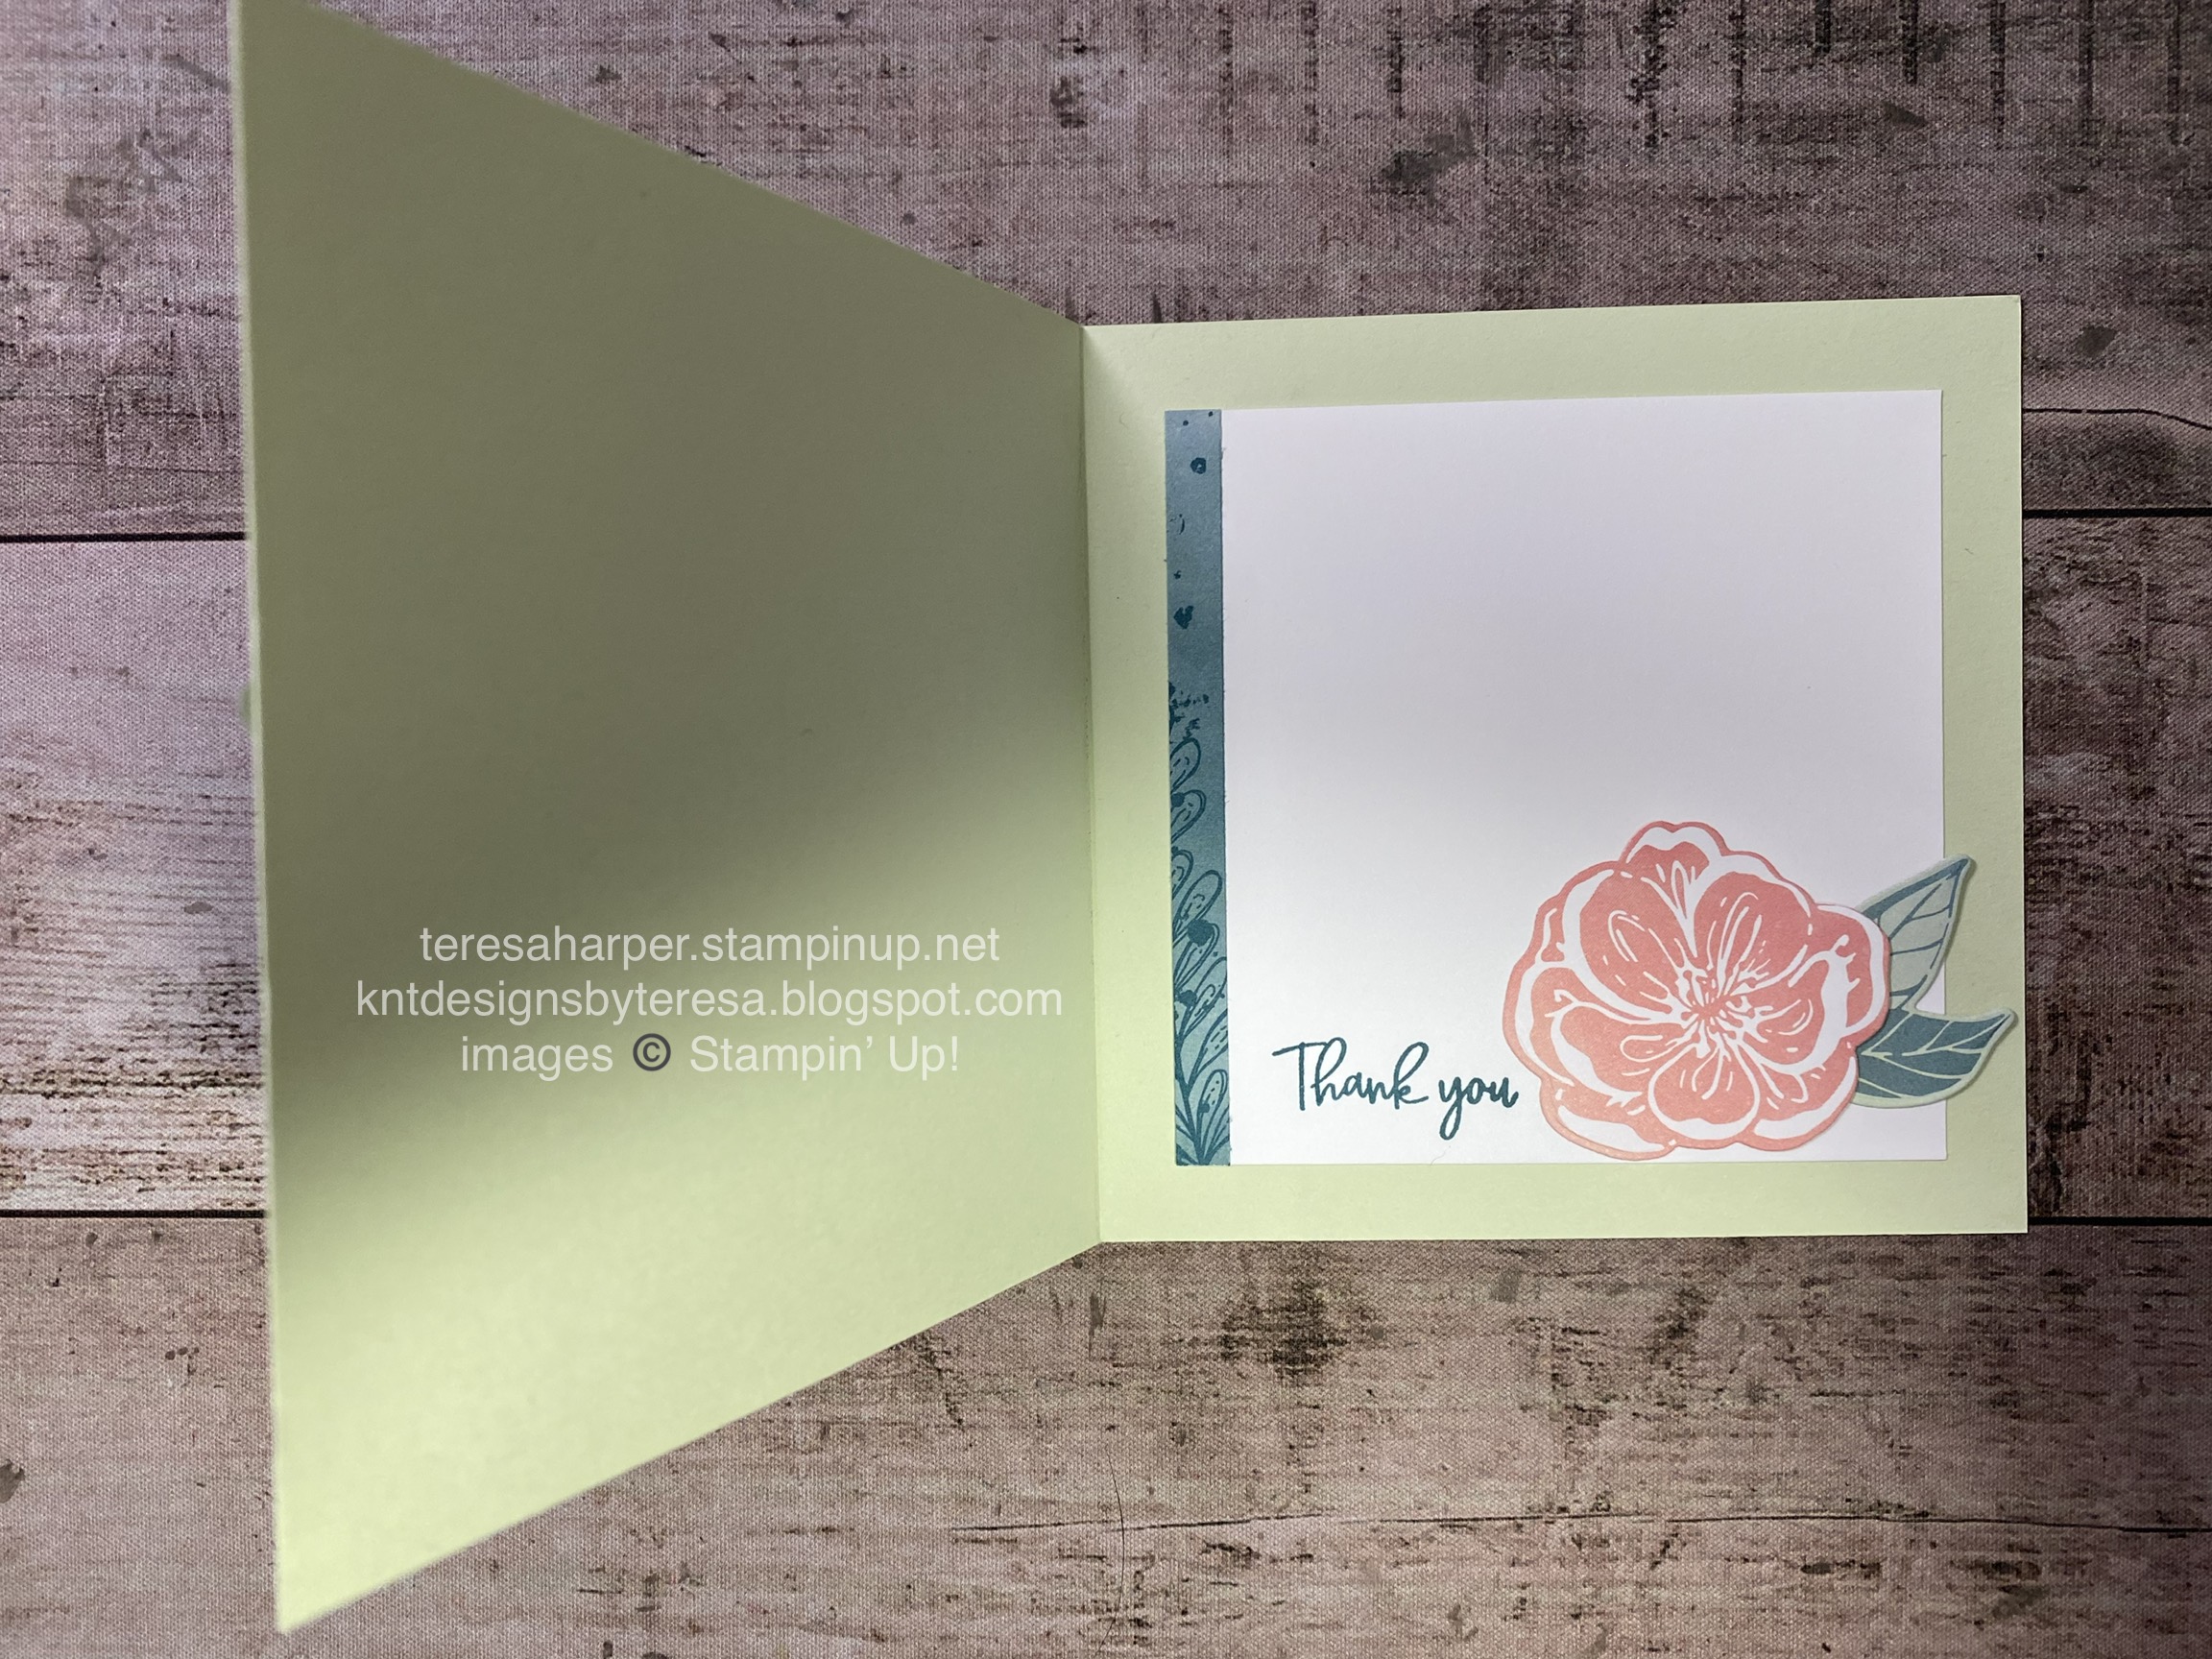
 I decided to make a simpler card today using the Collecting Seashells stamp we used earlier this week.  This card is quick and easily replicated.  Simply change the sentiment for another occasion if that's what you need.  You can watch the video tutorial over on my YouTube channel by clicking this link.


Supplies and measurements:
Shell Collecting stamp set (This is a reversible stamp set--watch the video and I'll show you how it works)
So Swirly embossing folder 163791
Gears & Textures 166851 (can be purchased in a bundle* with coordinating dies)
Nested Essentials dies 161597
Fabulous Sayings 167972 --January 2026 POM (while supplies last with qualifying order)
Something Fancy for inside sentiment (retired)
Painted Essentials DSP 167977--February 2026 POM (while supplies last with qualifying order)
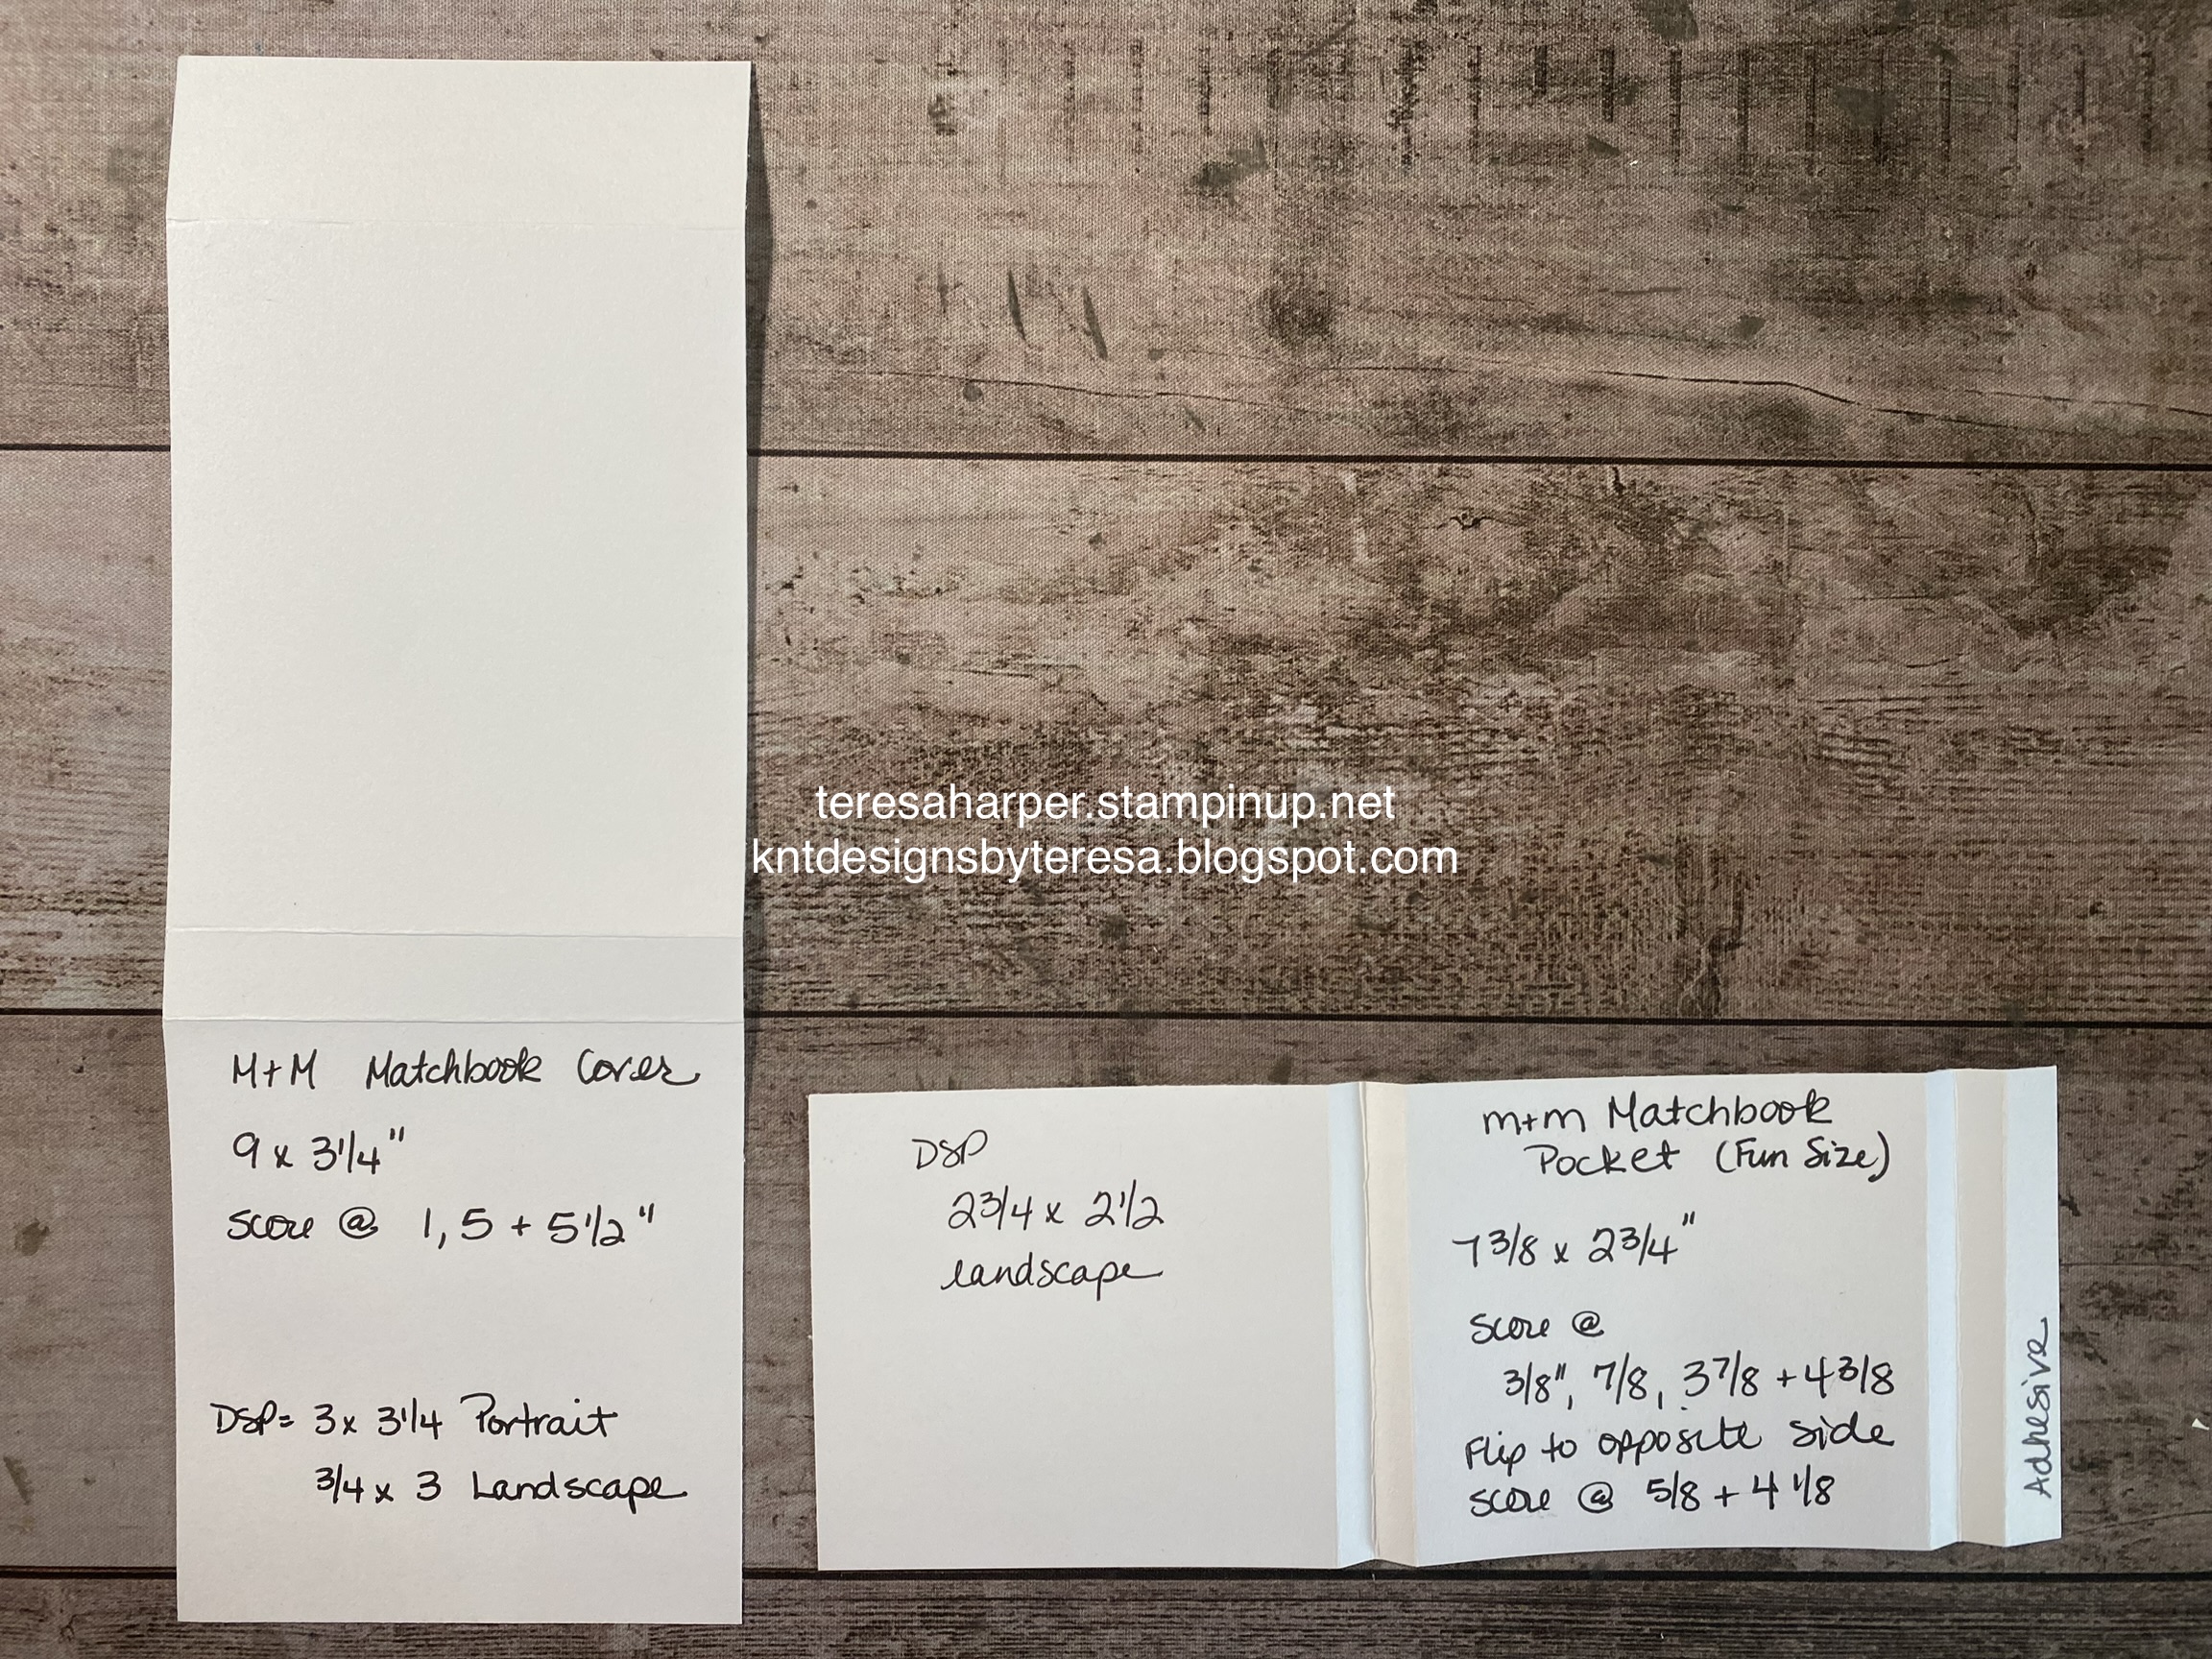
    2 pieces each 1 7/8" x 5 1/4" & (1) 1/2" x 1 7/8" for inside
Basic White thick cardstock 5 1/2" x 8 1/2"
    score at 2 1/8" & 4 1/4" on long side
Basic Beige cardstock
    2 1/8" x 5 1/4" & piece approx. 3" x 2 1/2"
Basic White cardstock, scraps for stamping
    & 1 7/8" x 5 1/4" for inside
Ink Pads: Misty Moonlight, Basic Beige, Lost Lagoon, Petal Pink
Pearls of Beauty 167098
Wink of Stella glitter brush 141897

Thanks so much for stopping by today.  I hope you are as excited about these products as I am.  To order yours, click on the shopping cart to the right.  I would be very much appreciative of your business.

Until next time; be happy, good health to you and happy stamping!
Teresa

*Purchasing bundles saves 10% over the individual piece prices when combined.  You must use the bundle item code for the 10% bundle discount.  When purchasing Last Chance items; be sure to check if the individual piece prices are discounted.  Individual piece prices may be less expensive if the discounts are deep enough.


Saturday, January 31, 2026

Hello Back Bend Fun Fold card with Sweet Bugs

 Today I have another fun fold card for you. This one is called the back bend card.  I saw it and had to give it a try.  I altered the measurements though because I didn't think the right-side measurement was large enough.  I wanted a little more room to adhere my focal point.  I also think it's a little more ascetically pleasing to my eye.  You can watch the video tutorial on how to make a card like this one over on my YouTube channel by clicking this link.


Supplies and measurements:
Sweet Bugs bundle* 167002 (includes stamps and coordinating dies)
Simply Said 163756 for the front sentiment
Fabulous Sayings (Product of the Month available while supplies last) inside sentiment
Lovely Stripes Embossing Folder 167179
Mossy Meadow cardstock 3 1/4" x 4 1/4"
Soft Sea Foam two-tone cardstock
    (1) 2 3/4" x 5 1/4"
    (1) 1" x 5 1/4"
    (1) 3/4" x 1 3/4" inside
Very Vanilla cardstock for card base 5 1/2" x 8 1/2"
    score on long side at 1 1/4" 2 1/2" & 5 1/2"
    inside layer 2 3/4" x 5 1/4"
Cute as a Bug Designer Series Paper, 3" x 4"
Ink Pads: Cajun Craze, Mossy Meadow, Memento Tuxedo Black
Stampin' Blends markers: Basic Black Light, Smoky Slate, Gray Granite Light, Mossy Meadow, Pumpkin Pie Light, Cajun Craze Light (inside colors) Petal Pink Light, Poppy Parade Light, Old Olive light
Moody Palette Glossy Dots 167180

Thanks so much for stopping by today.  I hope you like this fun fold and will give it a try.  

Until next time; be happy, good health to you and happy stamping!
Teresa

*Purchasing bundles saves 10% over the individual piece prices when combined.  You must use the bundle item code for the 10% bundle discount.  When purchasing Last Chance items; be sure to check if the individual piece prices are discounted.  Individual piece prices could be less expensive if the discounts are deep enough.

Wednesday, December 17, 2025

Hobby Haven DSP birthday card

Hello everyone!  I hope you are spending time with family and friends this holiday season.  I finished up my shopping (I think!) yesterday and will be taking some time off to enjoy time with family and friends.  I want to take this opportunity to wish everyone a very Merry Christmas, Happy New Year, Happy Holidays, Happy Hannukah or whatever it is you are celebrating this time of year.  From our home to yours, good health and good wishes.  

For my project today I was inspired by Jacque Williams, a demonstrator in Australia.  I'm using product from the November Online Exclusives, annual catalog and we even have a sneak peek item from the upcoming Jan-April 2026 mini catalog by Stampin' Up!  I hope you enjoy this project.  It's pretty quick to put together once you fussy cut the images.  There is a video tutorial available over on my YouTube channel.  You will find it by clicking this link. 


Measurements and Supplies:  
Banner Sayings bundle 167051
Addressed to You 167010
Stone & Vine 3D embossing folder (Sneak Peek, coming Jan. 6) 166990
Secret Sea cardstock for card base 5 1/2" x 8 1/2", scored in center at 4 1/4"
Garden Green two-tone cardstock, 2 strips each 1/2" x 5 1/2"
Basic White cardstock
    3" x 5 1/2" & 1/2" strip for sentiment
    4" x 5 1/4" for inside layer
Basic White medium envelopes 159236
Images cut from Hobby Haven Specialty DSP 167201
Ink Pads: Gray Granite, Secret Sea
Stampin' Blends marker: Secret Sea
2025-2027 In Color Flat Pearls 165192

Thanks for stopping by today!  
Until next time; be happy, good health to you and happy stamping!
Teresa

*Purchasing bundles saves 10% over the individual piece prices when combined.  You must use the bundle item code for the 10% bundle discount.  When purchasing Last Chance items; be sure to check if the individual piece prices are discounted.  Individual piece prices could be less expensive if the discounts are deep enough.

Saturday, June 21, 2025

Coneflower magnetic bookmark

 I have a very fun and easy project for you today.  You can make it with layers the way I did, or simply it just by using the die cuts.  Your choice but be sure to have some fun with them and share with all your friends and family!  You can watch the video replay of how I've put mine together over on my YouTube channel.


Supplies and Measurements:
Coneflower Celebrations bundle* 165251 (includes stamps 165247 & dies 165250)
Daffodil Delight cardstock
Basic White cardstock
Ink Pads: Early Espresso, Daffodil Delight
Stampin' Blends alcohol markers: Pecan Pie, Daffodil Delight (Dark), Lemon Lolly
Wink of Stella glitter brush 141897
1/4" thin magnets (non-Stampin' Up!)

I hope you have enjoyed this little project today.  I know your reading friends and family would be thrilled to receive one.  Why don't you give it a try and see how it goes?  I would love it if you would share over on my facebook crafting community page.  You will find the link HERE:   

Until next time; be happy, good health to you & happy stamping!
Teresa

*Purchasing bundles saves 10% over the individual piece prices when combined.  You must use the bundle item code for the 10% bundle discount.  When purchasing Last Chance items; be sure to check if the individual piece prices are discounted.  Individual piece prices could be less expensive if the discounts are deep enough.

Thursday, December 14, 2023

Light the Sky easy Cracker Treat box

First of all, it's FREE SHIPPING at Stampin' Up! today with a minimum $75 order before tax.  Be sure to get those orders in by 11:59 pm MT so you can qualify for the free shipping.  Orders are NOT guaranteed to arrive on or before Christmas.

Today I am featuring the Light the Sky stamp set and making a New Year’s cracker for your festivities.  These are very quick and easy to assemble for your New Year’s celebrations or for any occasion!  They use a die that does all the work for you making the cracker, everything cut and scored, ready to assemble.  All you need to do is decorate after assembly.  To see how I’ve put these together, you can watch the replay on YouTube.


Measurements and Supplies:
Basic White cardstock for stamping
Gold & Silver 1/8" Trim Combo 161633

For Let's Celebrate Cracker:
Cracker & Treat Box dies 159182
Light the Sky stamp set 162289
Stylish Shapes dies 159183 (for sentiment tag or use the tags in the Cracker & Treat Box dies)
Stargazing Designer Series paper 6" x 5" landscape orientation
Ink Pads: Berry Burst, Crushed Curry, Orchid Oasis, Versa Mark
White embossing powder, 155554
Heat Tool 129053
Embossing Additions Tool kit 159971

For Christmas Cracker:
Beary Cute Stamp set 162016
Double Oval Punch 154242
Ink Pads: Balmy Blue, Real Red, Smoky Slate
blending brush
Beary Christmas DSP, 6' x 5" in landscape orientation
Basic White cardstock for stamping

Thanks so much for stopping by today.  If you would like to take advantage of the free shipping today only, click the shopping cart on the right.  It will take you to my online store.  

Until next time; be happy, stay healthy and happy stamping!
Teresa


Saturday, July 1, 2023

Life is better Crafting matchbook style treat holder

 For today, I have a fun size treat container in the matchbook style.  These are quick and easy to make.  This holder could easily be adopted for any occasion by changing up the Designer Series Paper and stamps.  They can be as elaborate or as simple as you like.  They make great table favors.  I will have additional inspiration on my Facebook business page and my Knt Stampers Group Social page this week so be sure to check it out.  The social page will have a 4th of July idea using this holder.  To see how I’ve put this project together check out the video replay on my YouTube channel HERE:


Measurements and Supplies:
Crafting With You bundle by Stampin' Up! (stamps and dies, save 10% when you purchase the bundle (161226)
3D Basics Embossing Folders (161598). I used the star pattern here.
Glorious Gingham Designer Series Paper (163170)
    3 x 3 1/4", 3/4 x 3" and 2 3/4 x 2 1/2"
Pebbled Path cardstock, 9 x 3 1/4", score at 1, 5 & 5 1/2" on the 9" side.
Berry Burst cardstock, 7 3/8 x 2 3/4", score on 7 3/8" side at 3/8", 7/8", 3 7/8" & 4 3/8"
    flip cardstock over to opposite side and score at 5/8" and 4 1/8" again on the 7 3/8" side.
Basic White cardstock for stamping and die cutting images
Crumb Cake cardstock scrap 
Ink Pads: Berry Burst, Night of Navy, Pebbled Path
Stampin' Blends markers in Dk Bubble Bath to color hearts
Wink of Stella glitter brush

Thank you so much for stopping by.  I hope you make some of these, if so, I would love to see them.  Be sure to share over on Facebook in my Knt Designs Stampers Group Social so we can all be inspired.

Until next time; be happy, stay healthy and happy stamping!
Teresa


Thursday, March 16, 2023

Playing In The Rain kite flying card

 Here is a very quick and simple card using the Rain or Shine suite collection by Stampin’ Up!  I hope you like it.  Cards don’t have to be difficult to be adorable.  I’m sure this will put a smile on the face of the recipient.  To see just how easy it is to put this card together, watch my YouTube video replay HERE:


Measurements and Supplies:
Playing in The Rain bundle (includes stamps and coordinating dies) 160551
Rain or Shine Speciality Designer Series Paper, 4 x 5 1/4"
Old Olive card stock 5 1/2 x 8 1/2" scored in center at 4 1/4"
Basic White cardstock for stamping and die cutting & inside layer 2 3/4" x 4 1/4"
Vellum cardstock scrap for die cutting
Ink Pads: Tahitian Tide and Memento Tuxedo Black
Sunshine and Smiles Paper Pumpkin February 2023 stamp set for inside (optional)
Clear Embossing Powder
Embossing Additions Tool Kit 
Stampin' Blends alcohol markers:  SU 1000 (Light Natural Tones combo), Gray Granite, Dk So Saffron, Dk Pale Papaya for bunny.  Old Olive, Crumb Cake, Color Lifter, Lt Cajun Craze, Dk Pale Papaya for inside turtle and flowers.
Wink of Stella Glitter Pen

Thank you for stopping by today.  If you would please shop my online store for your Stampin' Up! supplies, I would greatly appreciate it.  Thank you in advance.

Until next time; be happy, stay healthy and happy stamping!
Teresa


Thursday, March 2, 2023

Lucky Clover St Patrick’s Day card

 This week I am featuring the Lucky Clover stamp set.  Today’s project is a very simple card put together with scrap strips of paper.  I did use the Lucky Clover punch to punch out the large clovers, but you can just as easily fussy cut them as the punch is already sold out.  I apologize for the lack of inventory.  I have two other projects for you this week and neither of those use the punch.  This is a great little stamp set and pretty inexpensive.  To watch the video replay of how I put this together, head on over to my YouTube channel HERE:


Measurements and Supplies:
Lucky Clover stamp set (Lucky Clover punch optional, fussy cut if you don't have it)
Basic White Thick cardstock 5 1/2 x 8 1/2", scored in center at 4 1/4" for card base
Five (5) 1/2" x 3 1/2" strips in each of Soft Sea Foam and Shaded Spruce cardstock
Basic White cardstock 3 1/2 x 4 3/4" to adhere strips to
Basic White cardstock scrap for stamping and punching shamrocks and 1/2" x 3" piece for sentiment strip
Shaded Spruce and Soft Sea Foam ink pads
For inside:
Basic White cardstock 2 3/4 x 4 1/4" 
Shaded Spruce cardstock 3 x 4 1/2"

Thank you for stopping by.  Click on the shopping cart in the upper right to shop my online store for Stampin' Up! supplies. 

Until next time; be happy, stay healthy and happy stamping!
Teresa


Thursday, February 23, 2023

Irresistible Blooms Book Bind Fun Fold kindness card

 Hello, hope your day is a happy one!  This week’s projects will feature the Hello, Irresistible  suite of products which will release to the public on March 1, 2023, as part of Stampin’ Up!’s  new Online Exclusives collection.  I’ve had a bit of a play with it and designed these projects for you.  Today’s card is a book bind fun fold which has a wow factor but is really simple to put together.  To see the live replay over on my YouTube channel click HERE:


Measurements and Supplies:
Hello, Irresistible Suite Collection (includes the next three items) 161154
Irresistible Blooms bundle (stamps and dies) 
Loose Frosted Dots
Hello, Irresistible Designer Series Paper
    4x4", 1 x 4", 1/4 x 3 1/2" and die cut flowers and leaves
Soft Sea Foam cardstock for card base
    4 1/4 x 11" scored at 5 1/2 and 6 3/4"
Basic White cardstock
    two pieces 3 1/2 x 3 1/2", die cut one with circle die, other is for the inside
Sea Foam Seam Binding Ribbon (retired, sorry)
Ink Pad, Pretty Peacock (returning In Color 2019-21)
Harvest Dies for sentiment (optional)

Thank you so much for stopping by today!  If you would like to order any Stampin' Up! supplies from my online store, click the shopping cart in the upper right.  Thanks in advance for your business.

Until next time; be happy, stay healthy and happy stamping!
Teresa


Thursday, February 2, 2023

Best Wishes with Artistically Inked

 Happy Thursday!  This week's project will feature the Artistically Inked stamp set and Artistic Dies which can be found in the Stampin' Up! 2022-23 annual catalog on pages 105 and 169.  In addition, I used the Stylish Shapes dies and the Sale a-bration free Designer Series Paper  (DSP) Favored Flowers which is only available until the end of this month.  To see how I put this card together, you can watch the video replay over on my YouTube channel HERE:


Supplies and Measurements:
Artistically Inked stamp set
Artistic dies
Stylish Shapes dies
Card base, Blackberry Bliss cardstock (CS), 5 1/2 x 8 1/2", scored in the middle at 4 1/4"
Favored Flowers DSP 4 x 5 1/4"
Distressed Gold specialty paper scrap for die cutting
Basic White CS for stamping and die cutting, 1/4 sheet
Ink Pads: Daffodil Delight, Blackberry Bliss, Fresh Freesia and Granny Apple Green
Adhesive Backed Milky Dots 

Thank you for stopping by today.  To purchase any Stampin' Up! supplies, I would very much appreciate if you would please visit my online store here: https://www.stampinup.com?demoid=2109129 

Until next time; be happy, stay healthy and happy stamping!
Teresa

Saturday, December 3, 2022

Gift Card tag and/or treat holder with Celebration Tags, 11th in the 12 Projects of Christmas 2022 series

 I hope you can use this tag made into a gift card holder OR treat holder.  I used the Celebration Tags dies to make this project.  My idea was that you could either attach to a gift or hang on the Christmas tree as a decoration with a gift card inside for the recipient.  

To see how I put this tag together, head on over to my YouTube channel HERE:


Measurements and Supplies: 
Celebration Tags dies
Celebrate with Tags stamp set
Split Card Texture dies
Mint Macaron cardstock for large tag die cut
Basic White cardstock 2 1/8" x 3 1/4", cut with Split Texture die
Basic White cardstock for stamping and die cutting
Basic White cardstock for inside 2 x 3 1/4" (optional)
Polished Pink Open Weave Ribbon
Ink Pads: Shaded Spruce, Polished Pink

Reminder:  Last Chance sale is going on now and all items are while supplies last.  Be sure to check the Clearance Rack as well, new items were added on December 1st.  You can shop in my online store by clicking on the shopping cart in the upper right.

Until next time; be happy, stay healthy and happy stamping!
Teresa

Thursday, December 1, 2022

Sending Love and Peace Celebration Tags treat holder, 10th in the 12 Projects of Christmas 2022

 So glad you are here today.  Today begins the Last Chance sale from the July-December 2022 Stampin' Up! mini catalog AND there's a clearance rack refresh.  Run, don't walk to my online store and grab up those bargains!  Supplies are limited and all items are while supplies last.  

I have a treat holder I created with the Celebration Tags dies which will be retiring shortly.  I hope you grab them up before they're gone.  They're on sale right now for $23.40 but only while supplies last....so hurry on over to my online store and pick them up today.  Click on the shopping cart and then go to Last Chance.  They are item 159866.  The coordinating stamp set I used Celebrate With Tags is not retiring.  Be sure to purchase separately though as you will save more money over the bundle price.  

To see how I put this treat box together, watch the replay over on my YouTube channel HERE:


Measurements and Supplies: 
Celebrate with Tags stamp set
Celebration Tags dies
Layering Circles dies for scalloped circle
Peaceful Deer for sentiment only (use whatever you like)
Celebrate Everything DSP 2" x 2 1/8" in Portrait mode
Basic White cardstock for stamping and die cutting
Cherry Cobbler cardstock scrap for scallop circle
Evening Evergreen cardstock
    1 piece to die cut the smaller tag die
    2 pieces each 2 1/4 x 1 1/2", score on the short sides at 1/4, 3/4" rotate 180 degrees, then score again at 1/4".  Do this for both pieces.
Ink pads: Sof Succulent, Evening Evergreen, Cherry Cobbler
Fun Flowers Resins Shapes

Thanks for stopping by!
Until next time; be happy, stay healthy and happy stamping!
Teresa


Saturday, November 5, 2022

Christmas Season cross stamping Christmas cracker

Today's project is the second project of my 12 Projects of Christmas 2022, and shows another way to use the cross stamping technique I demonstrated during my live tutorial on Tuesday which you can watch over on my YouTube channel HERE:

I wanted to show the technique is not just for cards and can be done on any size paper.  I hope you are inspired to try it and to make some treat boxes for loved ones during the holidays.  I think everyone should have the Cracker and Treat box dies.  They can be used for any occasion, and you get so many extra labels you can use on anything and everything!  


Supplies and Measurements:
 Measurements and Supplies:
Christmas Season Stamps (2022-23 Annual Catalog)
Christmas to Remember stamps (sentiment only)
Cracker and Treat Box dies (2022-23 Annual Catalog)
12 x 12 Full sheet of Basic White cardstock for stamping
Basic White scraps for sentiments
Ink Pads: Early Espresso, Crumb Cake, Evening Evergreen, Soft Succulent, Garden Green, Pear Pizzaz, Old Olive and Cherry Cobbler
Festive Pearls or other embellishment
Gold Shimmer Ribbon

Thanks for stopping by my blog today!  Please leave a comment and let me know what you think of this technique.  To shop my online store, click on the shopping cart in the upper right.

Until next time; be happy, stay healthy and happy stamping!
Teresa

Saturday, August 6, 2022

Ice Cream Best Remedy kit card

I made this card design as it was intended in the Best Remedy card kit, other than cutting the original card base in half and adding one piece to a Thick Basic White card base.  I also stamped in the inside of the card.  Other than that, it's as Stampin' Up! artists designed it.  You can see how to put this card together over on YouTube by clicking here:

Supplies and Measurements:
Best Remedy Card Kit by Stampin' Up!
Thick Basic White card base 5 1/2 x 8 1/2"
Striped card base from the kit, cut in half on the fold
Polished Pink embossed piece 3 1/4 x 4 1/2"
Crushed Curry dotted piece 1 1/4" x 3 1/2"
Sentiment piece 1 1/2 x 1 5/8"
Sequins
Mouse die cut from kit OR stamp, color and fussy cut the skunk from the kit stamp set.  
Basic White for inside layer 3 5/8 x 4 7/8" (optional)

Thanks for stopping by today.  To order this kit, click on the shopping cart and then go to kits.  Kits are only available while supplies last so hurry to get yours before they sell out. 

Until next time; be happy, stay healthy and happy stamping!
Teresa

Saturday, July 23, 2022

Wonderful World greeting cards

 The cards for today were made to go in the card gift box I showed on my blog on Thursday.  If you missed those measurements, be sure to go back and look.  You will also find a video over on my YouTube channel on how to put the cards and box together HERE:  All cards use the same dimensions, same stamp set and Designer Series Paper, and coordinate perfectly with the card gift box from Thursday.  I've made two of each card to put in the gift box.  I've used various sentiments from Inspired Thoughts by Stampin' Up!  It's one of my go to stamp sets for sentiments as it has a variety for any occasion and also has sentiments for the inside of your card as well.  As you can tell, I made all the cards using the same materials and layout, just changing up the colors and DSP from the packet.  


Measurements and Supplies:
Wonderful World Stamp and DSP pack (Sale a-bration choice, free with qualifying purchase in July and August 2022)
Pretty Flowers embossing folder
Brushed Brass Butterflies
Crinkled Seam Binding Ribbon (White), colored with Stampin' Blends markers
Card Base 5 1/2 x 8 1/2", scored in the center at 4 1/4" (Rich Razzleberry, Blackberry Bliss, Flirty Flamingo and Orchid Oasis cardstocks.)
Basic White and Pear Pizzazz cardstock 4 x 5 1/4" for Embossing
Basic White cardstock for focal image 2 3/8 x 3 1/8" (you'll need to six to make the cards)
Cardstock 2 1/2 x 3 1/4" to layer (Rich Razzleberry, Blackberry Bliss, Flirty Flamingo and Orchid Oasis)
Inside layer, Basic White cardstock 3 5/8 x 4 7/8"
Wonderful World DSP 2 x 4" (you'll need two each of three designs for six cards)

Thanks so much for stopping by today!  To shop my online store for your Stampin' Up! supplies, click on the shopping cart in the upper right corner.  I'd very much love it if you would leave me a comment.

Until next time; be happy, stay healthy and happy stamping!
Teresa


Thursday, June 9, 2022

Love and Big Bear Hugs

 Hello everyone!  Today I have an adorable card for you to send to someone who might need a little cheering up.  It features the Happier Than Happy bundle by Stampin’ Up! This card is rather easy and quick to put together.  You can watch how I put it together over on my YouTube channel here:


Supplies and Measurements: 
Deckled Rectangle Dies
Happier Than Happy Bundle (stamp and die bundle with Happy Forest dies)
Old Olive card base 5 1/2 x 8 1/2", scored at 4 1/4", embossed on the front with the Bark 3D embossing folder. (Retired)   If you don't have it already, you can use the Timber 3D embossing folder currently available.
Happy Forest Friends Designer Series Paper (DSP), cut with largest Deckled Rectangles Dies, approx. 3 3/4 x 5", 1/2" x 4 7/8" strip of coordinating DSP
Basic White cardstock 3 5/8 x 4 7/8", adhere 1/2" strip of DSP to right side, then cut with second largest deckled rectangle die for inside.
scrap piece of Mossy Meadow to punch scalloped oval from the Double Oval Punch
scrap piece of Basic White for stamping and punching sentiment and for stamping and die cutting bear
5" Old Olive ribbon from the Sahara Sand and Old Olive ribbon combo pack
Wink of Stella
Medium Basic White Envelopes
Ink pads in Soft Suede, Mossy Meadow

Thanks for stopping by my blog today!  I do so appreciate it.  I hope you've enjoyed this card.  I know it sure puts a smile on my face.  To order any of the supplies I've used today, click on the shopping cart in the upper right corner.  It will take you to my online store where you can shop 24/7 for all of your Stampin' Up! supplies.  Please leave me a comment and let me know if you give this card a try.  I'd love to hear from you.

Until next time; be happy, stay healthy and happy stamping!
Teresa


Saturday, May 28, 2022

Flowers of Friendship 1 piece of DSP makes 2 cards

 Today’s Project really is two cards made from one piece of 3” x 4” Designer Series Paper.  I hope you like the projects.  I participated in a mystery stamping game with Marisa Alvarez of Kitchen Table Stamper last week.  This layout is the one she used.  I have used different stamps and things to create this card, simply using the clues I was given at the time.  You can watch the replay of my projects on my YouTube channel here.

To start, you'll need a 3 x 4" piece of patterned paper, preferably non-directional.  With the 4" side across the top, mark on the left side using a ruler and pencil 1 1/4" down the left side.  Then down the right side, mark at 2 1/4".  Place on your trimmer with one mark in the cutting track at the top, and the other mark in the cutting track at the bottom.  Then cut from mark to mark.  This will give you two pieces of DSP to use on your cards.  I placed my pieces at the top of each card; however, you could place them both at the bottom of your two cards or one at the top and the other at the bottom.  It's really whatever you prefer.  Then you can decorate however you would like.  This is how I chose to decorate mine.  I hope you like them.


Inside of card 1.


Inside of Card 2

Measurements and Supplies for two cards:
3" x 4" piece of Design a Daydream Designer Series Paper (DSP)
Scrap piece of Design a Daydream DSP for stamping and punching flower leaves
1/2" x 3 5/8'' piece of same DSP for inside
card base one each of Petal Pink and Blackberry Bliss cut 4 1/4 x 11, scored at 5 1/2"
two pieces Basic White cardstock for outside layer 4 x 5 1/4"
two pieces Basic White cardstock for inside layer 3 5/8 x 4 7/8"
Scrap piece of Petal Pink large enough to punch 4 small and 4 large flowers
ribbon for two cards (your choice)  I used Cotton Ribbon combo pack (petal pink) 158140 and Crinkled Seam binding Ribbon 151326 (colored with dark Blackberry Bliss Stampin' Blend marker)
Champagne Rhinestones for card 1
Heart Pearls for card 2 flower centers, colored with dark blackberry Bliss Stampin' Blend marker
Stamp Pads in Old Olive, Blackberry Bliss and Petal Pink
Stamperatus (optional, but makes stamping the punched flowers quicker)
Wink of Stella glitter pen

Thanks for stopping by today.  If you would like to purchase any of the Stampin' Up! products I've used today, click on the shopping cart in the upper right.  I'd really appreciate your business.  Please leave me a comment, I'd love to hear from you.

Until next time; be happy, stay healthy and happy stamping!
Teresa

Saturday, April 9, 2022

A little note Enjoy the Moment and Painted Poppies

 The card I have for you today is another one of the cards made during my live tutorial on Tuesday.  It also features the stamp set Enjoy the Moment.  This time, I've paired it with Painted Poppies for a completely different look and feel.  This card actually started out as a challenge card from Kitchen Table Stamper and her Connect Four game.  This particular card was changed up a bit during my live with input from the live audience.  It does use some retiring product on the Last Chance list, available while supplies last.  Be sure to jump on over to my online store by clicking on the shopping cart in the upper right corner and check out the Last Chance list along with all the good bargains available there.  But remember to do it quickly as once these items sell out, they're gone and won't be returning.  Painted Poppies is carrying over to the new annual catalog, so no worries there.  You can watch the video replay over on my YouTube channel here: https://youtu.be/TL1rTFfZWyw 


I left the inside without a sentiment so I could write a note for the recipient, or add whatever sentiment I needed when the time comes.  I really like the color combination of Fresh Freesia and Rich Razzleberry along with the black and white.  
Supplies and measurements:
Basic White Thick cardstock, card base 5 1/2 x 8 1/2
Basic White scrap for stamping and punching
Rich Razzleberry cardstock 3 3/4 x 5"
Pattern Party Designer Series Paper (Last Chance List, available while supplies last) 1 1/2 x 5"
Fresh Freesia cardstock 1 1/4 x 5"
Basic Black cardstock for die cutting, appoximately 3" square
Matte Black Dots
Fresh Freesia Woven Ribbon
Inks in Momento Tuxedo Black, Rich Razzleberry and Fresh Freesia
Wink of Stella glitter pen
Hippo and Friends dies (last chance list, available while supplies last to die cut black shape)
Lovely Label Punch
Enjoy the Moment stamp set (last chance list, available while supplies last)
Painted Poppies stamp set.

Thanks for taking time from your busy day to stop by my blog.  I truly appreciate you and would love to hear from you, please leave me a comment.

Until next time; be happy, stay healthy and happy stamping!
Teresa