Showing posts with label 3D. Show all posts

Wednesday, January 8, 2025

Mixed Labels Easel Calendar with sticky note pocket and pen holder

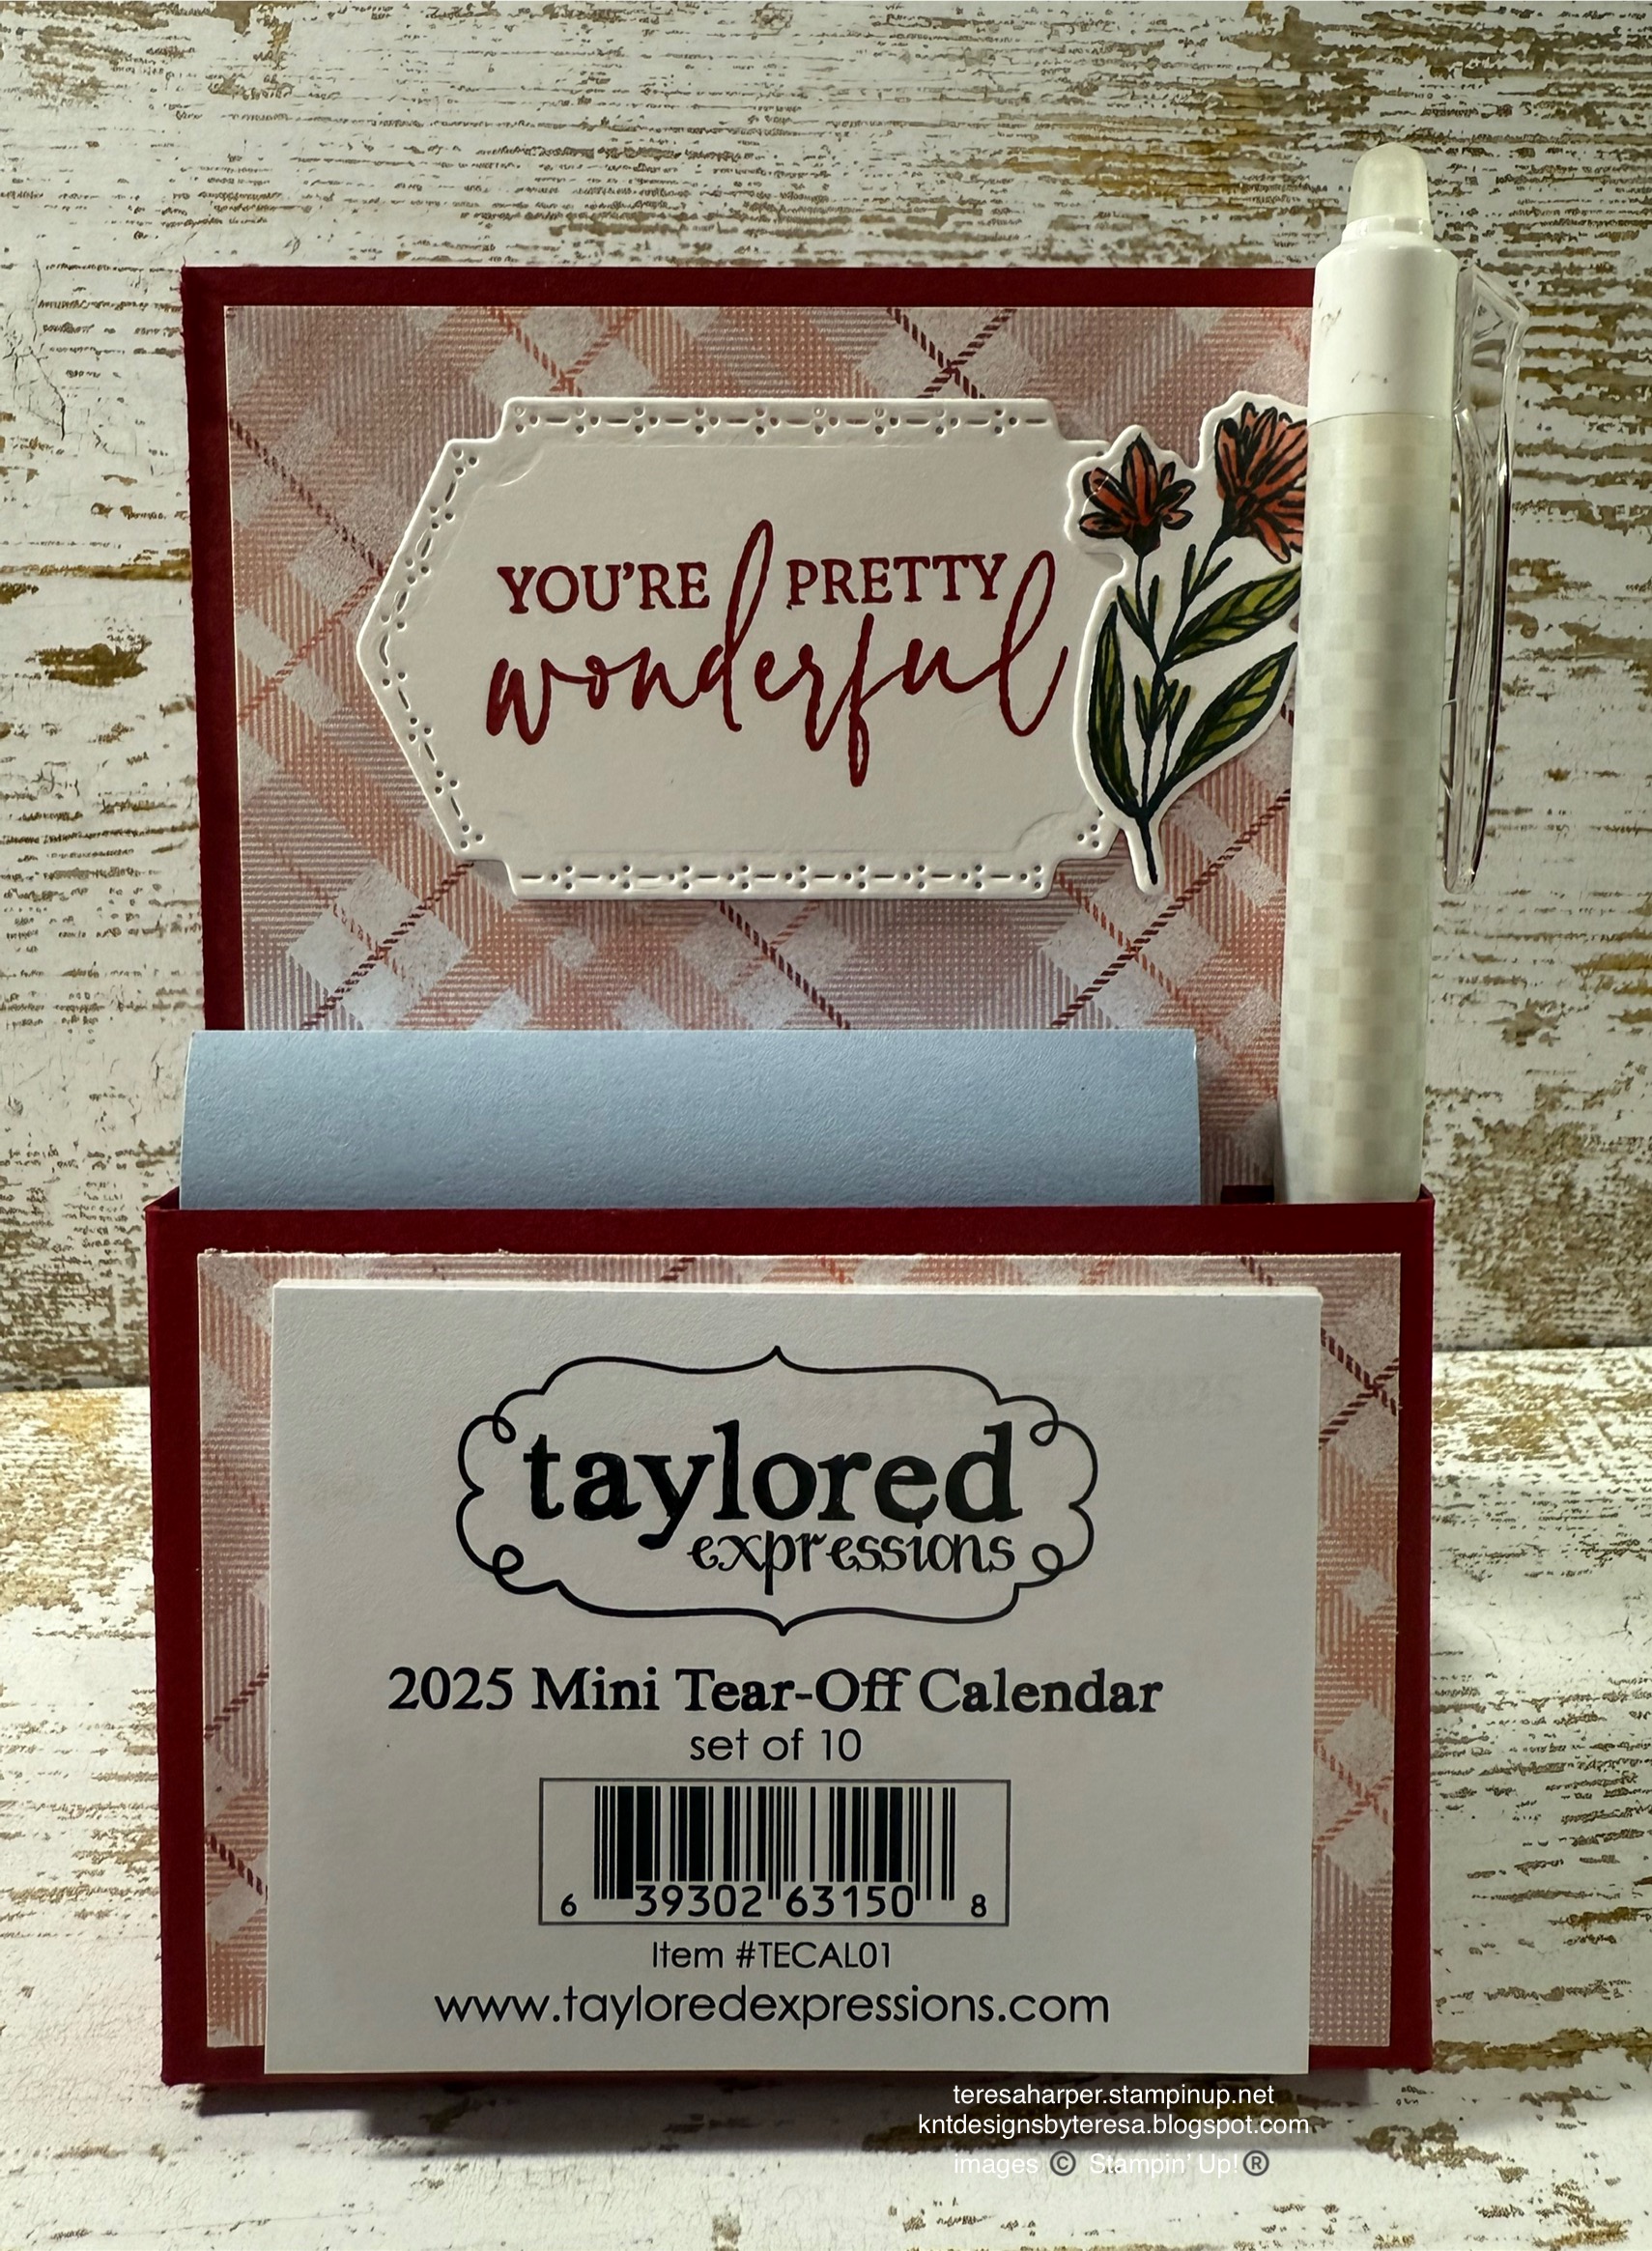
Hello and welcome back to my blog!  I hope you find today's 3D project useful.  I've used new product just released today by Stampin' Up! today.  I was inspired by other demonstrators who had made easel cards but couldn't quite make their designs work for me, so I took a couple different ones, added my own dimensions and my own design for the pen pocket, along with some help from my friend Tracy and came up with this design I'm very happy with.  My original prototypes were too front heavy and wouldn't stand up.  This one works perfectly and doesn't fall forward.  It's not really very difficult and I've provided some tips and tricks in the video, so be sure to watch how I've put this together.  The replay is over on my YouTube channel.


Supplies and Measurements:
Mixed Labels bundle 164653* (includes stamps 164643 and coordinating dies 164652)
Wildflower Designs bundle 163334* (includes stamps 163325 and coordinating dies 163333) or use a small flower set you have in your stash.
Timeless Plaid 6x6 DSP
    3 1/2" x 5 3/4", cut the top at 3 3/8" which leaves a section for the pocket of 2 3/8"
    You will have a 1/4" strip left after cutting the 6 x 6” dsp .  I've used it to decorate the back of my easel.   
Cherry Cobbler cardstock (4 pieces)
    3 5/8" x 10", score in half at 5"
    5 1/2" x 8 1/2", score on 8 1/2" side at 2 5/8" & 3 1/8"
        score on 5 1/2" side at 4 5/8" & 5 1/8" from each end
    3 1/2" x 4", score on 4" side at 1/2", 2" and 3 1/2"
    1 1/2" x 2 1/2", score on 1 1/2" side at 1/2" and 1"
Basic White cardstock for stamping images
    If desired, Basic White 3 3/8" x 4 3/4" for back of easel
Ink Pads: Cherry Cobbler, Memento Tuxedo Black
Stampin' Blends alcohol markers: Old Olive, Calypso Coral

Thanks so much for stopping by.  To shop my online store for all your Stampin' Up! supplies, click on the shopping cart in the upper right.  Beginning today, through February 28, 2025, is Sale a-bration where you can earn free products with a qualifying purchase (before tax & shipping).  There are no limits to the number of free products you can earn during this period.  Who doesn't love free product?

Until next time; be happy, stay healthy and happy stamping!
Teresa

*purchasing a bundle saves 10% over the individual piece prices when combined.  You must use the bundle item code for the 10% bundle discount.

Wednesday, November 27, 2024

Humble Home Gingerbread House Light String

Happy day Thanksgiving Eve to everyone here in the US.  I hope you have a wonderful holiday season filled with love, laughter, family and friends.  

For my project today, I've made a holiday light string using fairy lights and the Humble Home bundle.  This is not my original idea, I've recreated it from a string I saw by Anna Wheaton.  What an awesome idea it is, I just had to recreate it for you.  Of course, I've done mine a little different.  Be sure to watch the video replay to see how I've put it together.  You will find it on my YouTube channel where I share some tips and tricks to make this little gem more easily.  


Supplies and Measurements:
Humble Home bundle 164094* (includes stamps 164286 and coordinating punch 164093)
Pecan Pie cardstock, (2) 8 1/2" x 11" sheets, cut each sheet into 2 1/8" x 11" strips
Basic White cardstock for stamping 20 wreaths.
Pecan Pie ink pad, VersaMark Watermark ink pad
Basics WOW! embossing powder pack (Opaque Bright White)
Embossing Additions Tool Kit 159971
Wink of Stella Glitter Brush 141897
Real Red & White adhesive-backed Peppermints 164050
Vellum cardstock
1 inch circle punch
Adhesives: mini glue dots, Stampin' Dimensionals
fairy string light set with 20 lights (non Stampin' Up!)

I hope you like this project and will give it a try.  I've had a lot of fun making them and am very thankful Anne Wheaton shared it with her fellow demonstrators so I could share it with you.

Until next time; be happy, stay healthy and happy stamping!
Teresa

*purchasing bundles saves 10% over the individual piece prices when combined.  You must use the bundle item code for the 10% bundle discount.

**Online Exclusives items can be while supplies last.  If they are in the store, they are available for purchase.  If they say Currently Unavailable, the stock will be replenished.  If they are no longer in the store, unfortunately, they will not return. 


Thursday, September 7, 2023

Rustic Crate 3D Table Favor

 Hello, I'm so glad you're here.  With the launch of the new Stampin' Up! September to December mini catalog yesterday, I decided to inspire all of you with a few samples using the Rustic Crate bundle, which is featured on page 46 of the publication.  I'm starting with a 3D project you could adapt for any season/occasion as a table favor.  I hope you like it.  

To watch the replay and see how I put my crate together, be sure to head on over to my YouTube Channel HERE:


Supplies and Measurements:
Rustic Crate bundle 162268 (includes stamps 162265 & dies 162267)
Autumn Leaves stamp set 162179 (for sentiment only)
Crumb Cake cardstock 4 x 4", score at 7/8" on all four sides
Very Vanilla scrap cardstock for stamping and die cutting images
Ink Pads: Copper Clay, Early Espresso
Copper Clay textured ribbon 161629
Stampin' Blends as pictured above
Trail Mix & square zippered snack bags 
Tear n Tape adhesive
Stampin' Dimensionals
Tombow liquid adhesive
Wink of Stella Glitter Brush

Thanks so much for stopping by.  Please shop my online store for all your Stampin' Up! needs by clicking the shopping cart in the upper right.

Until next time; be happy, stay healthy and happy stamping!
Teresa

Saturday, June 3, 2023

Gone Fishing tackle gift box

 Happy Saturday!  Welcome to the weekend.  Today, I’m attending our monthly craft day and really enjoying some girl time with my friends.  I hope you can find some time soon to do the same.  As a reminder, through the end of this month, there is a Designer Series Paper sale going on with selected papers from the Stampin' Up! 2023-2024 Annual Catalog.  You can find these in my online store here: https://www.stampinup.com/categories/specials/designer-series-paper-sale?demoid=2109129

Onto our gift box!  I designed this box to fit the tackle box top die in the Gone Fishing bundle by Stampin’ Up!  I love how it turned out.  I was thinking this box could hold fishing tackle for your favorite fisherman or Swedish Fish and a gift card so he can shop for his tackle.  I got too sick after I designed the box, to go shopping for the right size bag, so I used Hershey Nuggets instead.  This could be used for Father’s Day, birthday, retirement or any other occasion you would like it for.  Change the colors, make it a makeup case, jewelry box or whatever you like.  Women like to fish also, so change up those colors and make one for her!  You can watch the video replay over on my YouTube channel HERE:


Measurements and Supplies:  
Gone Fishing bundle (stamps and coordinating Gone Fishing dies)
Misty Moonlight cardstock, 10 3/4" x 7" for box, scored as shown on template above.
    three pieces approx 4" x 5 1/8", die cut all three pieces with the inner divided tackle die
    one piece 3 5/8" x 4 7/8" to mount the three stacked tackle die pieces above on. 
Boho Blue cardstock, approx 1 3/4" x 2"
small Silver Foil scrap
Small Smokey Slate scrap
Very Vanilla scrap for stamping and die cutting images
Tinsel Gems three-pack
Ink Pads: Pebbled Path, Daffodil Delight, Old Olive, Lemon Lime Twist, Boho Blue, Azure Afternoon, Sweet Sorbet, Calypso Coral, Misty Moonlight.
Wink of Stella glitter brush
corner rounder
1/2" circle punch
Stampin' Cut & Emboss machine

I sure hope you give this project a try.  I do love how it turned out and I'm hoping my husband will love it also.  As a reminder, I will be gone for the next two weeks, but will return with more content on 
June 22.  I hope to see you back here then.  

Until next time; be happy, stay healthy and happy stamping!
Teresa


Saturday, February 18, 2023

Something Fancy Sweet Citrus treat box

I love to make treat boxes!  It’s one of my most favorite paper crafting things.  I used to case a lot of treat boxes but then I figured out how to design my own.  When I first saw the Something Fancy dies, I just knew I would need to make some treat boxes using those pieces.  Here is the first of my treat boxes with them.  I designed it to fit two lemon crisp Kit Kat miniature candy bars and it features the Sweet Citrus bundle for decorations.  Be sure to watch the live replay over on my YouTube channel to see how I put it together HERE:


Measurements and Supplies:
Sweet Citrus bundle (stamps, hybrid embossing folder & dies)
Something Fancy dies
Give It A Whirl dies (optional for cutting sentiment)
Black and White Gingham ribbon
Glossy Dots Assortment
Tea Boutique Designer Series Paper, 1 7/8 x 2 1/4" Portrait
Flirty Flamingo cardstock
    2 7/8 x 5 1/2" scored as shown in the photo above
    scrap for cutting two Something Fancy tag dies
Basic White cardstock for stamping and die cutting
Stamp Pads: Parakeet Party, Daffodil Delight, So Saffron, Flirty Flamingo
Stampin' Blends alcohol markers: Flirty Flamingo

Thanks so much for stopping by today.  To order any of the Stampin' Up! supplies I've used, click on the shopping cart in the upper right.  I'd love to earn your business.  

Until next time; be happy, stay healthy and happy stamping!
Teresa


Saturday, November 5, 2022

Christmas Season cross stamping Christmas cracker

Today's project is the second project of my 12 Projects of Christmas 2022, and shows another way to use the cross stamping technique I demonstrated during my live tutorial on Tuesday which you can watch over on my YouTube channel HERE:

I wanted to show the technique is not just for cards and can be done on any size paper.  I hope you are inspired to try it and to make some treat boxes for loved ones during the holidays.  I think everyone should have the Cracker and Treat box dies.  They can be used for any occasion, and you get so many extra labels you can use on anything and everything!  


Supplies and Measurements:
 Measurements and Supplies:
Christmas Season Stamps (2022-23 Annual Catalog)
Christmas to Remember stamps (sentiment only)
Cracker and Treat Box dies (2022-23 Annual Catalog)
12 x 12 Full sheet of Basic White cardstock for stamping
Basic White scraps for sentiments
Ink Pads: Early Espresso, Crumb Cake, Evening Evergreen, Soft Succulent, Garden Green, Pear Pizzaz, Old Olive and Cherry Cobbler
Festive Pearls or other embellishment
Gold Shimmer Ribbon

Thanks for stopping by my blog today!  Please leave a comment and let me know what you think of this technique.  To shop my online store, click on the shopping cart in the upper right.

Until next time; be happy, stay healthy and happy stamping!
Teresa

Saturday, December 11, 2021

Snowflake Wishes Cocoa Packet with Greeting Card and Gift Card Pocket

Hello everyone!  Today is Project 9 of the 12 Projects of Christmas.  I have a great gift option for you today.  First off, let me thank Dawn Griffith of Dawn's Stamping Thoughts for the inspiration for this project.  When I saw her make one, I just knew I had to make one with the Snowflake Wishes stamp set.  I love how it turned out and I hope you do too!  Now without further ado, let's get started.


This card holds anything that is 1/2" thick or less so you have quite a few possibilities for treats inside.  My pouch holds a packet of cocoa, Ghirardelli chocolate and a chocolate peppermint stir stick.   

The surprise of the cocoa pouch is that it opens up to a full-size greeting card and a gift card pocket!  You can see how to make this project by clicking here https://youtu.be/XBZttt0RLmA 
Below is the measurements and cutting template for the card and box.  


Supplies:
Pool Party cardstock 9x 8 1/2"
Basic White cardstock for inside sentiment panel 3 3/4 x 5 1/4
Designer Series Paper 2 pieces 3 3/4 x 5 1/4, 2 1/4 x 3 3/4 and 3/4 x 5 1/4 
Ink Pads in Pool Party, Highland Heather, Pacific Point and Versamark
White embossing Powder
Blending Brushes
Stitched Rectangle dies
Snowflake Wishes stamp set
Stampin' Cut and Emboss machine
Pool Party striped grosgrain ribbon

Thanks for stopping by today!  I'm so happy you did.  Please leave me a comment, I'd love to hear from you.  If you need to pick up some Stampin' Up supplies, click on the shopping cart in the upper right.  It will take you to my online store where you can shop 24/7.  I'd love to earn your business.

Until next time; be happy, stay healthy and happy stamping!
Teresa