Showing posts with label Stampin’ Blends markers. Show all posts

Friday, July 3, 2020

Red, white and blue jar of flowers watercolor car

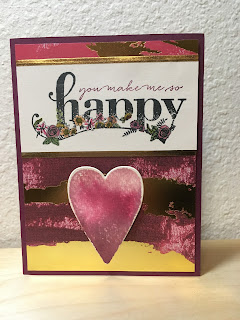
The project I’m showing you today was created as a make-n-take for my local stampers group.  We had our first in-person workshop this month.  As we are a group under 10 persons, we were allowed to meet.  My friend Lynette had asked me to create a card that could be used as a thank you and used the Jar of Flowers stamp set from the new annual 2020-2021 catalog.  This is the project I came up with.
I started with a whisper white card base 8 1/2 x 5 1/2”.  To this I added a piece of Designer Series Paper from the Boho Indigo product medley (153132 Or refill 153925) cut at 4 x 5 1/4”.  I die cut the second largest scalloped rectangle from the Stitched So Sweetly dies (151690) out of seaside spray.  I did a very light watercolor wash of night of navy and cherry cobbler on Fluid 100 watercolor paper (149612).  Let dry thoroughly, then stamp the jar image with memento ink and punch with the Jar punch (152703).  This punch can be purchased separately, or as a bundle (154064 ) with the Jar of Flowers stamp set.  I then stamped the floral spray from Jar of Flowers (152515) on whisper white card stock with momento ink and colored with Stampin’ Blends in misty moonlight, cherry cobbler, just jade, light seaside spray, light night of navy.  I used wink of Stella on the white flowers and the cherry cobbler flowers.  I then fussy cut the floral spray.  I first added my jar to the seaside spray die cut and then used stampin’ dimensionals to add the floral image.  

I thought this card could be used for most any occasion and certainly fits the upcoming holiday.  I hope you have enjoyed my card today and have been inspired.  Thank you for stopping by.  If you would like to purchase any of the products I’ve used today, please stop by my online store by clicking on the shopping cart in the upper right.  I would love to earn your business.  Please leave me a comment, I’d love to hear from you.

Until next time, be safe, stay healthy and make it a great day.
Happy stamping,
Teresa

Monday, September 2, 2019

Enjoy today with new wonders

Today’s project features a card in an envelope and I am sharing for Kylie Bertucci’s International Blog Highlights.   I started by making an envelope using the Magnolia Lane Designer Series Paper into an envelope.  I used the Stitched Nested label dies to cut the opening at the top and also for the sentiment labels in basic black and petal pink.  The little fairy comes from the host set called New Wonders. She is colored using my Stampin’ blends markers.  I used rococo rose, blackberry bliss, gray granite, so saffron and crumb cake.  For her wings, I used clear Wink of Stella.  I fussy cut her out and added her to my sentiment panel.

For the card inside, I used a base of basic black with a layer of petal pink cardstock.  To this I added a smaller panel of whisper white.  I stamped my sentiment which is also from New Wonders.  This card has a lot of fussy cutting to give it the dimension I was going for.  The flowers from this card are from free as a bird and the leaves are from New Wonders.  All of the images were colored with my blends markers.  For this little fairy I used purple posey and highland heather.  The leaves are colored in old olive.
A lot of time went into this card, but I think it was worth it in the end as I love how it turned out.
I hope you’ve enjoyed my post today and that I’ve inspired you to make and send a card of encouragement to someone you know.  Thank you for taking time from your busy day to stop by my blog.  Should you wish to purchase any of the items I’ve used today, please click on the shopping cart it will take you directly to my online store.  Until next time, make it a great day and happy stamping.

Monday, March 18, 2019

This Little Piggy is growing up birthday card

Hello everyone!  I just had to share this card today.  It was designed and made by my 14-year-old granddaughter Kaitlyn for her mom’s birthday.  She did the majority of the work, all of the design, coloring and fussy cutting.  I am thrilled with the way this turned out.  I picked her up after school, we came home and she got started working straight away.  When she was finished, she was ready to go home.  Her mom gets a lovely card and I got to spend some quality crafting time with my granddaughter.  It was a win-win.  The stamp set she chose is called This Little Piggy.  The sentiment comes from Itty Bitty Birthdays.  The flowers were die cut from Gorgeous Grape cardstock using the Bouquet Bunch framelits.  The grass is cut from a retired framelit set which was part of the Basket Bunch bundle.  Her card base is Highland Heather, with a layer of Soft Sky (retired) and a piece of the Highland Heather gingham Designer Series Paper from Gingham Gala 6x6 Designer Series Paper stack.  She used a bit of Wink of Stella on the cloud which is also from This Little Piggy.  She colored the pig with Stampin’ Blends in Petal Pink (combo), Ivory for her nose and light Crumb Cake on the hooves.  I think she did a fabulous job for her first time using the blends.  She then fussy cut out the pig and popped her up on stampin’ dimensionals.


I should have taken a photo of the inside of the card, but forgot.  Inside she used the Making a Difference stamp set to spell out Kinda, then added lol and jk (just joking).  Her mom got a laugh out of the sentiment she made.

I hope you’ve enjoyed today’s project and are inspired to create something of your own.  Please leave a comment, we’d love to hear from you.  If you want to purchase any Stampin’ Up! Supplies, I would be grateful for your business.  Please click on the shopping cart in the upper right.  It will take you directly to my online store.  Thanks for stopping by my blog today, make it a great day and happy stamping!

Monday, March 4, 2019

Thinking of you Country Floral chameleon card

Oh my gosh I really love the stamp sets that came in the January and February Paper Pumpkin boxes!    I combined the chameleon and bird from the January set with the teacup from the February kit, to come up with the focal image for this card.  First I stamped the chameleon, then masked it off and stamped the tea cup image over the top.  I used my Stamperatus to accomplish this so I could rest amp if necessary to avoid a halo effect from the mask.  I then stamped the little bird to look like he is standing on the succulent.  I colored the images with my Stampin’ Blends.  I cut the image out using the rectangle stitched framelit dies.  I mounted that on a piece of mint macaron which I also cut using the rectangle stitched dies.  I then cut a piece of watercolor paper, lightly misted it with water and ran it through the big shot with the Country Floral Dynamic Textured Impressions folder.  The depth and dimension is amazing and it’s free through March 31, 2019, with a $50 order! I colored it with my aqua painter using mint macaron for the leaves and pool party and Flirty Flamingo for the flowers.  This is layered on a Flirty flamingo card base.  The sentiment is from By the Bay which is a Sale-a-Bration free item you can use when you spend $50


 The inside card is stamped with an image from Tea Together and the envelope image and sentiment is from the same two Paper Pumpkin stamp sets.
Stampin’ Blend colors I used are Mint Macaron light and dark, Flirty Flamingo light and dark, Pool Party light and dark, Crumb Cake light, Soft Suede dark, Calypso Coral light, Smokey Slate light, color lifter, Call Me Clover light.  I hope this project has inspired you as I really enjoyed making this one and I love how it turned out.  If you want to purchase any of the items I’ve used today, head on over to my online store by clicking on the shopping cart in the upper right.

Please leave me a comment, I would love to hear from you.   Thank you for stopping by my blog today.  Make it a great day and happy stamping.

Monday, February 11, 2019

You make me happy heart bokeh

Today’s project features a technique Jenn Houston from the Artsy Fartsy Gallery showed on her Facebook Live.  She had gotten the heart bokeh idea from a friend.  I loved the idea and so I’ve reproduced it on this card.  I started with a card base in Balmy Blue and embossed it with the Hardwood Planks embossing folder.  The bokeh panel is on a 3 3/4x5 piece of Whisper White cardstock.  I used sponge daubers to sponge on Flirty Flamingo, Lovely Lipstick and Petal Pink ink randomly.  I cut the larger hearts in scrap cardstock from the Be Mine Stitched Framelits and the tiny heart from the Well Written framelit dies (a fabulous set by the way).  I then used the negative piece to sponge Whisper White craft ink through the openings randomly all over the cardstock and set it aside to dry.  The heart focal image features the Be Mine scalloped stitched die cut in Lovely Lipstick foil which is currently a Sale-a-Bration item you can only get for free, but hurry as stock is getting low and once it’s gone, it will no longer be available.  I stamped the inside heart in Momento ink on Whisper White and colored it in with my Stampin’ Blends markers in Balmy Blue, Granny Apple Green and Lovely Lipstick.  Again, I cut it out using the same die I used to cut the scalloped foil heart.

The sentiment comes from the coordinating stamp set Meant to Be and can be purchased as a bundle to save you 10% until June 3, 2019.  I masked off the word happy in the sentiment so I could use the Well Written framelit dies to cut out the larger happy die cut.  I used a layer of clear Wink of Stella and then covered with a layer of the fine tip glue pen and set it aside to dry which gave me the look of an epoxy sticker.  This is one of my new favorite technique for some die cuts.  I placed a small piece of the Whisper White flax ribbon which is available in the Occasions catalog.


I hope you’ve enjoyed my project today and that I’ve inspired you to create something of your own or CASE my project.  With Valentines Day coming, this would make a great Valentines for someone you love or perhaps even an anniversary card or just because.  If you need any of the supplies I’ve used today, I would love it if you would shop my online store by clicking on the shopping cart in the upper right.  Better yet, if you would like to earn a discount on all future purchases, please join my team.  I’d be happy to have you.  Sale-a-Bration is the very best time to join as you get $175 in product for $99 or you can choose to spend $129 and receive $175 in product and an awesome logo’d  craft bag.  All details can be found at teresaharper.stampinup.net.

Please leave me a comment, I’d love to hear from you.  Until next time, make it a great day and happy stamping.

Friday, February 8, 2019

Hey Love lollipop treat holder

I put together these treat holders after seeing a video by Darcy of Rejoice and Create.  You can check out her video over on YouTube.  I decided to use up some retired Designer Series Paper I had on hand.  I made up 34 lollipop holders.  I then decorated them with the Hey Love stamp set by Stampin’ Up! using the skunk and crocodile (or alligator) from the set.  I colored them using my Stampin’ Blends markers (which I absolutely love).  Colors used are Balmy Blue combo, Lovely Lipstick light, Granny Apple Green combo, Basic Black combo, Smokey Slate light and Ivory markers.  I fussy cut out each critter and mounted on a heart cut with the Be Mine Stitched framelits in Real Red.  The sentiment is also from Hey Love and stamped in Momento tuxedo black ink on Whisper White as are the critters.

Here is a closer look at the critters.  To ensure I didn’t lose the facial features of the skunk, I used the Stamperatus to stamp each skunk on a square piece of cardstock big enough to stamp four by rotating the cardstock then stamping until all four were on the cardstock.  I then colored each skunk and after I was finished coloring, I put the squares back on my Stamperatus and restarted each skunk, thereby ensuring the facial features were not lost in the coloring.  It also gave more definition to the body.

Thank you for stopping by my blog today.  I hope I’ve inspired you to do something creative.  Please leave me a comment, I would love to hear from you.  If you would like to purchase any supplies, please click on the shopping cart in the upper right.  It will take you directly to my online store.  Happy stamping!

Monday, February 4, 2019

You make me happy notecard

For today’s project, I used the Whisper White notecards and envelopes which are found on page 193 of the annual card.  This card is #simplestamping and makes a great card for Valentines, an anniversary or just because.  It’s so easy and quick to put together.  I started with a notecard, added a layer of Designer Series Paper from the Tropical Escape 6x6 Designer Series Paper stack then stamped my focal image and sentiment from the Meant to Be stamp set on a piece of Whisper White cardstock in Momento tuxedo black ink and colored it in with my Stampin’ Blends markers.  The colors I used were Flirty Flamingo, Lovely Lipstick and Call Me Clover.  Super simple and quick.  I used my Stamperatus for perfect placement of the sentiment.


The inside image is from the same stamp set and I used the same piece of Designer Series Paper to decorate the envelope.


Thanks for stopping by my blog today.  I hope I’ve inspired you in some way to be creative.  Please leave me a comment, I’d love to hear from you.  If you would like to purchase any of the products I’ve used today, click on the shopping cart in the upper right.  Remember, during Sale-a-Bration for each $50 increment in product you purchase, you receive one free level one Sale-a-Bration item.  If you purchase $100, you can choose, two level one OR a level two Sale-a-Bration item.  Sale-a-Bration runs until March 31.  

Friday, January 25, 2019

Celebrate Vibrant Vases

While at Onstage in Orlando in November, we were challenged to create some #simplestaming cards.  Now for those who know me best, my friends know simple stamping just isn’t in my nature.  I try to make things simple, and by the time I’m through, simple has left the building.  This is a card I came up with using primarily stamps, ink and paper.  It also uses only one stamp set so it can be reproduced with minimal supplies.  This card features a new photopolymer stamp set in the occasions catalog bu Stampin’ Up!.  It’s called Vibrant Vases and is a sister stamp set to Varied Vases in the 2018-2019 annual catalog.  Both sets have a coordinating punch, the Vase builder punch.  Varied Vases can be purchased as a bundle with the coordinating punch for a savings of 10%, then feel free to add on today’s featured set Vibrant Vases.  Doing this will qualify you for a free item from the Sale-a-bration brochure from January through March 31, 2019.


I started with a thick whisper white card base and added a layer of highland heather gingham paper from the Gingham Gala 6x6 Designer Series Paper stack.  I stamped my images on another layer of whisper white regular cardstock in black memonto ink.  These images have stamps to color in the details and I chose to use those rather than coloring them on my own.  Ink colors used are grapefruit grove, daffodil delight, Gorgeous grape, Highland heather and garden green.  For a finishing touch, I added some faceted gems in he grapefruit grove and a touch of wink of Stella.

I hope you’ve enjoyed my project today.  Should you want any of the supplies used or anything else Stampin’ Up!, please click on the shopping cart in the upper right.  It will take you directly to my online store.  I would be grateful for your business.  In addition, if you would like to join my team, it’s the very best time of year to do so.. you get $175 worth of product for $99 and there is no obligation to continue.  Join for the discount, or join to start a business,either way is fine with me.  No pressure, no judgments.

Please leave me a comment, I would love to hear your thoughts.  Make it a great day and happy stamping!
Teresa

Tuesday, January 22, 2019

Hummingbird amazing birthday card

This card features the brand new Humming Along cling stamp set from Stampin’ Up! Boy do I love the new cling stamps.  They do not fall off the clear blocks and/or Stamparatus plates.  I also used the new Balmy Blends combo of Stampin Blends alcohol markers.  The Blends are my favorite coloring medium.  I love how they blend together so smoothly and effortlessly.


I colored the flower with Melon Mambo light and dark Blends and Old Olive light and dark.  The beautiful hummingbird is stamped and colored three different times in various parts of the wings for a 3D effect.  For this I used Smokey Slate, Balmy Blue, Granny Apple Green and Calypso Coral Stampin Blends.  I finished it off with a coat of wink of Stella on the wings.  I mounted it on a card base of Balmy Blue.
Thanks for stopping by my blog today.  I appreciate you take a little time from your busy day to share my creativity.  Should you need any supplies, please click on the shopping cart in the upper right.  It will take you directly to my online store.  As I post this, we are in the beginnings of Sale-a-bration which means free stuff for you for each $50 increment that you spend.

Please leave me a comment, I would love to hear your thoughts.  Make it a great day and happy stamping!

Monday, November 5, 2018

Postcard Pals Bokeh card

I absolutely love the Postcard Pals (146701) stamp set.  It just makes me smile.  I borrowed this set from my friend and made my monthly thank you cards with it.  I started with a card base in Soft Sea Foam.  The Designer Series Paper is from the Wood Textures 6x6 paper stack (144177).  I then used a piece of Highland Heather cardstock.  I stamped my little postcard pal in Tuxedo Momento black ink, then masked him off prior to stamping one of the two images from the Bokeh stamp set (148113) in Soft Sea Foam stamped off once (aka second generation stamping).  I used my Stamperatus (146276) in order to get perfect stamp placement.  I then colored my image using Stampin’ Blends markers.  The sentiment is also from the Postcard Pals stamp set.  Every time I look at this card, I just can’t help but smile.  I hope it brightens your day as well, if only for a moment.

 My second card is done in Balmy Blue utilizing the same tools.  Thanks for stopping by my little blog today.  I hope I’ve inspired you to do something creative.  If you wish to purchase any of the supplies I used today, you can click on the shopping cart to the right.  It will take you directly to my online store.  I would love to earn your business.  Please leave me a comment, I would love to hear from you.  Thanks again, and have a crafty day.


Monday, October 15, 2018

Cauldron Bubble copper Happy Halloween

This card was inspired by a post on Pinterest by Barbara Bower.  I’ve changed a few things and made it my own.  It features products from the Toil and Trouble suite in the 2018 holiday catalog.  I used the Toil & Trouble Designer Series Paper (147531) and cut the cute little witch from the paper using the Cauldron framelits (bundle 149931).  The stamp set Cauldron Bubble (147713)) and the Cauldron Framelits (147914)  can be purchased separately or in the bundle.  The bundle saves you 10%.  I stamped and cut the broom and the cauldron.  I colored them using the Stampin’ Blends markers.  Happy Halloween is embossed in copper embossing powder.  The spider web embellishment was also cut from the framelits.  The bow is made from the Black 3/8” glittered organdy ribbon also from the suite.  These produces can be found on pages 48 and 49 of the 2018 Stampin’ Up!
Holiday catalog.  The background is stamped in Pumpkin Pie ink using the Buffalo Check background (147794) stamp.

Thanks for stopping by my little blog today.  I hope I’ve inspired you to do something creative of your own.  Please leave me a comment, I’d love to hear from you.  If you would like to purchase any of the products I’ve used today, I’d love to earn your business.   Please click on the shopping cart to the right, it will take you directly to my online store.  I hope you have a crafty day.  

Monday, February 12, 2018

Lovely Thank You Wishes

Today I am featuring the Lovely Wishes stamp set (145924) which can found on page 50 of the 2018 Occasions catalog.  I started with a card base of thick Whisper White cardstock.  I added an embossed layer of Pear Pizzazz using the Layered Leaves Dynamic embossing folder (It has an extra deep impression).  I then used one of the leaf stamps from the set to stamp on some of the raised areas in the coordinating ink color.  That’s one of the things I love most about Stampin’ Up! Everything coordinates--inks, papers, and embellishments!  It’s so easy to make beautifully coordinated projects without worrying about the colors matching.  My main focal panel was stamped on Whisper White cardstock in Momento tuxedo black ink.  I colored the images with my Stampin’ Blends markers.  I didn’t have to as the stamp set has stamps to easily fill in the images if you don’t care to color. I love to color and I've been having so much fun with my Stampin' Blends that I chose not to use those particular stamps on this project. 

The sentiment I used is from the Petal Palette stamp set (145785 clear mount).  Thanks for stopping my blog today.  I hope you've found a little inspiration here.  Please leave me a comment, I'd love to hear from you.  If you'd like to purchase any of the items I've used today, please click on the shopping cart to go directly to my online store.  I'd love to earn your business.  I hope you have a happy and creative day.

Monday, January 22, 2018

Let’s Celebrate Amazing You

My project today features my favorite stamp set from Sale-a-Bration (SAB) thus far.  It’s called Party Pandas (147221 clear mount) and can only be earned as a free item through March 31, 2018.  I started with a Berry Burst card base and stamped the confetti image from the stamp set in the matching ink around the edges.  No need to stamp the center as it's going to be covered.  My focal layer was sponged using a sponge dauber with Soft Sky for the sky area.  I used a blender pen with Lemon Lime Twist for the grass.  I stamped the Pandas directly on the Whisper White cardstock with Momento Tuxedo black ink.  That way I could use my Stampin' Blends to color in the hat and balloon.  The sentiment uses the Amazing You stamp set (147212) also from SAB and the coordinating framelits called Celebrate You thinlets (146840).  I die cut the word amazing from retired Blushing Bride glimmer paper, but you could use any of our glimmer papers or even foil papers with equally great results.

This card is for my amazing friend who has a birthday on the 22nd of this month.  I know she will love it.  Thanks for taking time out of your busy day to stop by my blog.  Please leave me a comment, I'd love to hear from you.  If you wish to order any of these products, click on the shopping cart and it will take you to my online line where you can place your order.  I'd love to earn your business.  I hope you have a creative day. 

Monday, January 15, 2018

You’re Inspiring Labels to Love

My card for this week features a holiday favorite which has been carried over. It’s called Labels to Love (144967 clear mount) and has a coordinating Everyday Label Punch (144668).  The sentiment comes from a new stamp set from the Occasions mini catalog called You’re Inspiring (145808).  It can be found on page 31 and is very versatile with uses for Mother’s Day, Easter, birthdays and thinking of you cards.  Be sure to check it out.  My card base is Powder Pink with a layer of Petal Passion Designer Series Paper (DSP) (145589).  The flower images are from a free Sale-a-Bration stamp set called Amazing You (147215) only available with a $50 purchase through March 31, 2018.  I used my Stampin' Blends to color the flowers, then fussy cut them out.  If you haven't tried the Stampin' Blends markers, they are fantastic.  They are Stampin' Up!'s new alcohol markers released in November 2017.  They are so easy to color with and blend beautifully.  Even a novice like me, can color beautifully with them.

Thank you for stopping by my blog today, please feel free to leave me a comment.  I'd love to hear your thoughts.  If you would like to order any of the products I've used, please click on my shopping cart to the right.  It will take you directly to my online store where you can place your order.  I'd love to earn your business.  I hope you have a creative day.

Saturday, January 6, 2018

Happy wishes painted with love heart card

This card features the Happy Wishes Sale-a-Bration free stamp set along with the new Painted with Love Speciality Designer Series Paper.  The heart on this card is made using a marker technique direct to the stamp, gently spritzed with water, then stamped on watercolor paper.  I used Sweet Sugarplum, Berry Burst and Rich Razzleberry markers to get the ombre look.  The secret to this technique is not to spray too much water onto your stamp.  It only takes one or two sprays to create the effect.  Be sure to let the stamp sit on the watercolor paper for a couple of minutes to absorb the liquid.  The stamp comes from the Sure Do Love You stamp set which can be found on page 19 of the 2018 Occassions catalog.  It also has a coordinating framelit set  Lots to Love Box framelits dies.  They can be purchased as a bundle to save you 10%.  I used the heart die to cut out my heart after stamping it.  The sentiment comes from Happy Wishes which can be earned for free when placing an order of $100.  I colored the flowers on it with my new Stampin' Blends markers along with the original Stampin' Write markers.  I hope you enjoy this card.  I used it as a make-n-take at my last workshop. 


If you’d like to purchase any of these items, please click on my shopping cart which will take you to my online store.  I’d love to earn your business.  Have a creative  day and thank you for stopping by. 

Monday, January 1, 2018

Party Panda 2018

Happy New Year everyone.  It’s been quite a long while since I’ve posted anything.  It seems Life is quite busy and blogging takes a bit of time.  I set it aside last year, but have been challenged to post weekly this year.  We’ll see how that goes.  My first project uses the Large Numbers framelits, the new Sale-a-bration stamp set Party Panda, We must Celebrate stamp set for the confetti and the happy. Both stamp sets will be available beginning January 3.

What is Sale-a-bration you ask?  It is only the best time of the Stampin’ Up! Year!  For every $50 spent on merchandise, before taxes or shipping, you earn a free item from the Sale-a-bration brochure.  It definitely doesn’t get any better than free and there are no limits to the amount of items you can earn for free.  I hope you enjoy my card and I wish for each of you a healthy and very happy new year.