Showing posts with label Easter. Show all posts

Saturday, March 14, 2026

Quick and easy Easter card with Seasonal Celebrations

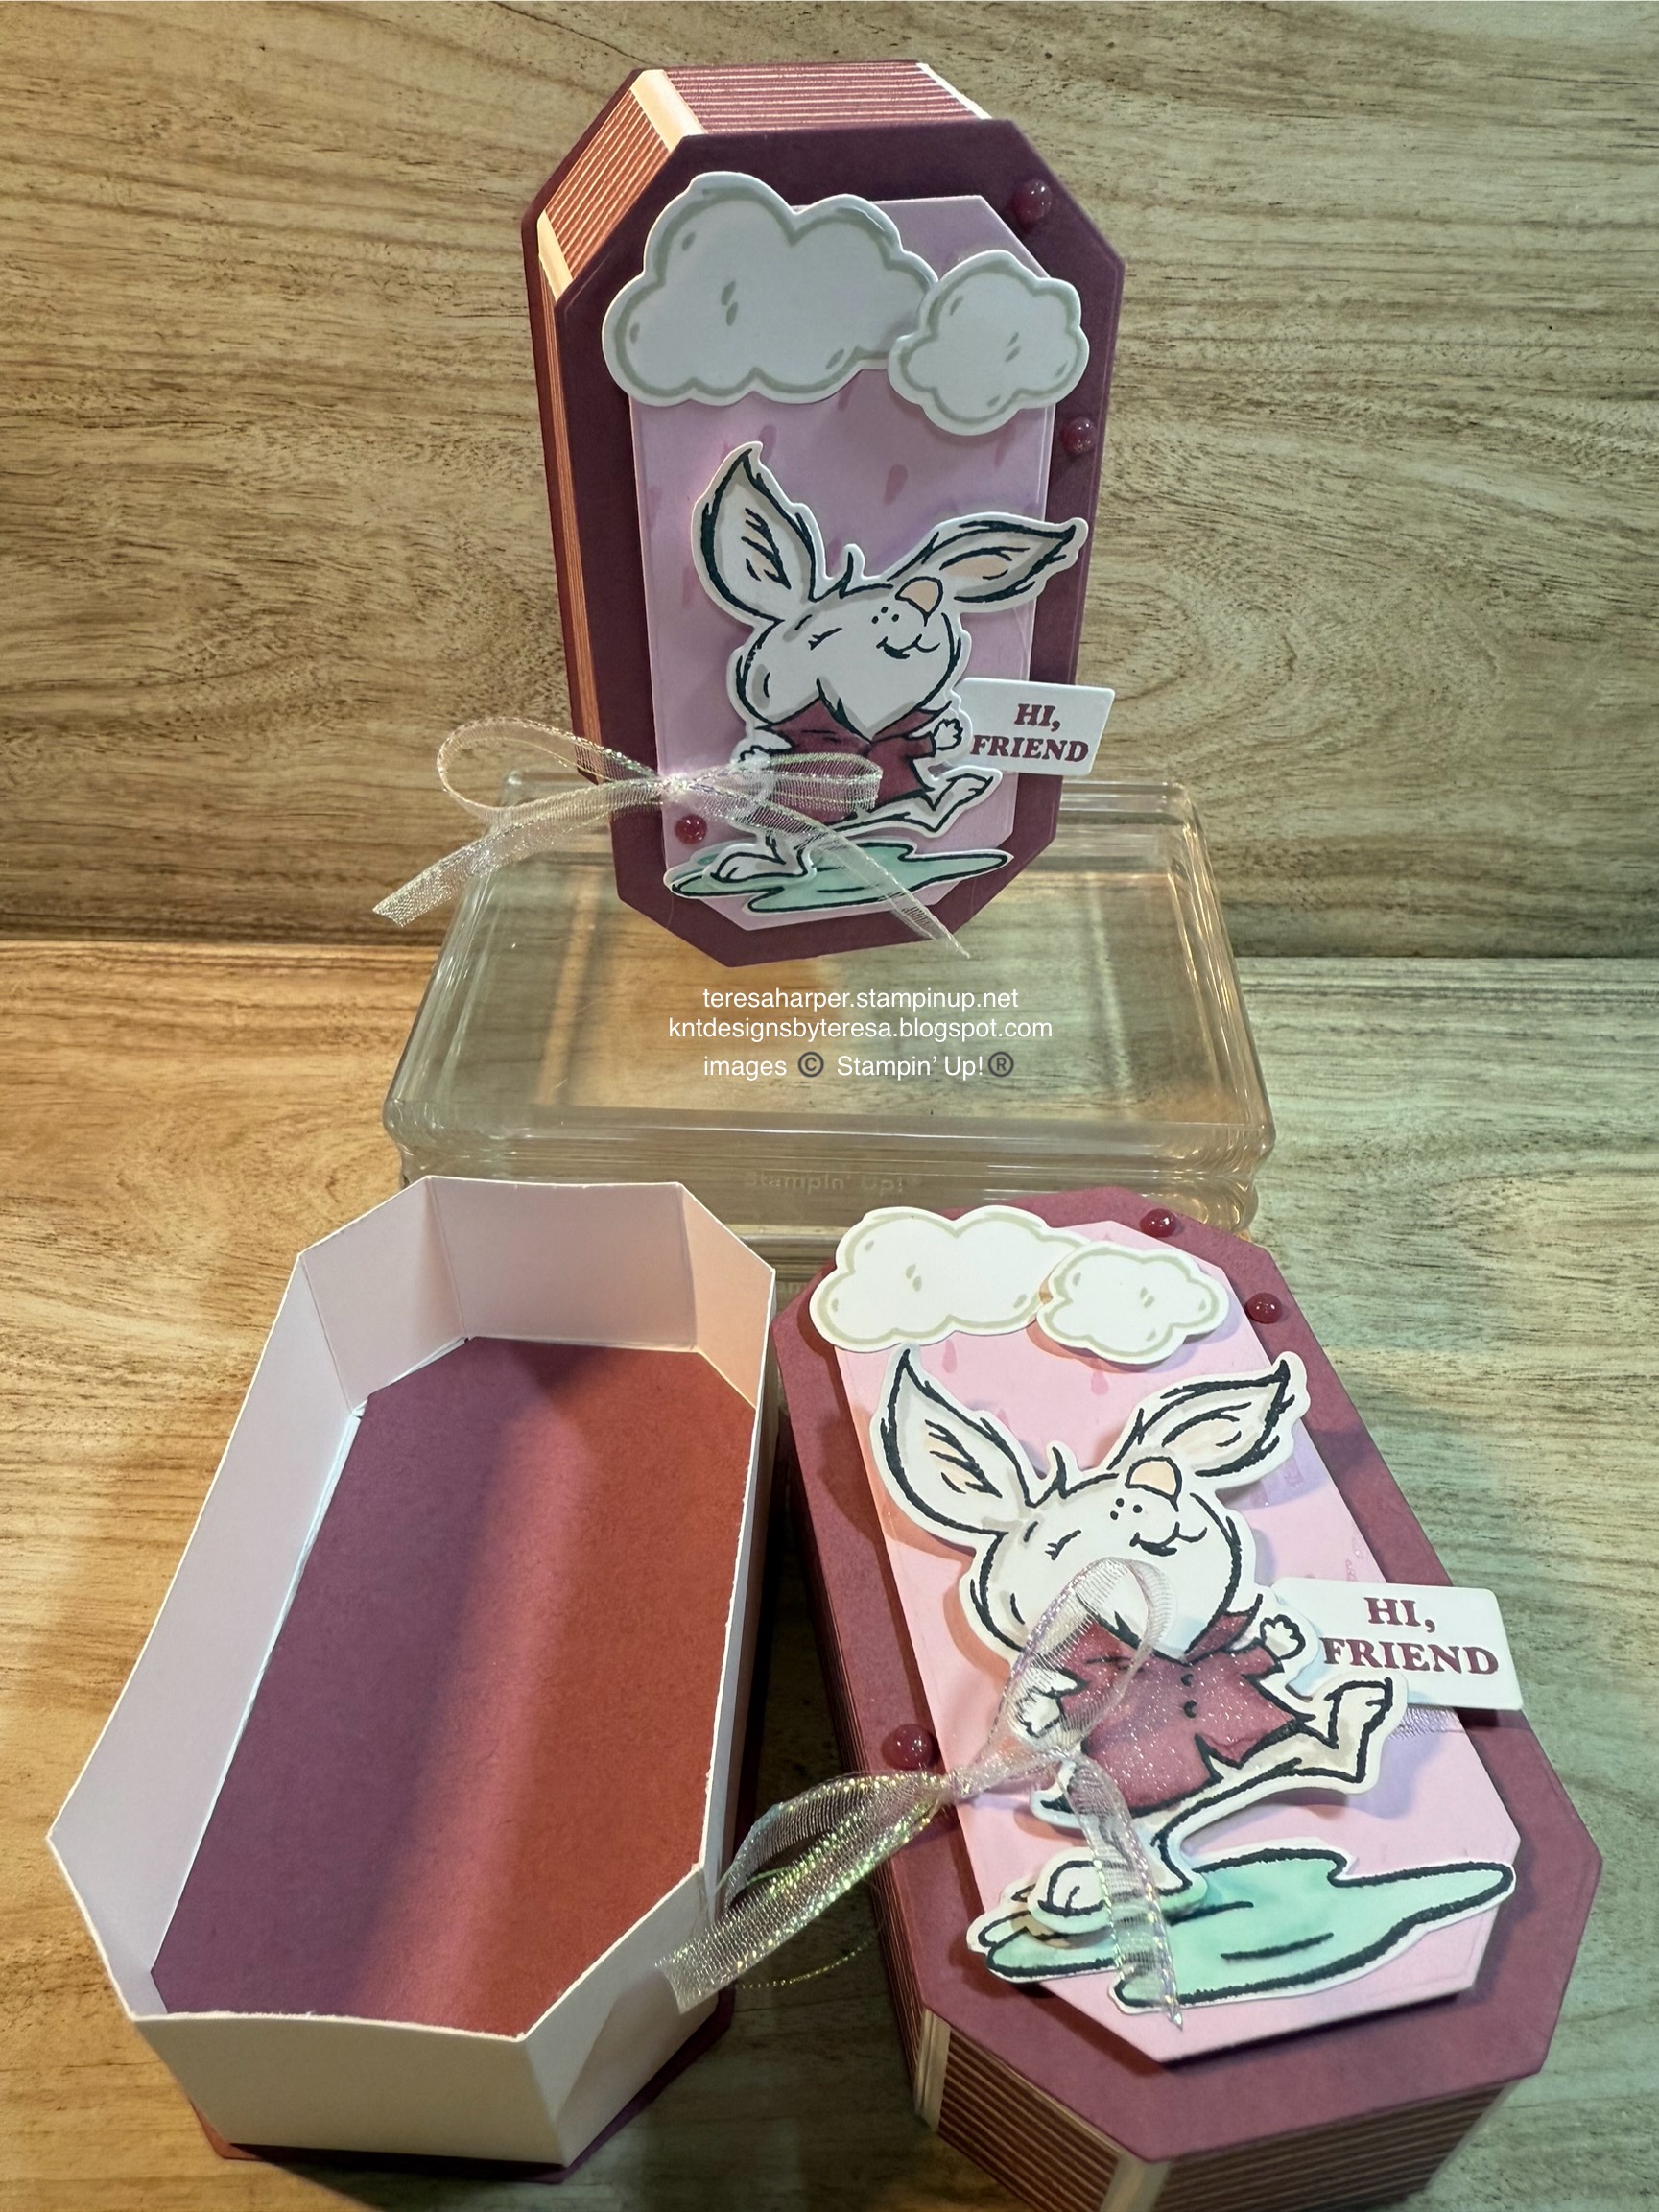
Today I have a quick and easy Easter bunny card.  I've used a sketch I saw on Facebook (not sure who posted it) but I decided to use the sketch for this card.  It would be very easy to mass product if you send out Easter cards (or change up the stamps & paper for any occasion).  You can see how easy it is to put together by watching the video tutorial over on my YouTube channel.  Click this link to watch.


Supplies and measurements: 
Seasonal Celebrations 167225
Addressed to You 167010 (for envelope only--totally optional)
Easter Basket bundle 166947 (for bow tie & sentiment)
Nested Essentials dies 161597
Lazy Daisy 3D embossing folder 167196
Azure Afternoon cardstock 5 1/2" x 8 1/2", scored at 2 1/8" & 4 1/4" & scrap for bow tie
Basic White cardstock 4" x 5 1/4" & inside layer 3 5/8" x 4 7/8"
    scraps for die cutting rounded corner rectangle & sentiment
Easter Joy Specialty DSP (2 coordinating pieces) each 2 3/4" x 3 1/2"
Ink Pads: Azure Afternoon, Lemon Lolly, Shy Shamrock, Crumb Cake & Memento Tuxedo Black
Stampin' Blends marker: Natural Tones Light SU 1000
Easter Assortment 166951
Wink of Stella glitter brush 141897

Thanks for stopping by!  I hope you give this sketch a try.  Let's spread a little cheer with a handmade card.

Until next time; be happy, good health to you and happy stamping!
Teresa

*Purchasing bundles saves 10% over the individual piece prices when combined.  You must use the bundle item code for the 10% bundle discount.  When purchasing Last Chance items; be sure to check if the individual piece prices are discounted.  Individual piece prices may be less expensive if the discounts are deep enough.

                  Online Exclusives 


Wednesday, February 18, 2026

Quilted cross Easter card

Hello all!  Great news!  Stampin' Up! announced free shipping for the next three days with a $75** qualifying order!  Free shipping will run February 18-20, 2026, and ends at 11:59 pm MT or 10:59 p.m. PT.  Head on over to my online store for all the details.  

Today I have a card that was inspired by May May Made it.  I saw how she made these little quilted circles and placed them into a cross using a patterned paper.  It inspired me to try out her method.  I had to change the circle sizes and Stampin' Up! does not currently have the size circle punch she used.  I altered the measurements to fit the 1 3/4" punch, grabbed some wood paper, and put this card together using Stampin' Up! products.  I hope you give this a try.  I do love how it looks.  To watch the video tutorial where I show you how to create it, head on over to my YouTube channel by clicking this link. 


Supplies and measurements:
Easter Basket bundle* 166947 (includes stamps and coordinating dies)
Nature Walk DSP 166912 4" x 5 1/4" & 1/2" x 3 5/8" for inside
Wood Grain Wonders 12x12 DSP (Sneak Peek item, available March 3, 2026)
    (6) 1 3/4" circles 
Thick Basic White cardstock for card base, 5 1/12" x 8 1/2", scored in center at 4 1/4"
Basic White for stamping & 1 3/16" square
Ink Pads: Basic Gray, Secret Sea
Stampin' Blends alcohol markers: Peach Pie, Pretty in Pink, Lemon Lolly, Darling Duckling, Cloud Cover, Secret Sea, Flirty Flaming, Petal Pink, Old Olive
Wink of Stella glitter brush 141897
Moody Palette Glossy Dots 167180

Thanks so much for stopping by today!  You will find my online store to order the products you will need for this project or any other by clicking on the shopping cart to the right.  Thank you in advance.

Until next time; be happy, good health to you and happy stamping!
Teresa

*Purchasing bundles saves 10% over the individual piece prices when combined.  You must use the bundle item code for the 10% bundle discount.  When purchasing Last Chance items; be sure to check if the individual piece prices are discounted.  Individual piece prices may be less expensive if the discounts are deep enough.

**Qualifying order is $75 USD before tax and after any rewards or coupons have been deducted

Sunday, April 6, 2025

Rectangular Octagon treat box with Playing in the Rain

Hello all!  Today our project is all about using products which are retiring and are on the Last Chance list.  All of the last chance products I've used in this project are discounted and while supplies last.  Hurry on over to my online store to get yours today.  Click the shopping cart on the right.

I made a cute rectangular hexagon treat box which could easily be used for Easter.  I hope you will give it a try.  You can watch the video replay on how I've put this box together over on my YouTube channel.  Be sure to use the measurements below as the measurements I gave in the video for the box bottom are incorrect.  You will find those below.  So sorry about that.  


Measurements and Supplies:
Playing in the Rain stamps 160542 **Last chance
Playing in the Rain dies 160550 **Last chance
Countryside Corners dies 161471 **Last chance
Wonderful Thoughts for sentiment 161899
Notes & Totes dies 164656 (Sneak Peek, available May 6, 2025)
Basic White cardstock 12 x 12
    1 5/8" x 11 3/8" for box top, score on short side at 1 1/4"
    score on long side @ 2 3/4, 3 1/2, 4 3/4, 5 1/2, 8 1/4, 9, 10 1/4 & 11"
1 5/8" x 11 1/4" for box bottom
    score on long side @ 2 3/4 less 1/32, 3 1/2 less 1/32, 4 3/4" less 1/32, 5 1/2" less 1/32, 8 1/8", 8 7/8" 10 1/8" & 10 7/8"  (1/32) is between the measurement given and the next tiny 1/16" measurement below it.)
Basic White cardstock for stamping/die cutting
Moody Mauve cardstock **Last Chance 
    Cut four (4) of the 3rd largest octagons from Countryside Corners dies
Bubble Bath cardstock, cut one (1) 4th largest octagon
2023-2025 In Colors 6x6" DSP pack 163778 **Last chance   
    Cut (4) pieces 5/8" x 1 1/8"
    Cut (2) 1 1/8" x 1 1/8"
    Cut (2) 2 5/8" x 1 1/8"
Iridescent Striped Trim 163299
2023-2025 In Color Opaque Sparkle Gems 163782 **Last chance

Thanks so much for stopping by today!  I truly appreciate it.

Until next time; be happy, stay healthy and happy stamping!
Teresa

*Purchasing bundles saves 10% over the individual piece prices when combined.  You must use the bundle item code for the 10% bundle discount.  When purchasing Last Chance items; be sure to check if the individual piece prices are discounted.  Individual piece prices could be less expensive if the discounts are deep enough.

** Last chance are items are while supplies last.  Some are discounted, some are not.  Once inventory has been depleted they are gone for good.  Hurry and get them while they're still available if you want them.

Sunday, March 23, 2025

Easter Greetings lift top milk carton box

It’s time for another treat box project.  With Easter coming up in an about a month, now is the time to get started on those Easter treat projects.  For mine today, I was inspired by Julie DiMattio and Melissa Faust.  I took the lift off milk cartoon idea and tweaked the measurements to meet my own needs.  My finished box bottom size is 1 5/8” x 3 1/4” x 1” and holds two of the Kit Kat bunny fun size bars.  To see how I’ve made the box, head on over to YouTube and watch my video.


Measurements and Supplies:
Storybook Friends bundle 164675* (includes stamps 164668 & dies 164674)
Exposed Brick 3D embossing folder 161600
Framed Scenes dies 165396
Floral Delight DSP 164700
    4" x 5 5/8" in landscape if directional
    Score on 4" side at 2 1/2" and 3 1/2"
    Score on 5 5/8" side at 1", 2 5/8", 3 5/8" & 5 1/4"
        Score on 5 5/8" side only down to the first horizontal score line at 1/2" & 3 1/8"
        Add diagonal scores as shown on the template above.
Old Olive cardstock 7 1/2" minus 1/32" x 8 1/8" minus 1/32"
    score on all four sides at 3 1/4"
Old Olive Two Tone cardstock (last chance list assortment pack Autumn to Remember 166499 but coming in new annual catalog in single packs)
Iridescent Pearls 158987
White 1/4" Ribbon 165562
Ink Pads: Mossy Meadow, Memento Tuxedo Black
Stampin' Blends: Lt Crumb Cake, Old Olive, Lt Petal Pink, Dk Daffodil Delight
Sponge Dauber 133773

Thanks so much for stopping by today.  I hope you have enjoyed this project and that you will give it a try.  Of course, you could use it with any stamp set for any occasion.  If you wouldn't mind sharing your version, please add to the KnT Designs Stampers Group Social over on Facebook.

Until next time; be happy, I hope you have good health and happy stamping!
Teresa

*Purchasing bundles saves 10% over the individual piece prices when combined.  You must use the bundle item code for the 10% bundle discount.  When purchasing Last Chance items; be sure to check if the individual piece prices are discounted.  Individual piece prices could be less expensive if the discounts are deep enough.

Friday, February 28, 2025

Easter Greetings Arch-Shaped card

 I'm doing things a bit differently today.  Normally, this would post on Saturday, but because the tree stamp set is a free stamp set only through today, I'm posting this on Friday, February 28, 2025.  I hope you will take advantage of the Sale a-bration free offering and choose the Pick A Season stamp set as one of your free choices.  I really do love this stamp set and it has such great versatility.  I think it's a must have for all stampers.  If you would like to see how I put this card together, please watch the replay over on my YouTube channel.  


Measurements and Supplies:
Everyday Arches dies 164629 (can be purchased in a bundle* 164630 and includes coordinating stamps) 
Pick A Season stamp set 164969 (Sale a-bration free choice through today at 11:59 p.m. MT)
Storybook Friends bundle* 164675 (includes stamps 164668 & coordinating dies 164674)
Ink Pads: Balmy Blue, Summer Splash, Early Espresso, Pretty in Pink, Highland Heather, Daffodil Delight, Garden Green, Basic Gray & Memento Tuxedo Black
Stampin' Blends alcohol markers: Crumb Cake, Gray Granite, Granny Apple Green, Lt Petal Pink, Balmy Blue, and Lt Boho Blue
Balmy Blue cardstock for card base 5 1/2" x 8 1/2", scored in center at 4 1/4"
Basic White for largest & third largest die (x2) & scraps for stamping

Be sure to watch the video for the ink smooshing technique & on how to make the shaped card.  Thanks so much for stopping by today.  I truly appreciate you taking time from your busy day.  

Until next time; be happy, stay healthy and happy stamping!
Teresa

*purchasing bundles saves 10% over the individual piece prices when combined.  You must use the bundle item code for the 10% bundle discount.  When purchasing Last Chance items; be sure to check if the individual piece prices are discounted.  Individual piece prices could be less expensive if the discounts are deep enough.

Thursday, February 29, 2024

Easter Bunny Encircled in Nature wreath card

 Man, have I been having fun this week playing with some new Online Exclusives products releasing to customers in my online store on March 5.  Be sure to check back then and click the shopping cart to see what's been added to the Online Exclusives section.  

For this card I wanted to show the versatility of the dies for most any occasion.  In this case, Easter, or you could use for Spring by leaving the Easter eggs out.  I started by die cutting the floral images out of Basic White cardstock.  I then water colored them and set them aside to dry before moving on to stamping and coloring my bunny and eggs.   If you would like to watch the video replay, you can rewatch on Facebook here as I'm unable to download my video and upload to YouTube.  So sorry for the inconvenience! FB video replay here:


Supplies and Measurements:
Encircled in Nature bundle (releases March 5) 163629 (includes stamps 163623 & dies 163628)*
Easter Bunny stamp set 160272 (can use sentiment from here OR from the February Paper Pumpkin if you have it)
Cane Weave 3D Embossing Folder, 160580
Deckled Circles dies 162286 (or circle approx 3" in diameter)
Everyday Details dies 162864 (or rectangle for sentiment approx. 2 1/4" long x 1/2 to 3/4" high)
Flight & Airy DSP (SAB item, no longer available after 2/29/24)
Thick Basic White cardstock for card base, 5 1/2" x 8 1/2", scored in center at 4 1/4"
Highland Heather cardstock, 4 1/8" x 5 3/8"
Basic White cardstock for stamping and die cutting
Purple Fine Shimmer Gems 162611
Copper & Natural Ribbon Combo Pack, 162192 or other ribbon
Ink Pads: Fresh Freesia, Gorgeous Grape, Granny Apple Green, Basic Gray & Pecan Pie
Stampin' Blends Markers: Granny Apple Green, Azure Afternoon, Bubble Bath, Fresh Freesia, Daffodil Delight, Highland Heather, Petal Pink (I used the light markers mostly)
Water Painters 151298

Thanks so much for stopping by today.  I truly appreciate you taking time from your busy schedule to spend a few minutes with me.  

Until next time; be happy, stay healthy, and happy stamping!
Teresa

*save 10% over the individual piece price when purchased in a bundle

Saturday, February 24, 2024

There's no bunny like you egg basket

Hello!  I'm so glad you've found me today.  With Easter early this year (March 31), it's time to get working on those Easter projects before time gets away from us.  As soon as I saw the Excellent Eggs bundle, I knew I wanted to try to pair it with the Easter Bunny stamp set from the annual catalog.  I love how this little treat box turned out and I hope you do too.  To see how to put these little egg baskets together, be sure to watch the video replay on YouTube.


Measurements and Supplies:
Excellent Eggs bundle 162808 (includes stamps 162801 & coordinating dies 162807)*
Easter Bunny stamp set 160272 (does have a coordinating Easter Bunny punch 160331 available)
Garden Meadow dies 162740 (can be bundled with coordinating stamp set 162741)*
Wild Fern Dies, 162654 (can be bundled with coordinating stamp set 162655)* (sentiment label)
Lighter Than Air DSP, cut fresh freesia scalloped pattern with largest egg die
Card stock scraps in Lemon Lolly, Flirty Flamingo, Balmy Blue and Basic White
Fresh Freesia cardstock, two scraps cut with largest egg die
Fresh Freesia cardstock, 4" x 4 1/2"
    Score on 4" side at 1" on each end
    Score on 4 1/2" side at 1 3/4" each end
Inks: Granny Apple Green, Azure Afternoon & Basic Gray
Stampin' Blends: Azure Afternoon light, Petal Pink light & Gray Granite light
Blending brush
Flat Adhesive-Backed Pearls, 160449
Sheer Ribbon Combo Pack, 161635 in Azure Afternoon

Thanks for stopping by!  To purchase your Stampin' Up! supplies, click the shopping cart in the upper right.  I would love to earn your business.

Until next time; be happy, stay healthy and happy stamping!
Teresa

*save 10% over the individual piece price when purchased in a bundle


Thursday, February 15, 2024

Easter Lily card

Here we are again, another week has gone by.  Today is my youngest daughter's birthday, so a very happy birthday shoutout to Suzanne!  Lilies are her favorite flower so it is very appropriate that we are using the Easter Lily bundle by Stampin' Up! as the featured product this week.  You only have until the end of February to get your free Sale a-bration rewards with purchase and I hope you will consider this bundle of stamps and dies.  I tried to show how to put together the 3D lily included in the Easter Lilies dies. It took a few minutes for me to figure out how to put the flower together, but once you get it, it's super easy.  You can watch the video replay and see how it's done over on YouTube.


Supplies and Measurements: 
Easter Lilies bundle, 162786 (includes stamps, 162783 & coordinating dies, 162785)*
Throughout the Year stamp set, 162312 (for sentiment)
Radiating Stitches dies, 161595
Iridescent Foil Gems, 162842
Card Base, Daffodil Delight, 5 1/2" x 8 1/2", scored in center at 4 1/4"
 Basic White cardstock, approx. 4 x 5 1/4" cut with Radiating Stitches largest rectangle die
Basic White cardstock for stamping and die cutting
Mossy Meadow cardstock scrap for sentiment, approx. 3 3/4" x 1"
Just Kiddin' Designer Series Paper, 2 3/4" x 4 1/4", 162828
Stampin' Blends alcohol markers: Lemon Lolly, Lt Parakeet Party, Lt. Old Olive
Wink of Stella Glitter Brush
Basics Embossing Powders, 155554 (sorry, currently unavailable but will return soon)
Heat tool, 129053
Embossing Additions Tool Kit, 159971
Inks Pads: Mossy Meadow, Crumb Cake and Daffodil Delight & Versamark watermark stamp pad

I hope you have enjoyed your visit to my blog today!  Thanks so much for stopping by.  To purchase your Stampin' Up! supplies from my online store, click on the shopping cart in the upper right.

Until next time; be happy, stay healthy and happy stamping!
Teresa

*save 10% over the individual piece price when purchased in a bundle

Saturday, March 11, 2023

Easter Bunny for a Cup of Tea and cookie treat box

 Here we are on another Saturday morning.  I’m currently at an all-day stamping event with my friends.  What a great day for a Cup of Tea and cookies!  I have the perfect way to treat your friends to that.  Today’s project is a tea, cookie and chocolate box I designed as an Easter gift.  However, you could adapt this box for any occasion all year long.  I hope you try them.  To see the video replay of how I put this box together, be sure to hop on over to my YouTube channel HERE:


Measurements and Supplies:
Easter Bunny stamp set
Cup of Tea bundle (includes stamp set and Tea Cup dies)
Cane Weave 3D embossing folder
Scalloped Contour dies
Dandy Designs Designer Series Paper
    4 3/8 x 2 5/8 and 2 x 7/8"
Starry Sky cardstock 7 x 8"
    Score on 7" side at 1, 5 1/2 and 6 1/2
    Score on 8" side at 1, 3 3/4, 4 3/4 and 7 1/2"
Basic White cardstock
    cut 3rd largest scalloped rectrangle
    scrap for stamping and die cutting images
Fresh Freesia cardstock
    2 x 3 15/16" (emboss with Cane Weave EF)
Ink Pads in Starry Sky and Memento Tuxedo Black
Stampin' Blends alcohol markers:
    Sweet Sorbet, Crumb Cake, Petal Pink, Granny Apple Green, Orchid Oasis, Starry Sky, Daffodil Delight, Tahitian Tide, and Fresh Freesia
Iridescent Pearls

Thank you for taking time from your busy day to stop by my blog.  I do so appreciate it.  To order Stampin' Up! supplies from my online store, click on the shopping cart in the upper right.  Thank you so much!  It really means a lot to me.

Until next time; be happy, stay healthy and happy stamping!
Teresa


Thursday, February 17, 2022

Daffodil Daydream Medley of Cards

 During my FB Live Tuesday, I made several cards and showed how to use the Daffodil Daydream bundle of products by Stampin' Up! along with the Daffodil Afternoon Designer Series Paper (DSP) which you can earn for free with a qualifying purchase through the end of February 2022.  You can watch the live replay on my YouTube page here: https://youtu.be/5SRsVDEiEAY 

This is one of the cards we made.  It is a simple card with a big impact, I think.  
Measurements: A2 card base in Daffodil Delight, Daffodil Afternoon DSP 4 x 5 1/4", Flirty Flamingo focal layer 3 1/8 x 4 1/8" and Shimmery White cardstock for the focal image 3 x 4".  Stampin' Blends markers for coloring in Daffodil Delight and Evening Evergreen.  White baker's twine colored with the dark Flirty Flamingo blend.  
Inside layer is Basic White cardstock cut at 3 5/8 x 4 7/8".  This is the layer I use for the inside of my cards most often as I can get five of them from one sheet of cardstock.  The sentiment comes from A Wish for Everything.  It can be found in the 2021-2022 Annual Catalog and has coordinating dies called Word Wishes dies which cover most holidays.  Be sure to check those out!  


Supplies and measurements:  A2 card base in Mint Macaron, Daffodil Afternoon DSP 4 x 5 1/4", Encircled in Beauty die cut in Flirty Flamingo, largest Layering Circle die in Basic White using a partial die cut technique. (see video for how to)  Stampin' Blends in Mossy Meadow, Flirty Flamingo and Daffodil Delight.  Wink of Stella pen on flower centers.  Bumble Trinkets and Crinkled Seam Binding ribbon.  The thanks is cut from Basic black using the Well Written dies (retired), but you could use the Amazing Thanks dies which are current and in my online store.  I cut three out and layered them on top of each other using our adhesive sheets on the back of the black cardstock prior to die cutting.

For my final card today, I started with an A2 card base in Mint Macaron, then added a Daffodil Afternoon base layer 4 x 5 1/4".   Using the Stitched Rectangles dies, I cut the rectangle which is approximately 2 1/4 x 3 1/2" in Basic White.  Sentiments are from Special Moments and stamped in Momento Tuxedo black ink.  I cut the largest oval from the Beautiful Shapes dies in Pale Papaya and layered on the rectangle.  The darling kangaroo is from Count on Me.  I colored her using the newly released Natural Tones Collection of Stampin' Blends Markers in SU 400 and SU 1000.  The flower she's holding is colored with Pale Papaya and Mossy Meadow. 
For the inside of the card I used the stitched rectangle die which is closest to 3 5/8 x 4 
7/8".  I stamped the bear from Count on Me and colored it with SU 300.  I just love the new options available in the Natural Tones collection of markers!  The heart is colored with Flirty Flamingo and her clothes were paper pieced using the Daffodil Afternoon DSP.  I show how I did this in the video.  

Well, that's all for me today.  Thanks for stopping by!  To place an order, click on the shopping cart in the upper right corner.  I'd love to earn your business!  Please leave a comment, I'd love to hear from you. 
 
Until next time; be happy, stay healthy and happy stamping!
Teresa

Friday, March 30, 2018

Easter Basket Crate

Just wanted to quickly share this little Easter crate I made for my friends and co-workers.  It utilizes a retired stamp set called Basket Bunch and the crate is from the Wood Word bundle (145136) in the 2017-2018 annual catalog along with the Wood Textures DSP stack.  (144177).

Hope you have a very happy Easter.  Thanks for topping by my blog today.  Please leave a comment, I'd love to hear from you.