Showing posts with label snowman. Show all posts

Saturday, November 1, 2025

We wish you a merry Christmas Festive Friends wreath card

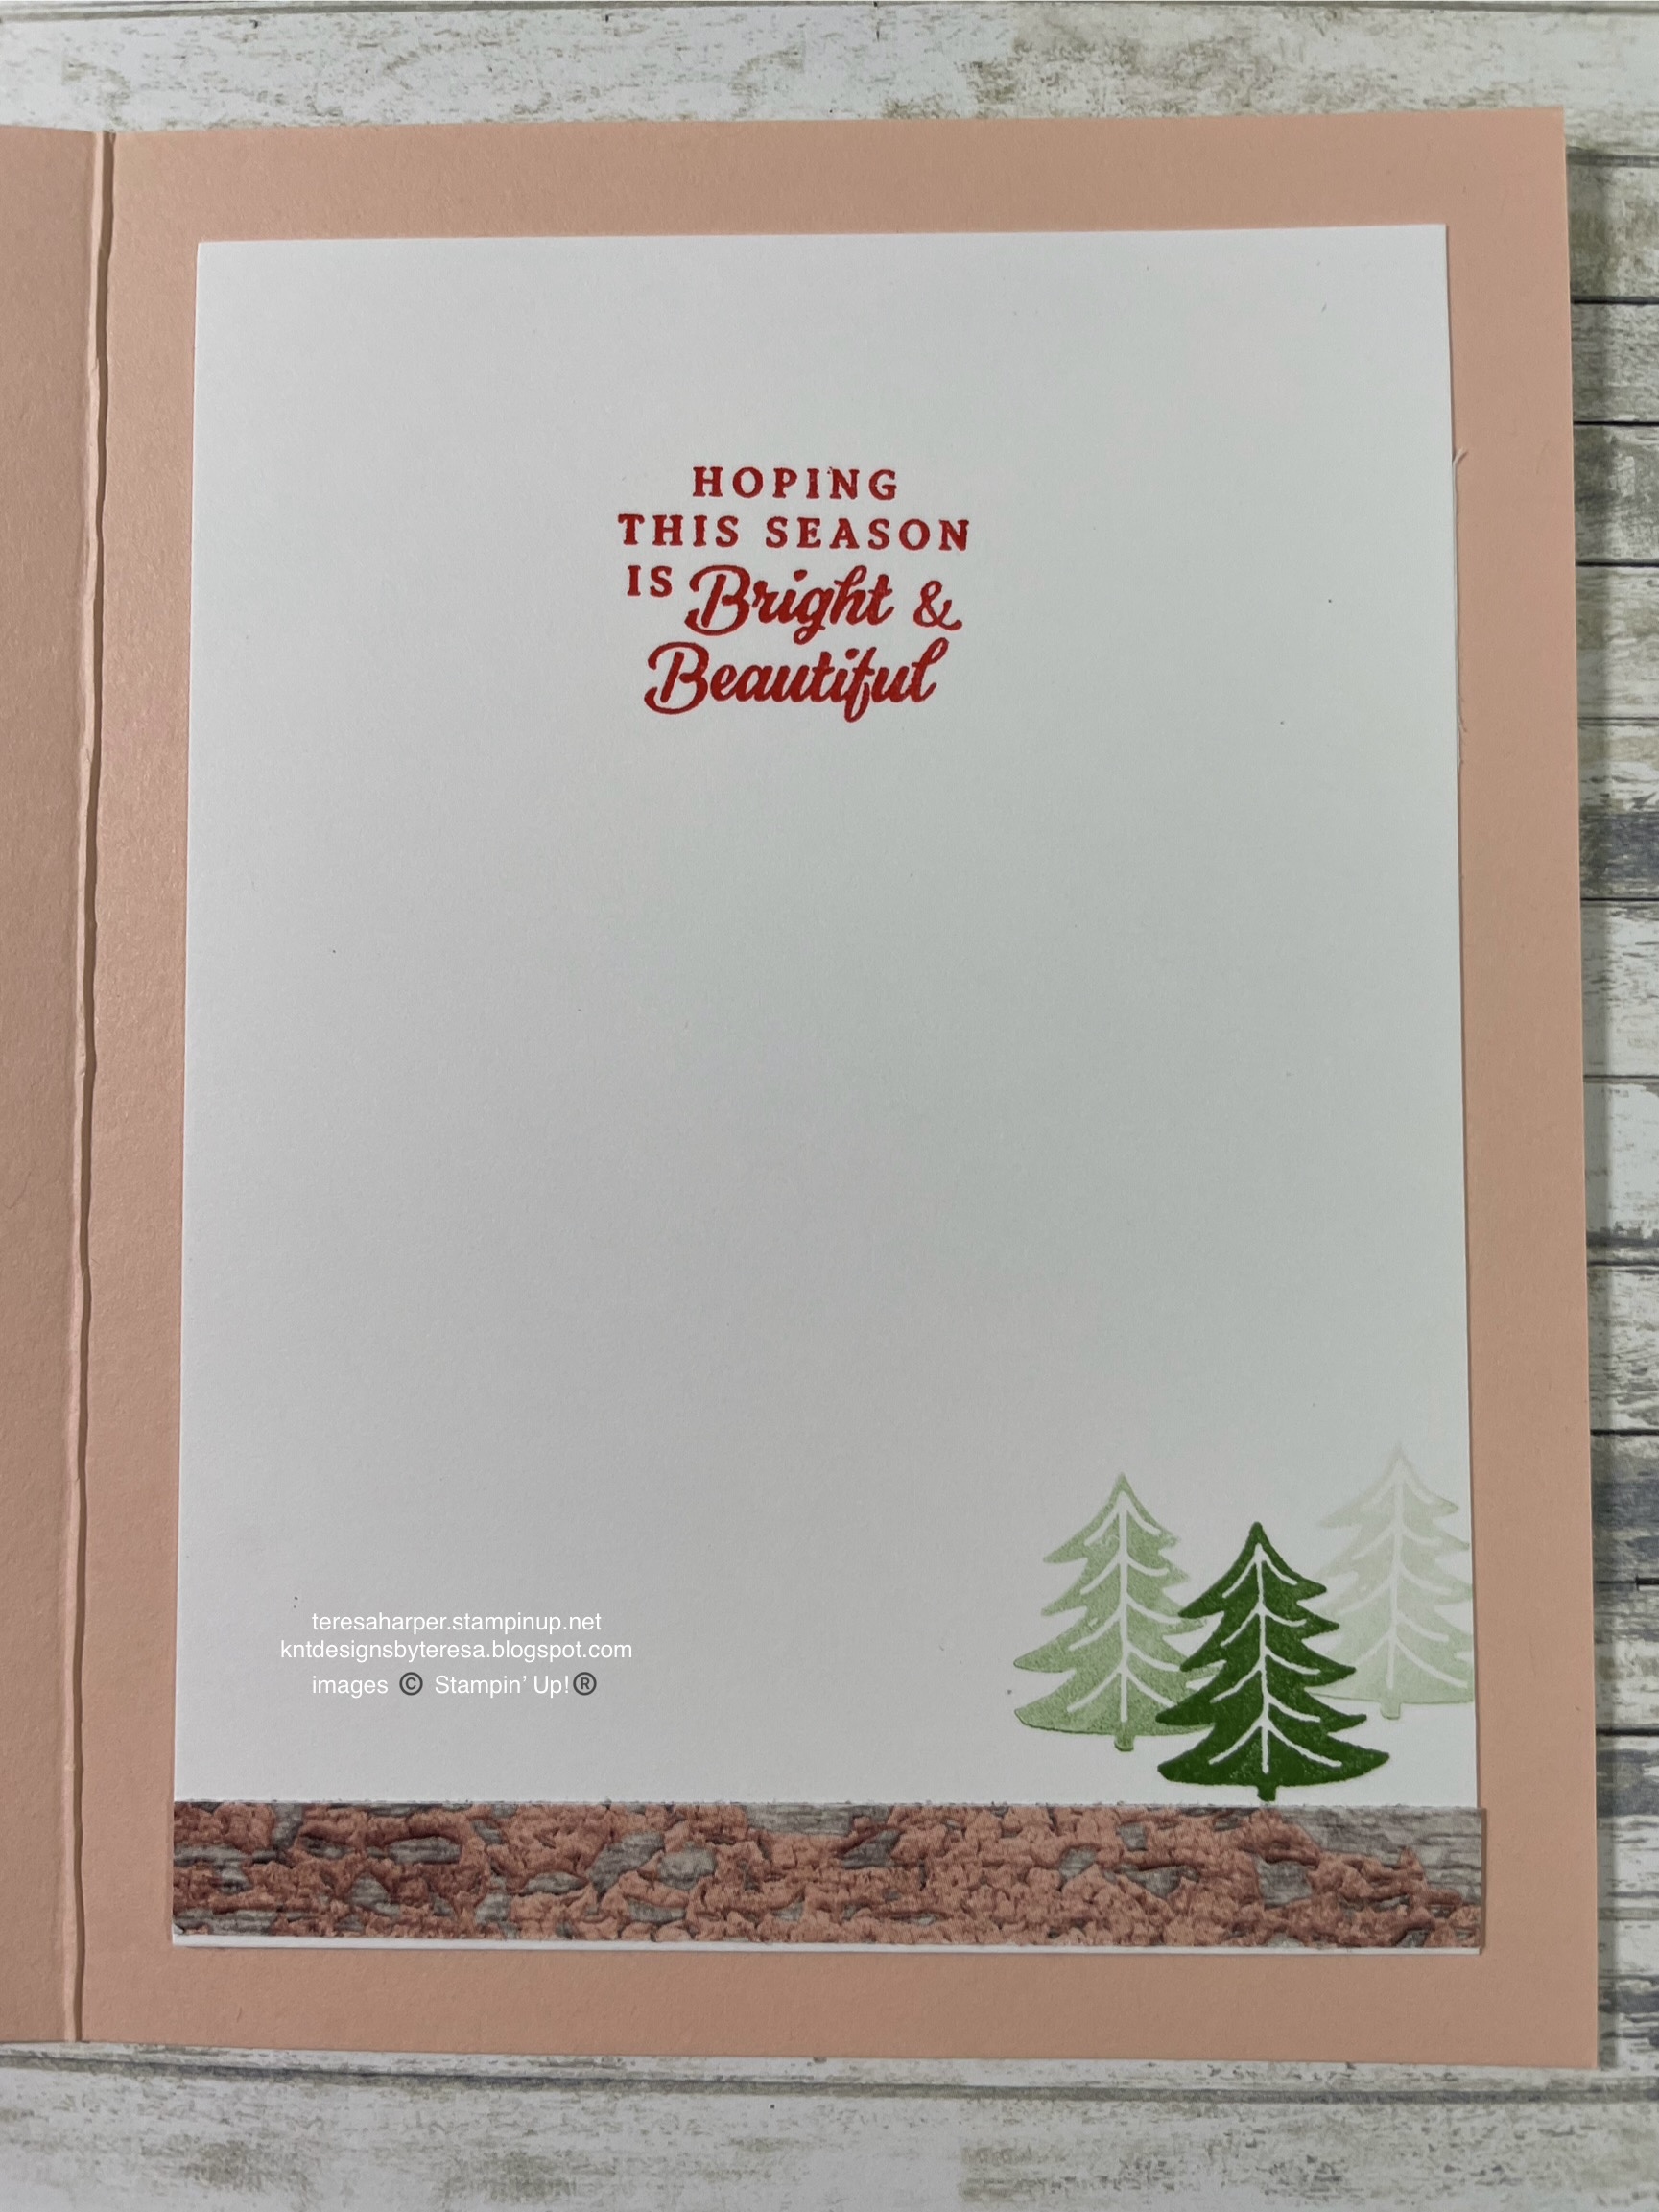
When I started designing this card, I was looking to go a whole different direction.  But then, as I opened up the Delicate Pines stamp case, I spied the curved bough stamp and this card came to mind.  I'm so glad I changed direction, because it turned out so cute in the end.  Do you ever do that?  Start out in one card in your mind and go a completely different direction?  To see how I've put this card together, you can watch the video tutorial over on my YouTube channel by clicking this link. 


Supplies and measurements: 
Festive Friends bundle* 166039 (includes coordinating stamps and dies)
Delicate Pines bundle* 166074 (includes stamps & coordinating dies)
Magic & Hope stamp set (bow) 165950
Triple Banner Punch 167050 **Sneak Peek item releases to customers on November 4th.
Words for the Season stamp set (for inside sentiment) 165716
2025-2027 In Color 6"x6" paper pack 165300
    4" x 5 1/4"
Cloud Cover cardstock for card base 5 1/2" x 8 1/2", scored in center at 4 1/4"
Basic White cardstock for focal images 3 3/4" x 5"
    scrap piece about 2" x 3 3/4" for snow
    scrap piece about 1" x 3 3/4" for snow 
Basic White for inside 3 5/8" x 4 7/8"
Basic White for stamping & die cutting
Stamp pads: Secret Sea, Cloud Cover, Pretty Peacock, Pretty in Pink, Real Red
Stampin' Blends markers: Pretty in Pink, Lt Pool Party, Dk Peach Pie, Lt Pumpkin Pie
Blending brush 160518
Wink of Stella Glitter Brush 141897
2 1/2" circle punch (optional) I used to trace for wreath shape
Adhesives I used: Stampin' dimensionals, mini Stampin' dimensionals, mini glue dots, Stampin' Seal

Thanks so much for stopping by today.  You can shop my online store for all your Stampin' Up! supplies by clicking on the shopping cart to the right.  Thanks in advance for supporting my small business.

Until next time; be happy, good health to you and happy stamping!

*Purchasing bundles saves 10% over the individual piece prices when combined.  You must use the bundle item code for the 10% bundle discount.  When purchasing Last Chance items; be sure to check if the individual piece prices are discounted.  Individual piece prices could be less expensive if the discounts are deep enough.

Sunday, July 20, 2025

1/2 sheet fold flat box using July 2025 Online Exclusives

 Hello again.  I'm so glad you are here.  For today's project, I'm continuing my fold-flat box series, this time, I've redesigned the box to fit on a 1/2 sheet of 8 1/2" x 11" cardstock.  I love maximizing my paper, so I usually try to make boxes sized to make two from a single sheet of cardstock.  I've used some of the newly released July Online Exclusives for my box today.  I also showed a Halloween version in my video tutorial.  Be sure to watch the replay over on my YouTube  channel.


Measurements and Supplies:
Jar of Joy stamp set 166176
Sweet Jar bundle* 165507 (includes stamps and Jar Builder punch)
Stripes & Dots background stamp set 165334
Falling Snow background stamp set (to make your own patterned paper) 164312
Notes & Totes dies 164656 (for mini tag die-can be purchased in a bundle with stamps)
Real Red & White Baker's Twine 164051
Baker's Twine Essential Pack 155475 (white)
Real Red & White Adhesive-backed Peppermints 164050 
Ink Pads: Poppy Parade, Shaded Spruce, Secret Sea & Cloud Cover
Timid Tiger Stampin' Blends alcohol marker (I used the light from the combo)
Secret Sea cardstock for box, 5 1/2" x 8 1/2"
    Score on the 5 1/2" side at 1/2" & 1 1/2" from each end (score, rotate 180, score again)
    Score on the 8 1/2" side at 1" & 3 3/4" from each end. (score, rotate 180, score again)
Cloud Cover cardstock 4 1/4" x 5 1/2"
Basic White for stamping images
Velcro 3/8" thin fasteners (You can purchase at your local craft store or get from Amazon)

Please do watch the tutorial as I also show you my Halloween version using the Fright Night stamp set.  I have provided the template, but it is easier to make when you see how it's done (at least for me).

I hope you are inspired to make some of these fold-flat boxes.  Please share with me and my crafting community over on my Facebook group page, KnT Designs Stampers Group Social.  I would love to see what you make and I know my crafty friends would too.  In addition, please share what you found to fit inside.  

Until next time; be happy, good health to you and happy stamping!
Teresa

*Purchasing bundles saves 10% over the individual piece prices when combined.  You must use the bundle item code for the 10% bundle discount.  When purchasing Last Chance items; be sure to check if the individual piece prices are discounted.  Individual piece prices could be less expensive if the discounts are deep enough.

#CreativeChallengeSU

Sunday, October 27, 2024

Seasons Greetings Snow Globe card

 For my card today, I've again used the Snowy Scenes suite of products. I hope you have liked all the projects I've shown this week and are inspired to create with your bundle. I loved this suite of products right from the start. It's so whimsical and can be used for many occasions with the variety of wintery images.  If you would like to see how I've put my card together, please watch the video replay over on my YouTube channel.


Supplies & Measurements:
Snowy Wonder bundle 164125* (includes stamps 164334 & dies 164124)
Snowflake Sky embossing folder 162026
Falling Snow stamp 164312
Peaceful Season stamps for inside sentiment 164145
White Loose Snowflakes 164128
Snowy Scenes 12 x 12 Designer Series Paper 164333, 1 1/2" x 5 1/4", 3/8" x 3 5 /8" for inside
Brushed Silver & Gold Specialty Paper** (upcoming release in November 2024) 164861
Country Woods 12 x 12 DSP 163393 for die cutting globe base
Basic White cardstock for stamping & die cutting
Petal Pink cardstock for base 5 1/2" x 8 1/2", scored in center at 4 1/4"
Petal Pink cardstock 2 3/4" x 5 1/4"
Garden Green cardstock scraps
Berry Burst, Old Olive & White Glimmer Paper 163769**
Silver & White Sheer Ribbon 162249
Ink Pads: Memento Tuxedo Black, Pool Party, Poppy Parade, VersaMark
Stampin' Blends: Lt Pool Party, Lt Pumpkin Pie, Poppy Parade, Lt Petal Pink

Thanks so much for stopping by!  I appreciate you taking time from your busy day.  
Until next time; be happy, stay healthy and & happy stamping!
Teresa

*purchasing bundles saves 10% over the individual piece prices when combined.  You must use the bundle item code for the 10% bundle discount.

**Online Exclusives items can be while supplies last.  If they are in the store, they are available for purchase.  If they say Currently Unavailable, the stock will be replenished.  If they are no longer in the store, unfortunately, they will not return. 


Monday, August 5, 2024

Filled With Cheer Majestic Fun Fold card

 Hello my friends, so happy you stopped by today.  I have a really fun and easy fun fold for you today.  This fun fold was created by Sue Campfield.  I’ve recreated it here using our featured stamp set for this week, Filled With Cheer.  To see how I put my card together, watch the video replay on my YouTube channel.


Supplies and Measurements:
Filled With Cheer stamps set 164362
Deckled Circle die 162286
Snowflake Sky 3D Embossing Folder 162026
Merriest Trees stamp set (for inside sentiment only) 162043
Iridescent Pears Basic Jewels 158987
Adhesive-backed Snowflake Assortment 162129
Ink Pads: Pretty Peacock, Memento Tuxedo Black
Stampin' Blends: Moody Mauve, Pretty Peacock, Lt Smoky Slate, Lt Gray Granite , Lt Blueberry Bushel
    Pebbled Path
Wink of Stella Glitter Brush
Card Base, Lost Lagoon 5 1/2 x 8", scored at 3 3/4" & 4 1/4", 
    flip to opposite side of cardstock, then score at 1 5/8", 1 7/8" 6 1/8" & 6 3/8"
Winter Meadow DSP 162133
(4) pieces each 1 3/8" x 5 1/4" (I used two different patterns) 
(1) piece 3/8" x 5 1/4" (I used same as one of the patterns above)
(1) 1/2" x 1 5/8" for bottom of back sentiment strip if desired (optional)
Deckled Circle 7th smallest approx 3 1/4", cut from gray pattern for stamping
Basic White Cardstock for layering
(3) pieces each 1 5/8" x 5 1/4" (I embossed two of these with the Snowflake Sky EF)
Pretty Peacock cardstock for 8th smallest Deckled Circle die approx 3 1/2"

Please order your Stampin' Up! supplies by clicking on the shopping cart in the upper right.  I'd be every so grateful for your business.

Until next time; be happy, stay healthy and happy stamping!
Teresa

Saturday, November 26, 2022

Snowman Magic Cracker Treat box, 9th in the 12 Projects of Christmas 2022

 I sure hope everyone survived Thanksgiving Day and Black Friday shopping.  I had such a good time!  It's a tradition for my mom and I to get up early each Black Friday and spend the day together shopping, having lunch and just enjoying each other's company.  We've missed a handful of years, but we both look forward to our time together each year.  

Today's project was inspired by Tami White.  I figured out my own measurements for the box to fit the treats I wanted to put in them.  The Snowman treats I found at my local Home Goods store.  The brand is LaSuissa, made in Italy, milk chocolate filled with cocoa cream.  I myself am more of a dark chocolate fan, but I couldn't pass up those little snowmen for this project.  To see how I've put it together, be sure to watch my YouTube channel replay HERE:


This is the template of how each piece should look when you die cut them.  Be sure to trim 1/8” or so off each end piece of the white as shown in the video.


Measurements and supplies:

Snowman Magic stamp set
Cracker and Treat Box dies
Shimmer or Basic White cardstock, 2 5/8 x 5
Basic Black cardstock, 2 1/4 x 5"
Scraps of Basic White for scarf and holly
Ink Pads: Memento Black, Shaded Spruce and any color for scarf (Sweet Sorbet)
Stampin' Blends in Lt. Pumpkin Pie and Lt. Cherry Cobbler
Silver Metallic Edge Cotton Ribbon

Thank you so much for stopping by!  If you would like to purchase any Stampin' Up! supplies, click on the shopping cart in the upper right.  Please leave me a comment, I'd love to hear from you.

Until next time; be happy, stay healthy and happy stamping!
Teresa


Thursday, November 24, 2022

Snowman Magic Faux Step Fold card, 8th in the 12 Projects of Christmas 2022

 Happy Thanksgiving everyone!  I hope you are having a wonderful time with family and/or friends.  I am spending Thanksgiving with my husband and oldest granddaughter today.  

Today's project is a Faux Step Fold card and I really am pleased with the way it can easily sit on the mantle for display all holiday season long.   To see how I've put my card together, head on over to my YouTube channel HERE:


Measurements and Supplies:
Snowman Magic bundle (includes stamps and Snowman dies)
Wintry 3D embossing folder
Texture Chic Designer Series Paper
    for narrow card: 2 1/4 x 4 3/8" OR for wider card 2 3/4 x 4 3/8"
Pool Party cardstock for card base 4 1/4 x 11", Score at 4 1/2, 9 & 10" on long side
Petal Pink cardstock 8 1/2 x 2 1/2" for narrow card OR 8 1/2 x 3" for wider card, score either piece at 3"
Evening Evergreen cardstock 3 x 4 1/4" approx.  Run through Wintry 3D embossing folder with snowflakes, then cut:
    (2) two pieces 1 x 4 1/4"
    (1) one piece 7/8" x 4 1/8"
Scrap of Soft Suede cardstock for snowman arms
Basic White cardstock for stamping and die cutting
Basic White cardstock for inside 4 x 3 3/4"
Ink Pads: Basic Gray, Pool Party, Evening Evergreen, Memento Black
Stampin' Blends: Lt Pumpkin Pie, Dk Pool Party

Thanks so much for stopping by, I really do appreciate you take time from your busy day!  Please leave me a comment, I'd love to hear from you.  To purchase any of the supplies I've used today, click on the shopping cart in the upper right.  It will take you to my online store.

Until next time; be happy, stay healthy and happy stamping!
Teresa


Monday, December 6, 2021

Snowmen Peppermint Bark treat box with Penguin Place

 Hello everyone!  Today is Project 6 of the 12 Projects of Christmas.  I have a special treat box for you today.  When I designed this box I did so with the Ghirardelli Peppermint Bark Snowmen.  I tried to recreate the snowman on the package and use the Penguin Place bundle.  I was inspired by a video I watched on how to use the Penguin Builder Punch to make a snowman.  I loved it and knew I had to make one of my own.  The Ghirardelli Peppermint Bark Snowmen seemed the perfect pairing for my project.  I hope you love it as much as I do.  I'm thinking these will make some really nice teacher gifts, coworker gifts and the box is plenty big enough to drop a gift card inside!  You can see how I created this box by watching the FB live replay on YouTube by clicking here: https://youtu.be/rzT0rkzErpE 


Measurements and supplies:
Real Red cardstock 5 1/4 x 4", scored on all four sides at 1/2"
Real Red cardstock 5 5/16 x 4 1/16, scored on all four sides at 1/2"  Punch finger holes with a 1/2" circle punch on the long sides.
Pattern Party Designer Series Paper (DSP) 4 1/8 x 2 7/8"
Basic White approximately 3 7/8 x 2 5/8--diecut with 3rd largest Scalloped Contour die
Scraps of Basic White for punching and stamping large enough to punch Penguin and stamp scarf
Real Red scrap to punch hat for snowman
Scrap Heartwarming Hugs DSP for hat band
Scrap of Pumpkin Pie for the snowman nose
Inks in Evening Evergreen, Real Red, Smokey Slate and Momento Tuxedo Black
Gingham Ribbon
Wink of Stella
Penguin Place stamp set
Penguin Builder Punch
Snowman Builder Punch for nose
Black fine line marker

Thanks for stopping by my blog!  I appreciate you taking time from your busy life to spend it with me.  If you would like to purchase any of the supplies I've used today, please click on the shopping cart in the upper right corner.  I would love to be your Stampin' Up demonstrator if you don't already have one.  Please leave me a comment, I'd love to hear from you.

Until next time; be happy, stay healthy and happy stamping!
Teresa

Saturday, October 30, 2021

Warm winter wishes with Snowbody Better

 Here it is Saturday already!  I have another project for you today I made during my weekly Tuesday night live over on Facebook.  I would love it if you followed me there.  I usually make two projects every Tuesday evening live at 7:45 pm PDT.  You can always watch the replay over on my YouTube page at Teresa Harper kntdesignsbyTeresa.  

I started this project by stamping and coloring the snowman image in Momento Tuxedo black ink as I colored with Stampin’ Blends markers which are alcohol based.  I then fussy cut out the image with my paper snips.  I die cut a piece of basic white cardstock using the second largest Scalloped Contour die.  To this I stamped the snowflake image from Welcoming Woods stamp set in Versamark ink randomly on the top 2/3 of the die cut, added white embossing powder and heat set the powder.  Next, I used a blending brush and Misty Moonlight ink to add a little color to the “sky”.  I then began building my card layers.  To the Night of Navy cardbase, I added a piece of Beauty of the Earth Designer Series Paper, then added my scalloped die cut.  The snowmen were then added to the scalloped die cut using Stampin’ Dimensionals to give added depth.  The sentiment piece is stamped in Night of Navy ink on Misty Moonlight cardstock, then clear embossing powder was immediately added and heat set.  It must be done very fast as our classic ink dries quickly so you need to have all your supplies open and ready to go.). The sentiment was then cut out with a die from Beautiful Trees dies.  Finally, I added some white gems from Elegent Gems.   


Supplies used:
Beauty of the Earth Designer Series Paper 4 x 5 1/4”
Night of Navy cardstock 5 1/2 x 8 1/2”
Basic White Cardstock, half sheet for stamping and die cutting 
Misty Moonlight cardstock scrap for sentiment
Stampin’ Blends in Misty Moonlight light, Balmy Blue light, Flirty Flamingo, Fresh Freesia, Evening Evergreen and Soft Succulent
Blending Brush
ink pads in Momento Tuxedo black, Versamark clear and Night of Navy
White and clear embossing powders
Scalloped Contour Dies
Snowbody Better stamp set
Welcoming Woods stamp set

Thanks for stopping by my blog today.  Please leave me a comment to let me know your thoughts.  If you would like to purchase any of the products I’ve used, please click on the shopping cart in the upper right corner.  It will take you directly to my online store where you can shop 24/7.  I would really appreciate your business.

Until next time, happy stamping!
Teresa


Wednesday, October 27, 2021

Welcoming Woods Snowbuddy Better

 Happy Wednesday everyone!  Hope your week is going well.  Today I have a card featuring Snowbuddy Better and Welcoming Woods by Stampin’ Up!  I hope you love this card as much as I do.  I’m a sucker a stamp set with snowflakes and/or snowmen, so it’s no surprise this stamp set made it into my collection.  When I purchased the Welcoming Woods stamp set, I had this idea in my head.  

I first stamped and colored the snowmen, then masked the snowmen and stamped the birch trees from Welcoming Woods over the top.  Leaving the mask in place, I then used blending brushes and added ink in Bumblebee, Polished Pink, Fresh Freesia and Misty Moonlight to get the colored sky.  After the ink was fully dry, I stamped the snowflakes in Versamark ink, then added white embossing powder and set with my heat tool.  I also stamped my sentiment on a scrap of Misty Moonlight cardstock in Versamark, added white embossing powder and heat set.  I then cut it out with one of the smaller frames from Ornate Frames dies.

Supplies used:
Mint Macaron card base 5 1/2 x 8 1/2 scored @ 4 1/4”
Misty Moonlight cardstock layer 4 x 5 1/4” and scrap for sentiment
Focal layer Basic White 3 3/4 x 5”
Flowers for Every Season ribbon pack
White embossing powder from the Basics package of three
Versamark ink pad
Basic Grey ink pad
Stampin’Blends in Mint Macaron, Polished Pink, Mossy Meadow, Misty Moonlight Flirty Flamingo, light Grey Granite and light Balmy Blue.
Ink pads in Polished Pink, Basic Grey, Bumblebee, Fresh Freesia and Misty Moonlight
Blending Brushes
Ornate Frames to cut out the sentiment.

If you would like to see how I made this card, you can watch my Facebook live replay at KnT Designs by Teresa over on Facebook or on YouTube at Teresa Harper kntdesignsbyTeresa.  Thank you for stopping by today.  If you would like to purchase any Stampin’ Up! supplies, click on the shopping cart in the upper right corner.  I would love to earn your business if you don’t already have a Stampin’ Up! Demonstrator.

Until next time, happy stamping!
Teresa