Friday, February 28, 2020

Thoughtful Blooms Stone Thank You card

Hello, I’m back after a long absence.  Life has been crazy busy and something had to give.  Things are better and it’s time to get back to blogging.  Hopefully, I can keep the momentum going.  Today’s card is one I made using several Sale-a-Bration products which are available through the end of March 2020 with a qualifying order.  For every $50 increment you spend, you earn a free Sale-a-Bration item of your choice.  This card uses the Thoughtful Blooms stamp set, small bloom punch and stone embossing folder which is part of the Power of Hope Bundle.  The small bloom punch will be available for purchase in the upcoming 2020-2021 annual catalog.  In addition, I used the bee stamp from the January Paper Pumpkin (if you don’t have this set, you could use a bee from the Honey Bee stamp set (151527) which can be purchased separately, or as part of a bundle which includes coordinating dies (153792).  Colors used on this card are coastal cabana, early espresso, pineapple punch, so saffron and calypso coral.  The sentiment is from Label Me Bold (151631).  This set was inspired by Million Dollar Sales Achiever Jasmin Schulz.  Focal images are on a diecut from the Nature’s Thought dies (153586) which are part of the Coordination Product release available through March 31.


I hope you’ve enjoyed my post today and that I’ve inspired you to make a send a card to someone you know.  Thank you for taking time from our busy day to stop by my blog. Should you wish to purchase any of the items I’ve used today, please click on the shopping cart to the right, it will take you directly to my online store.  Until next time, make it a great day and happy stamping!

Monday, September 2, 2019

Enjoy today with new wonders

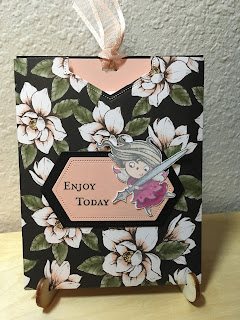
Today’s project features a card in an envelope and I am sharing for Kylie Bertucci’s International Blog Highlights.   I started by making an envelope using the Magnolia Lane Designer Series Paper into an envelope.  I used the Stitched Nested label dies to cut the opening at the top and also for the sentiment labels in basic black and petal pink.  The little fairy comes from the host set called New Wonders. She is colored using my Stampin’ blends markers.  I used rococo rose, blackberry bliss, gray granite, so saffron and crumb cake.  For her wings, I used clear Wink of Stella.  I fussy cut her out and added her to my sentiment panel.

For the card inside, I used a base of basic black with a layer of petal pink cardstock.  To this I added a smaller panel of whisper white.  I stamped my sentiment which is also from New Wonders.  This card has a lot of fussy cutting to give it the dimension I was going for.  The flowers from this card are from free as a bird and the leaves are from New Wonders.  All of the images were colored with my blends markers.  For this little fairy I used purple posey and highland heather.  The leaves are colored in old olive.
A lot of time went into this card, but I think it was worth it in the end as I love how it turned out.
I hope you’ve enjoyed my post today and that I’ve inspired you to make and send a card of encouragement to someone you know.  Thank you for taking time from your busy day to stop by my blog.  Should you wish to purchase any of the items I’ve used today, please click on the shopping cart it will take you directly to my online store.  Until next time, make it a great day and happy stamping.

Friday, August 16, 2019

Promotion congratulations welcome to the team

One of my former coworkers recently received a job promotion.  I’m so proud of him and I had just received the new stamp set Welcome To The Team.  The idea for this card just popped into my head and came together better than I imagined.  Wahoo!  I always love it when that happens.This card features several new products and one of the 2019-2021 In colors.  I started with a standard A2 card base of Night of Navy.  To this I added a piece of designer series paper from the 2019-2021 In color 6x6 stack in Seaside Spray.  this piece is cut at 4" x 5 1/4".  The frame is part of the Heirloom Frames Dies and 3D embossing folders (152325).  This particular set is different from any embossing folders we've offered before.  It comes with two 3D embossing folders, the rectangle shown below and an oval, as well as dies to cut both the rectangle and oval frames.  In order to obtain the effect you see on the card below, you first cut your card stock with the die using a die cutting machine (I use a Big Shot).  After die cutting the shape, you then run it through the machine again, but this time using the die cut inside the matching embossing folder.  So cool right!  I'm loving these frames.  They have so many possibilities.  Come back for a view of the cards I created with the ovals.  I'll be posting those soon. 

After getting my frame ready, I measured the inside piece that was die cut from the center of the frame and added 1/8" to the measurement just to ensure you didn't see the background paper through the frame.  That piece was cut at 1 7/8" x 2 7/8" out of whisper white cardstock.  I then stamped the sentiment and office chair from the Welcome To The Team stamp set in Memento tuxedo black ink and colored the image with my Stampin' Blends markers.  I used the night of navy combo, dark smokey slate and light gray granite as my colors.  I love how this came together and looks amazing.  I know my friend will be ecstatic to receive it. 

Thanks for taking time from your busy day to stop by my blog today.  I hope I've inspired you to share some creativity with a handmade card.  If you live in the USA and would like to order any of the products I've used today, please click on the shopping cart.  It will take you directly to my online store.  Please leave a comment, I would love to hear from you and always appreciate hearing your thoughts.  Until next time, make it a great day and happy stamping!