Showing posts with label Fun size candy bar. Show all posts

Saturday, August 3, 2024

Hello Small Treat box, Filled With Cheer

 Hello my friends!  So glad you could stop by today.  I've used the Filled With Cheer stamp set to make this little treat box that doesn't necessarily have to be for Christmas.  It has very nontraditional colors and I believe the flowers can pass for any season.  If you give this box a try, be sure to share with all of us over on the KnT Designs by Teresa Stampers Group Social page on Facebook.  If you would like to see how I put this box together, you can watch the video replay over on YouTube. 


Supplies & Measurements:
Filled With Cheer stamp set 164362**
Greetings of the Season bundle 164113** (includes stamps 164325 & dies 164112)*
Labeled with Love punch 163569
Exposed Brick 3D Embossing Folder
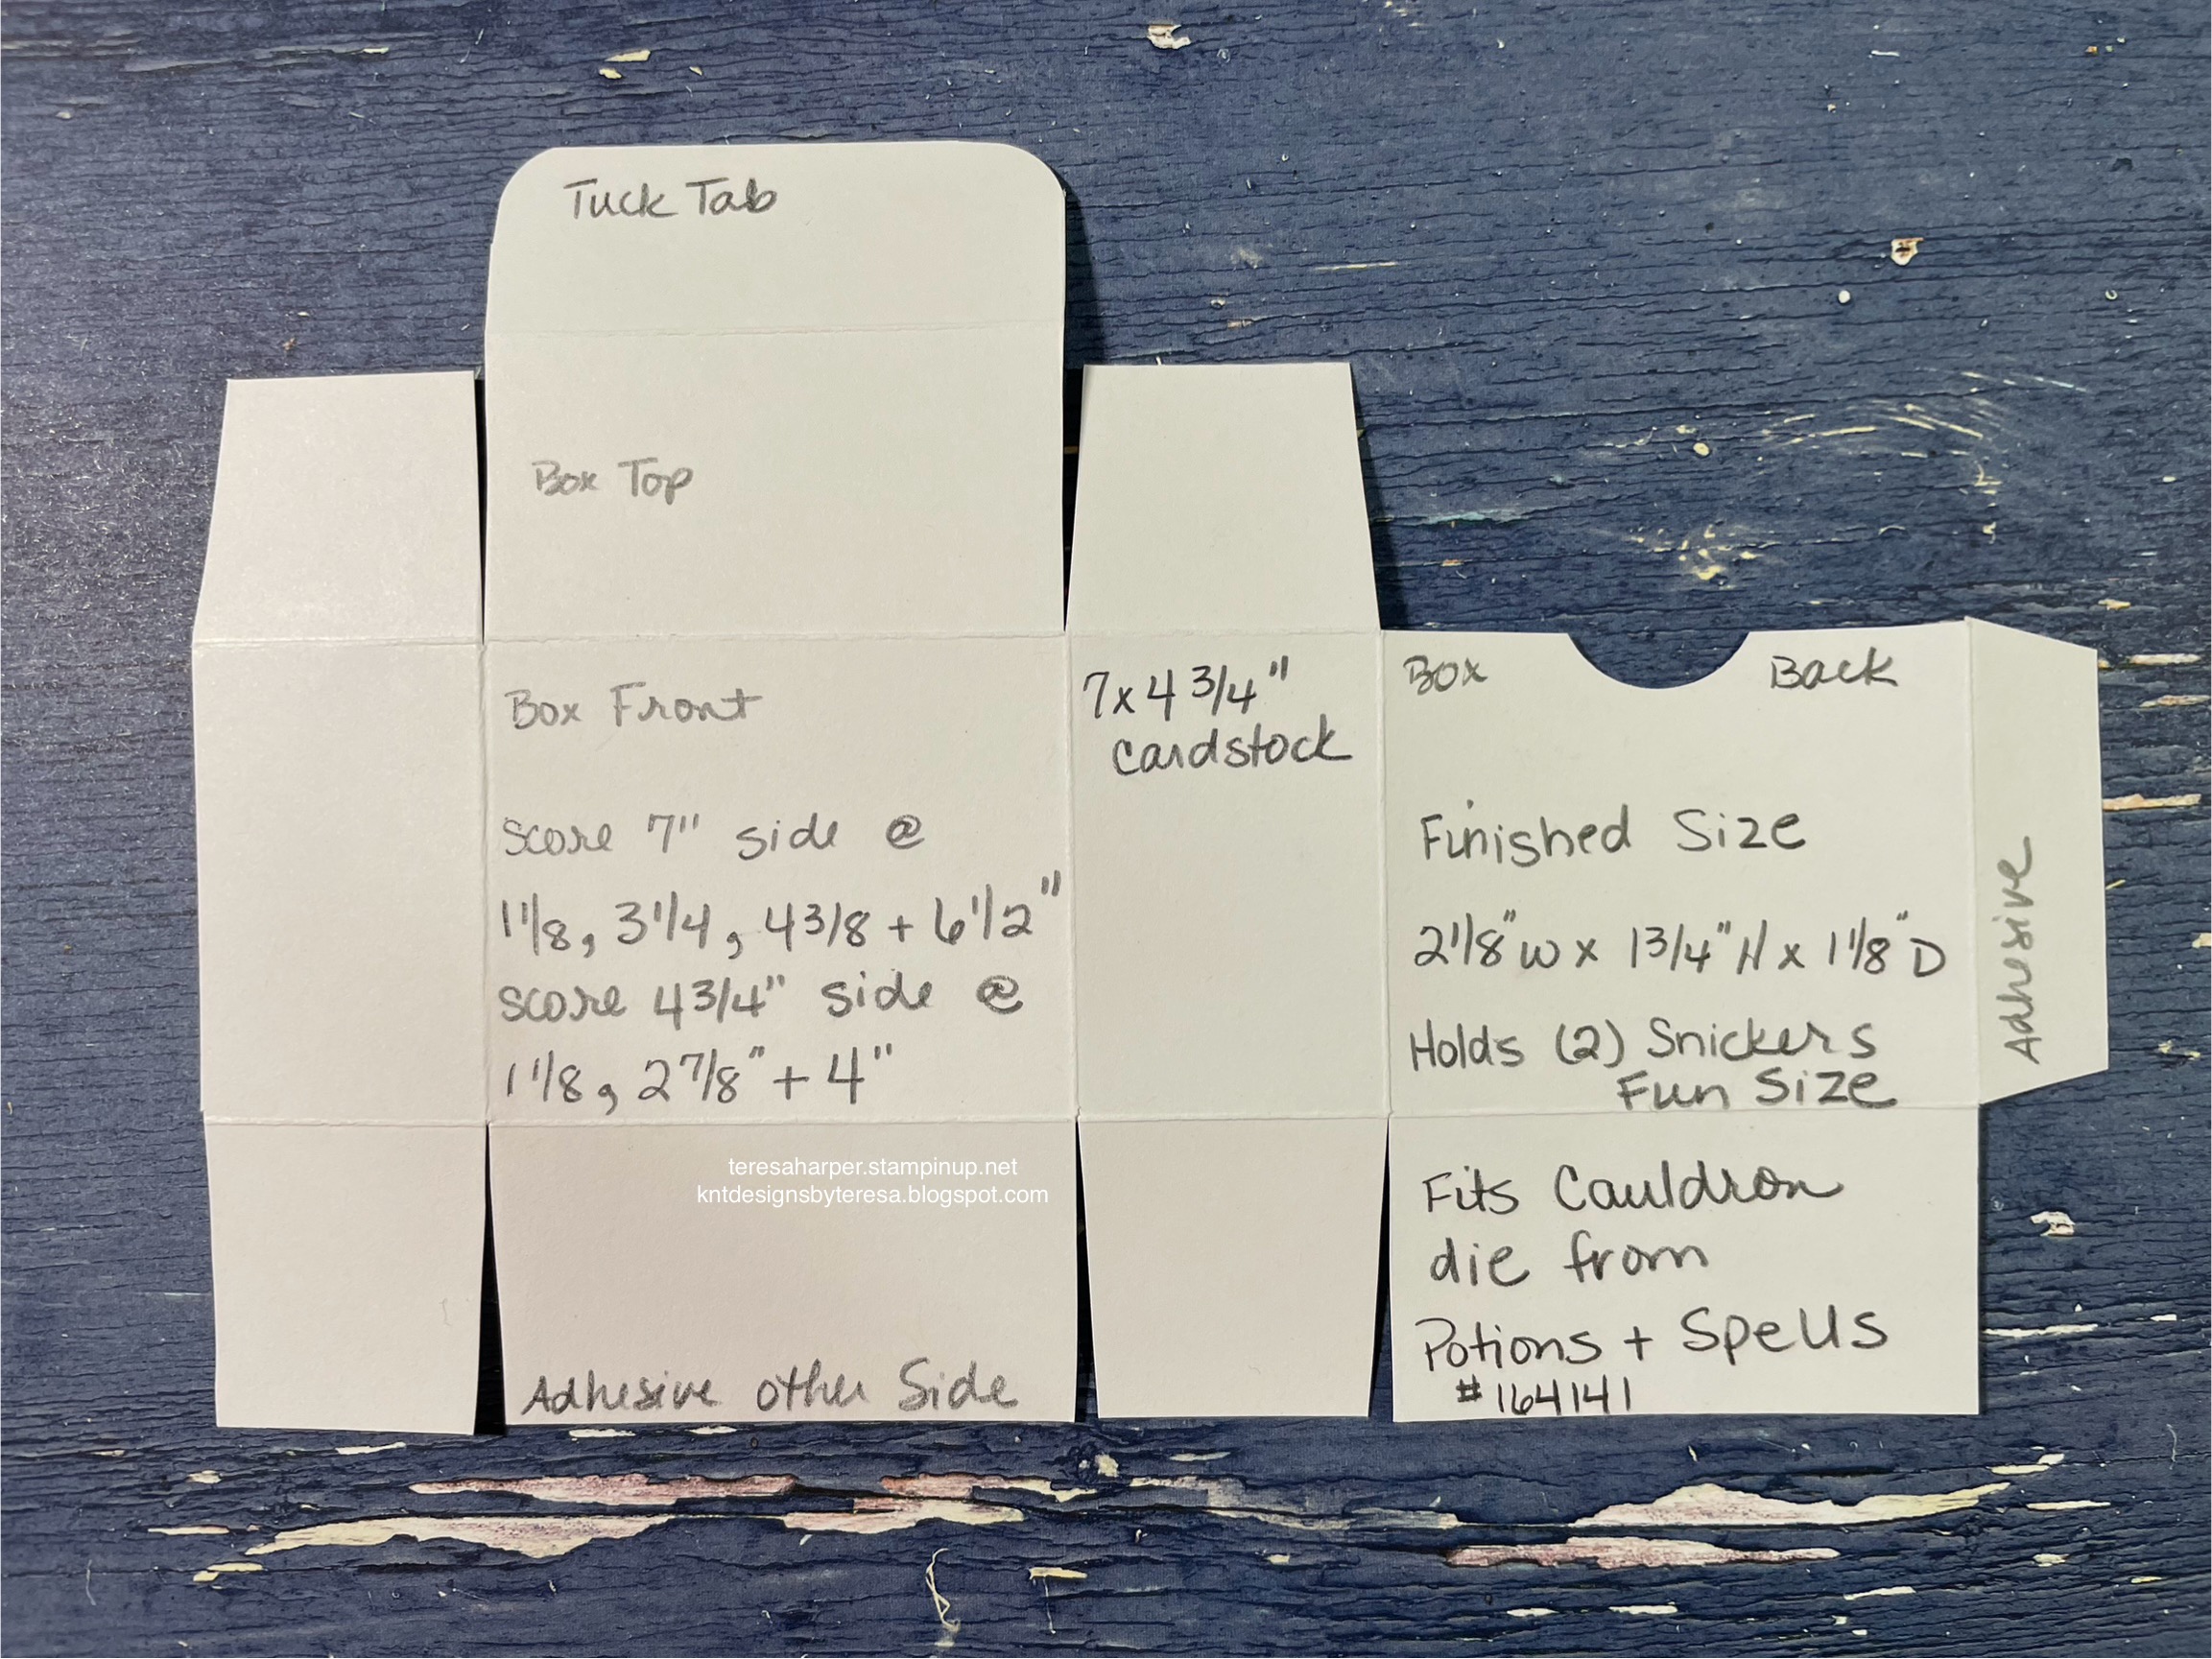
Bubble Bath cardstock for box, 4 3/4" x 7"
    Score on 7" side @ 1 1/8", 3 1/4", 4 3/8" & 6 1/2"
    Score on 4 3/4" side @ 1 1/8", 2 7/8" & 4"
Subtles 6x6 DSP
     1 piece 1 5/8" x 2" landscape orientation
     2 pieces each 1" x 1 5/8" portrait orientation
    1 piece 1" x 2" landscape orientation
Blending Brush
Pebbled Path ink pad
Stampin' Blends: Pebbled Path, Daffodil Delight, Flirty Flamingo, Pretty in Pink, Shaded Spruce, Shy Shamrock
Iridescent Faceted Gems 163368
Corner rounder & 3/4" punch from my retired stash

I hope you have enjoyed this project today and will give it a try.  It really is a quick and easy box and it's sure to make someone feel very special when you give it to them.  Of course, you can decorate it for whatever occasion suits your needs.

Until next time; be happy, stay healthy and happy stamping!
Teresa

*purchasing bundles saves 10% over the individual piece prices when combined.  You must use the bundle item code for the 10% bundle discount.

**Online Exclusives items can be while supplies last.  If they are in the store, they are available for purchase.  If they say Currently Unavailable, the stock will be replenished.  If they are no longer in the store, unfortunately, they will not return. 

Thursday, December 8, 2022

Kindest Gnomes Warm Wishes treat box, Final in the 12 Projects of Christmas series 2022

 Today I have the 12th and final project in the 12 Projects of Christmas series.  There will be a bonus project on Saturday so be sure to check back then.  The treat box I've created for you today holds 6 Hershey miniature candy bars, 3 Ghirardelli Peppermint Bark squares or 2 Fun Size Snickers or Milky Way candy bars.  I'm sure you can find other things to fit as well.  

The finished box size is 3 1/4x 2 1/8 x 1".  It isn't quite large enough to hold a gift card if that's what you are looking for.   To see how I put this box together, you can watch the replay over on my YouTube channel HERE:


Measurements and Supplies:
Kindest Gnomes stamps and Gnome dies
All That Dies
Snowman Magic stamp set for holly (but you can use whatever you already have on hand)
Celebration Tags dies for banner die (again, use whatever you already have on hand)
Painted Christmas DSP
    (1) 3 x 1 7/8"
    (2) 3 x 3/4"
    (2) 1 7/8 x 3/4"
Soft Succulent cardstock scrap for scallop punch and die cutting sprigs
Soft Succulent cardstock, 5 1/4" x 7
    Score on 5 1/4" side at 1" from each end
    Score on 7" side at 1, 3 1/8, 4 1/8 and 6 1/4"
Evening Evergreen cardstock scrap for die cutting label die
Ink Pads: Evening Evergreen, Memento Black
Stampin' Blends markers: Evening Evergreen, Soft Succulent, Cherry Cobbler, Smokey Slate and Natural Tone SU 900
Festive Pearls

Thanks so much for joining me throughout the 12 Projects of Christmas series.  I appreciate you so much.  If you would like to order any supplies, please click on the shopping cart in the upper right corner.  Leave me a comment, I'd love to hear from you.  

Until next time; be happy, stay healthy and happy stamping!
Teresa

Monday, December 13, 2021

Time of Giving truffle box and gift tag Project 11 of the 12 Projects of Christmas

 Todays project in our 12 Projects of Christmas is a truffle treat box and matching gift tag.  They feature the Time of Giving stamp set and Giving Gifts dies.  Thanks for looking.  You can watch how I put my projects together over on my YouTube channel here https://youtu.be/cMP3AIJnac8 


The finished box size is 2 x 3 1/2 x 1 1/4”.  I stamped all over the cardstock before scoring.  It makes a nicer finish when you do it beforehand.


Here is the cutting template 

We made this matching gift to go along.  I love how this turned out.  Directions are in my video.


Supplies and measurements
Cherry Cobbler cardstock for box 6 1/2 x 7, 2 1/4 x 4 inch for tag
Basic Black cardstock 2 pieces 1 5/8 x 3 1/4 (1 each for the box and tag) I used adhesive sheets on the back to make it easier to adhere.
Basic White Thick 2 1/4 x 4" for the tag
Time of Giving stamp set and Gift of Giving dies
Evergreen Forest 3D embossing folder
Black and White Gingham Ribbon
Cherry Cobbler Ink pad
Evening Evergreen Ink pad

Additional Supplies used for the Blushing Bride box
Blushing Bride cardstock
Silver foil
Blushing Bride ink pad
Gray Granite shimmer ribbon

Thanks for stopping by today.  Please leave me comment and let me know which box is your favorite.  If you would like to shop my online store for supplies, click on the shopping cart in the upper right corner.  I would really appreciate your business.

Until next time; be happy, stay healthy and happy stamping!
Teresa

Tuesday, October 12, 2021

Cute Halloween treat box

 Hello everyone, it’s been a very long time since I have blogged.  Life got in the way….I’ve spent months watching the grandkids while my daughter went to work throughout the pandemic.  2-4 little ones can really take it out of you.  While I worked on doing Facebook live videos, the blogging went by the wayside.  I’m definitely going to try to be better about it.  With kids physically back in school, I don’t feel quite so exhausted.  So let’s give this a try!  

Today, I am sharing a treat box I designed specifically to hold three Linder truffles, but when I got it finished, I discovered it fits two fun size candy bars, as well as a fun size candy bar and a 2 pack of Biscoff cookies.  It is perfect for those extra special people in your life you’d like to give a little treat to this Halloween.

First you will want to stamp the front panel for your box.  I cut a piece of Basic White cardstock 1 7/8 x 3 3/8 for the front.  To this I used my blending brush to add some Granny Apple Green ink, then using the Banner Year stamp set by Stampin’ Up!, I stamped the cobweb image all around the outside edges.   Set this aside.  For the treat box, start with a piece of cardstock 6 1/2” x 7”.  With the 6 1/2” side at the top of your Simply Scored tool, score at 1 1/4, 4 3/4 and 6.  Rotate clockwise 1/4 turn.
On the 7” side, score at 1 1/4, 3 1/4, 4 1/2 and 6 1/2”.   See template for cutting.  You can also watch my YouTube video over at Teresa Harper KntdesignsbyTeresa or check out my Facebook Live replay at KnT Designs by Teresa.  I found it easiest to add my front panel to the box prior to putting the box together.  Add the stamped panel to the portion of the box with the box flap at the top.  You can add after you have made the box if you wish.  

I used Basic black cardstock for my box base.  After putting my box together, I stamped the sentiment which is also included in the Banner Year stamp set, in Momento Tuxedo Black ink on Basic White cardstock and cut with a die from the Frightful Tags dies and also cut the same tag in basic black then adhered them together and glued directly to the front panel.  From the Cute Halloween Designer Series Paper, I fussy cut the three ghost images and added them to the stamped layer.  
The finished box size is 2” x 3 1/2” x 1 1/4”.


Thanks for taking time out of your day to spend a little time with me.  I hope you are inspired to make a treat box for someone special.  Leave me a comment and let me know what you think.  I’d love to hear from you.  If you’d like to purchase any of the items I’ve used, you can shop my online store by clicking on the shopping cart in the upper right.  Thank you in advance.