A place to share my love for paper crafting as an independent Stampin' Up!®️ Demonstrator.
Showing posts with label Wrap It Up. Show all posts
Saturday, October 22, 2011
Screamie Halloween Witch Box
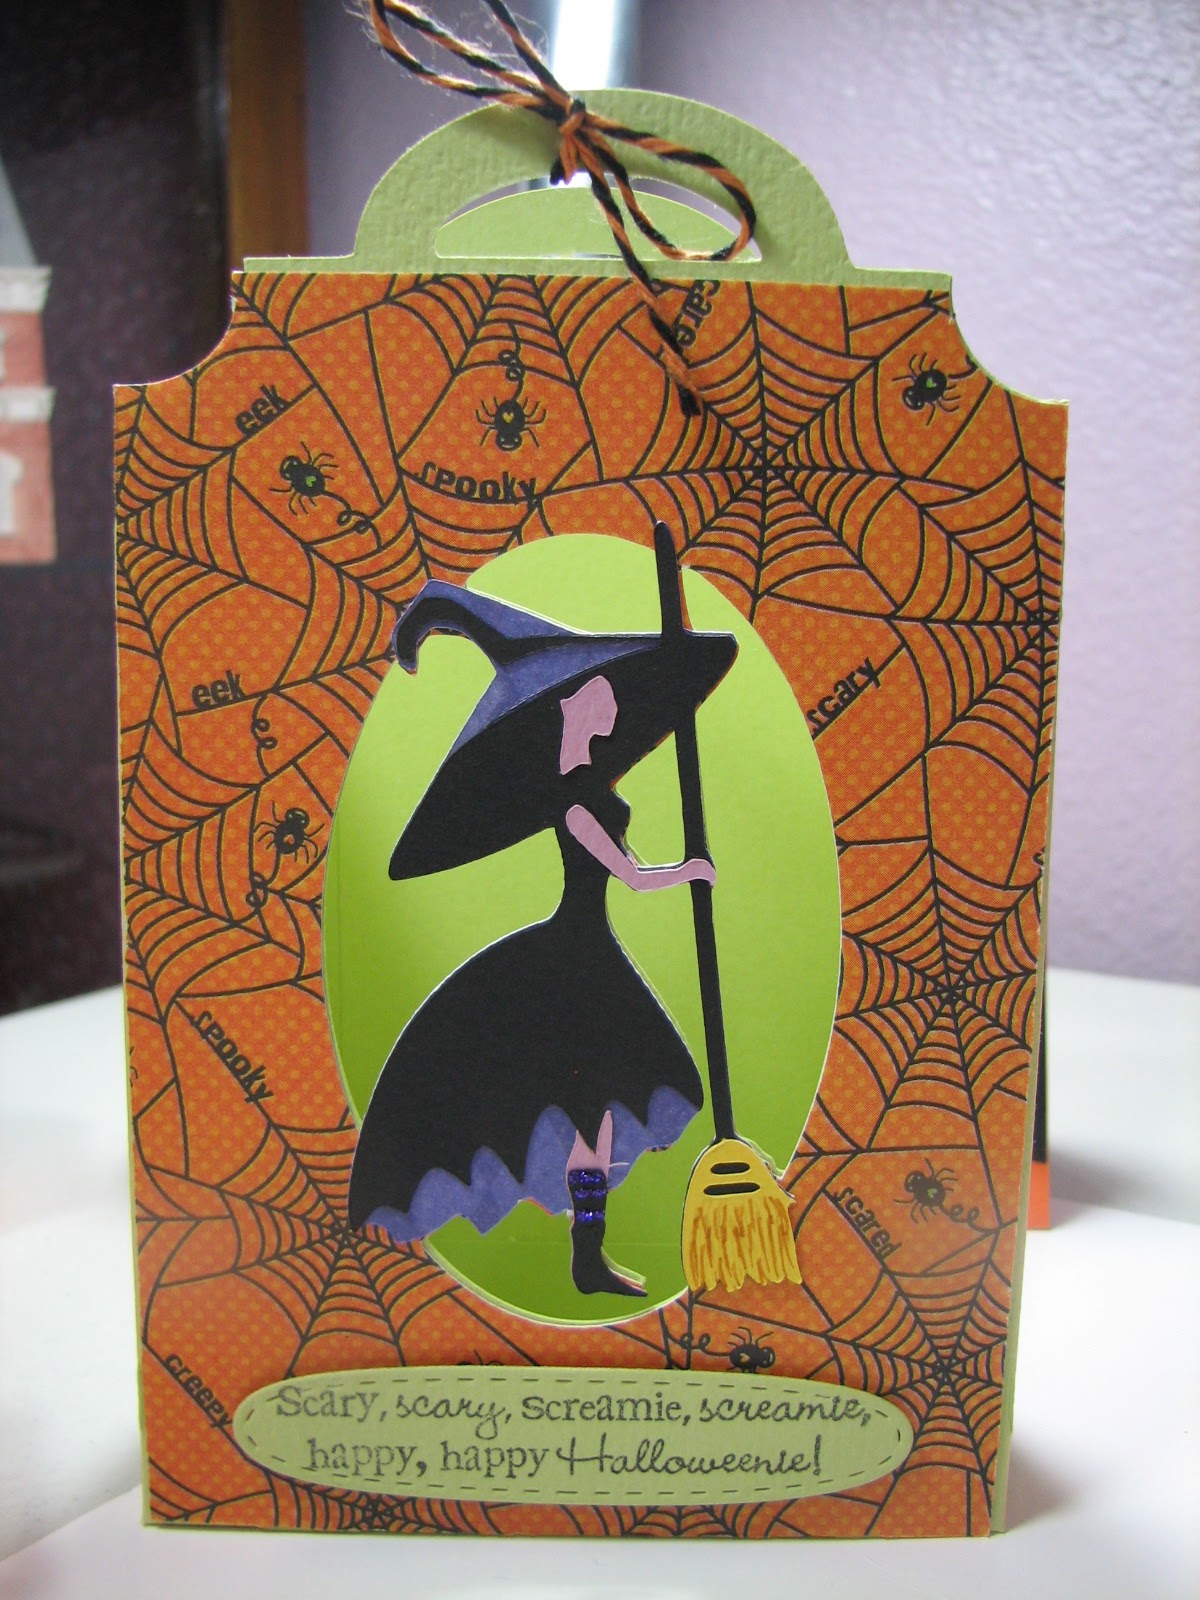
Here is cute box I made for my secret pal using the Wrap It Up Cricut cartridge. I am very pleased at how it turned out. I think she will love it! The box is cut at 8" (I did a fit to page to see how big I could make it from a 12 x 12" piece of cardstock) in green. I then used my Gypsy to cut the rest of the layers. The adorable spider paper is from DCWV ghosts and goblins mat stack. The little witch is cut at 3.10" so she will fit perfectly on top of the box cutout. (There is a layer for the box, but it is only a single layer and I wanted to have all the layers for dimension.) To cut her layers I used Cutmates paper for the black, yellow and pink colors. I cut her purple layer from a sheet of KP Halloween Harlequin paper I picked up at my local stamp store the other day.
The box is shown here along with some pumpkin boxes I made from the Happy Hauntings cartridge. I used Peachy Keen pumpkin face parts to make their adorable faces. All sentiments are by MCT. The stitched oval die on the witch box is also from MCT.
Here is a close up of the details on my witch. I doodled some lines on the broom to give it a litte more detail. I hope you enjoyed looking.
For those of you who haven't heard of Cutmates paper, it is specifically designed to cut in diecutting machines (the Cricut). I call it my butter paper, because the tiniest of details cut out "like butter" and you don't get all those tears like you get from a lot of other papers. I discovered it while I was out shopping at the beach during our annual fall beach crop. I picked it up at Stacy's Scrapshack .
Tuesday, June 14, 2011
Hello Kitty Ballerina Grad Card
I made this card for my 6-year-old granddaughter. She had a little "graduation" ceremony from kindergarten. The kids were dressed in caps and gowns and it was the cutest thing ever! She asked me to make her a ballerina with a cap on it. Hope you enjoy the creation I came up with. I think it turned out so incredibly adorable! I used an action wobble on the graduation cap for some interactive play for her. Of course, this photo doesn't do the action wobble justice.
I used the Hello Kitty Font cartridge and using my Gypsy, I welded two shadow images at 4.50" images together for the base of the card, along with the graduation cap from Wrap It Up at 2.50". Scroll is also cut from Wrap It Up at .80". All paper is SU and is pink piourette, pretty in pink, white, black and confetti white for the base of the card. The scroll is cutting using very vanilla and cherry cobbler. The kids' caps and gowns were black with red tassles. Though you really can't see it, the scroll has class of 2023 written on it. I thought it was quite cute, the decorations for the ceremony had the class high school graduation year posted.
Thanks for looking. Hope this inspires you for any graduation cards you might have to make.
Sunday, May 29, 2011
Graduation Gift Card Holder Throwback Thursday Challenge
I needed to make a graduation card for my friend's son who is graduating this next Saturday. I wanted it to be super nice as she is an avid scrapbooker and this card will almost certainly become a lasting part of his senior scrapbook. Also, he is one of six valedictorians with a 4 pt GPA. We are so proud of him! Here is my card. I hope you are inspired by it. I got inspiration from craftingwithkatie.com when she showed a video on how to make a coffee mug gift card holder using the Cheerful Seasons cricut cartridge. Here is my version.
For my card I used my Gypsy, Wrap It Up, Plantin Schoolbook and Just Because Cards Cartridges. I took the graduation cap and scroll from Wrap It Up. The owl is cut from Just Because Cards and Plantin Schoolbook was used to weld a rectangle to the base of the graduation cap to make the gift card holder portion of the card. The owl is cut at 10.30 inches (all layers except shadow which is cut at 10.05), the graduation hat at 2.8 inches and the scroll at 1 inch.
The graduation hat is designed to pull out from behind the shadow layer of the owl which is attached on either side and bottom to the card base with pop dots to allow enough space for the gift card to slide easily.
To the base of the graduation hat, I welded a rectangle 2.42 inches wide by 6 inches in height to form the base for the gift card, then cut the remaining layers. I didn't want to use the tassle which is attached to the grad hat, so I cut it off with scissors to allow for a tassle made from baker's twine. The base of the card is two owl shadows cut at 10.05 inches with two grad caps cut at the 2.8 inches, with the left hand side flipped, then the two images welded together. The inside Congratulations sentiment is from Stampin' Up and the other is from My Creative Time's My Favorite Sayings stamp set. I think it goes perfectly!
All cardstock used is from Stampin' Up and colors are certainly celery (discontinued), daffodil delight, really rust, black, more mustard, night of navy and very vanilla. Googlie eyes are some I picked up at JoAnn's. I think they are very cute with the eyelashes! I also used an SU shimmer brad for the button on the top of the cap.
Subscribe to:
Posts (Atom)


